Table of Contents
Advertisement
Quick Links
Advertisement
Table of Contents

Related Manuals for BAS-IP AV-01KD


Summary of Contents for BAS-IP AV-01KD
- Page 1 AV-01KD AV-01KD Exported on 08/12/2019...
-
Page 2: Table Of Contents
Table of Contents Device description....................5 Appearance.............................5 Technical parameters..................6 Main features ..........................6 Funcitonal capabilities ....................... 6 Configuration through WEB interface............7 Login ..............................7 Main ..............................7 Network info ...................................8 Network ............................9 Custom NTP ..................................9 Panel ..............................9 Apartment settings ..............................9 SIP settings.................................. - Page 3 Installation and connection................20 Completness check of the product ..................20 Electrical connection ........................20 Mechanical mounting ........................ 21 Connection of additional modules ..................23 Usage of the device ...................24 Getting the RTSP stream from the camera of the outdoor panel ......24 – 3...
- Page 4 • Device description (see page 5) • Technical parameters (see page 6) • Configuration through WEB interface (see page 7) • Installation and connection (see page 20) • Usage of the device (see page 24) – 4...
-
Page 5: Device Description
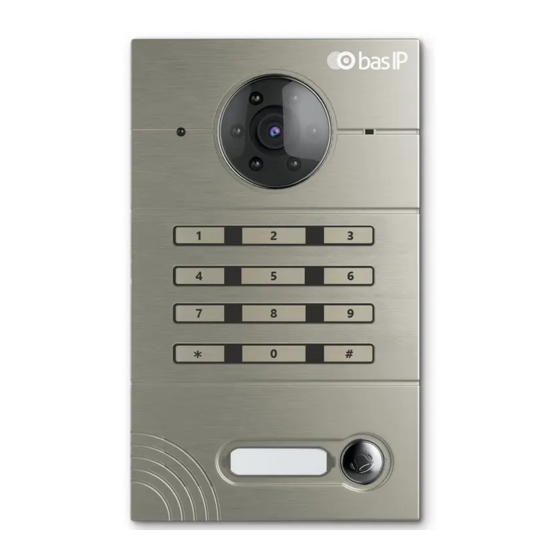
Device description AV-01K is an individual call panel with a code set. This panel can operate in two modes - individual and multi apartment. In the individual mode, the keypad panel serves as a keypad for opening the lock, and using the direct call button, you can communicate with the desired monitor. -
Page 6: Technical Parameters
The size of the panel itself: 115 × 190 × 45 mm Installation Type: Flush, surface with BR-AV bracket Funcitonal capabilities Interface: Russian / English, WEB – interface Opening the lock: From the monitor, via the BAS-IP Intercom application ACS Integration: No Shortcut buttons: 1 mechanical call button, keypad Number of call melodies: 4 polyphonic melodies Authentication: Separate password for settings, WEB –... -
Page 7: Configuration Through Web Interface
Configuration through WEB interface • Login (see page 7) • Main (see page 7) • Network (see page 9) • Panel (see page 9) • Access (see page 12) • Forward (see page 16) • Advanced (see page 18) • System (see page 18) Login... -
Page 8: Network Info
Device info Framework: A version of the framework. Launcher: A version of the launcher. Network info DHCP: Current DHCP status. IP адрес: Current IP address of the device. Subnet mask: Used subnet mask. Gateway: Gateway address. DNS server: DNS server address. MAC address: Physical address of the device. Configuration through WEB interface – ... -
Page 9: Network
Network DHCP: Enable/disable the automatic retrieval of network settings. IP: Panel IP address. By default, the call panel can have a static IP address 192.168.1.90 or 192.168.1.91. Mask: Subnet mask. Gateway: The main gateway. DNS: DNS server address. Custom NTP Current device date/time: Shows the current device's date and time. -
Page 10: Sip Settings
Mode: Selection of the panel operation mode. To work in the multi-apartment panel mode, with the ability to dial an apartment using the keyboard, you need to select the "Unit Panel". In this mode, the call button will work as a concierge call button. To work in the individual panel mode, with the ability to dial the lock opening code using the keyboard, you must select the "Personal Panel". -
Page 11: Call Settings
Enable/Disable: Enable/disable SIP registration. Proxy: A proxy SIP server that can be represented by both an IP address and a domain name. Data format: Before the proxy address, you must specify "sip:". Server: SIP server address. Data format: Сan be represented by both an IP address and a domain name. STUN IP: STUN server address. -
Page 12: Device Settings
The maximum time for calling: The time interval after which the panel automatically ends an outgoing call if there is no answer. Maximum talk time: The time interval after which the panel automatically ends the outgoing conversation. Device settings Video quality: Select your preferred video resolution. RTP data profile: Select your preferred RTP data profile. -
Page 13: Common Settings
Common settings Master card: Master card number. Use master code: Enable/disable using master code to open the lock. Master code: The code entered on the keypad for opening the lock. When using the control module with two locks SH-42, when entering the master code on the panel, both locks will open. -
Page 14: Open Lock
Keep the lock open, if there is no SIP registration: Function to automatically open the lock if SIP registration on the panel is lost. No Sip registration time: Time period after which the lock begins to open if SIP registration on the panel is lost. -
Page 15: New Identifier
New identifier After clicking on the "New identifier" button, the following interface will appear: Identifier number: Number of identifier in decimal format. Building: building number 0001-9999 Unit: Configuration through WEB interface – 15... -
Page 16: Forward
Unit number 00-99 Floor: Floor number 00-99 Room: Room number 01-99 Forward This section is used to substitute numbers by means of the panel when making calls to internal monitors when there is no monitor or it is turned off, or to any given SIP number. Forward settings Mode: Mode of the forwarding. - Page 17 Input format for SIP calls sip:5588@sip.bas-ip.com, where 5588 is the SIP number of the device being called, sip.bas-ip.com is the address of the SIP server, which can be specified either by the IP address or by the domain name. Configuration through WEB interface – 17...
-
Page 18: Advanced
Advanced RTSP feed: Function to view additional IP cameras during a call (up to 4 streams). This feature is available for v4 monitors and any other SIP devices with a keyboard. During a call, it is possible to switch between streams by pressing keys 1 through 5. The key "1"... -
Page 19: Settings
Settings Choose file: Selecting the panel configuration file from the PC file system. Set default settings: Reset all panel settings to factory defaults. Backup all settings: Save and export configuration files. Device language Choosing the language of the device. Reboot Reboot: Soft reset of the panel. Configuration through WEB interface – ... -
Page 20: Installation And Connection
Installation and connection This page describes the process of installation and connection of the outdoor panel. • Completness check of the product (see page 20) • Electrical connection (see page 20) • Mechanical mounting (see page 21) • Connection of additional modules (see page 23) Completness check of the product Before installation of the outdoor panel, it is necessary to check that it is complete and all... -
Page 21: Mechanical Mounting
2. Connection scheme of electromagnetic lock using external power supply for panel and the lock. Mechanical mounting Before mounting the door panel, a hole or recess in the wall with dimensions 94 × 170 × 60 mm (for flush mounting) must be provided. Overall dimensions of the bracket (flush box) = 93 × 169 ×... - Page 22 Installation height recomendations The outdoor panel should be installed at a convenient height for you. Approximate height of installation is 160-165 cm of the camera level. Installation and connection – 22...
-
Page 23: Connection Of Additional Modules
Connection of additional modules The following modules can be connected to the outdoor panel: • Module to control two locks SH-42 Installation and connection – 23... -
Page 24: Usage Of The Device
Usage of the device • Getting the RTSP stream from the camera of the outdoor panel (see page 24) Getting the RTSP stream from the camera of the outdoor panel To get the RTSP stream from the camera of the call panel to the video surveillance system, you need to put in the add line of the camera rtsp://admin:123456@192.168.1.16:8554/ch01, where admin is the login, 123456 is the password to access the WEB interface, 192.168.1.16 is the IP address of the panel, 8554 is the port of access to the camera, ch01 is the channel number.
Need help?
Do you have a question about the AV-01KD and is the answer not in the manual?
Questions and answers