Table of Contents
Advertisement
Quick Links
Advertisement
Table of Contents

Related Manuals for Advance acoustic BiPro3


Summary of Contents for Advance acoustic BiPro3
- Page 1 Manual Edition 1 / 3_2017...
-
Page 3: Table Of Contents
Contents Contents . . . . . . . . . . . . . . . . . . . . . . . . . . . . . . . . . . . . . . . . . . . . . . . . . 3 Use in practice . -
Page 4: Thank You For Flying Advance
Thank you for flying ADVANCE Congratulations on your choice of an BIPRO 3 – a quality product from ADVANCE. We hope that you will spend many rewarding hours in the air with it. This user manual is an important part of the harness. Here you will find instructions and important information about safety, care and main- tenance, and that’s why we recommend that you read this document carefully before your first flight. -
Page 5: About Advance
About ADVANCE ADVANCE, based in Switzerland, is one of the world’s leading para- glider manufacturers. Since it was founded in 1988, the company has consistently pursued its own directions and concepts, both in develop- ment and production. The results are quality products with distinctive characteristics. -
Page 6: Bipro 3 - Daily Ease
BIPRO 3 – Daily Ease Thought out – to the smallest detail Comfortable The possibility to adjust the seating angle and good support under the The BIPRO 3 is our vision of the perfect tandem harness. This starts seat makes the BIPRO 3 very comfortable in flight. Comfort begins on with weight. -
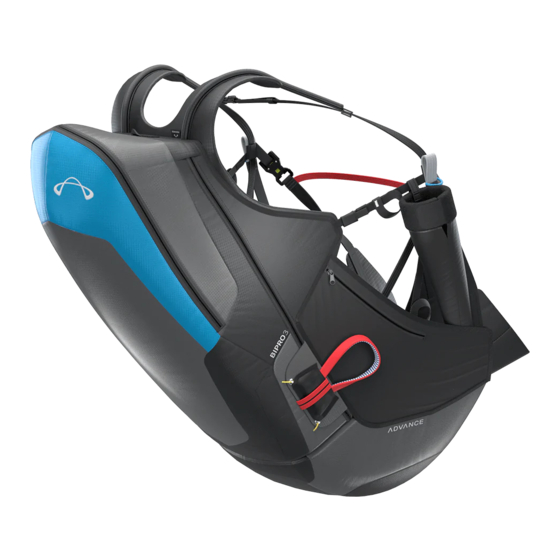
Page 7: Features At A Glance
Features at a glance Side view Velcro (e.g. for holding a mini vario) Reserve connection channel with zip Tube-pocket for tidy reserve connection line stowage Back stowage with inside document pocket Outer container with Labyrinth closure Easy Fold Feature for simple folding and packing Side pocket with zip (right), open side pocket (left) - Page 8 Front view Removable Selfie-Stick holder with Neoprene scabbard (right or left) Blue loop to secure the Selfie-Stick 10 Popular Get-Up closure system with effective Edelrid Triple Lock buckles 11 Comfortable V-Legpads 12 Comfortable seat geometry thanks to 3D development 13 Mini chest strap 14 Robust 10 mm YKK zip fastener...
-
Page 9: Safety Information
Safety information Like all commercially available reserve parachutes, paraglider harness- General recommendations about es are never suitable for free fall parachuting because their design and paragliding construction details do not allow such a thing. Neither the reserve par- Taking part in paragliding sport requires appropriate training and a achute nor its attachments to the harness can withstand the loadings comprehensive knowledge of the equipment, as well as the neces- involved in an abrupt opening. -
Page 10: Preparing The Product
Preparing the product Delivery Available as Options Before delivery every ADVANCE product has to be checked by the § Three spreader versions to go perfectly with the BIPRO 3: Hard dealer for delivery package contents and correct initial settings. A Hybrid (with removable carbon rod), Soft, and Soft Trim. -
Page 11: Closing The Harness
Closing the harness The BIPRO 3 has the well-known ADVANCE Get-Up closure system, now for the first time featuring two Edelrid Triple-Lock buckles. This very effective buckle replaces the previous problematic Click-Lock buckles. They close under load. Three deliberate consecutive actions are necessary (hence triple lock) to open it. -
Page 12: Adjusting The Harness
Adjusting the harness The BIPRO 3 is very easy to set up. Put the harness on, close the Getup System and hang the BIPRO 3 in a harness stand. Caution: Always check correct clip in for the Edelrid Triple Lock buckles . -
Page 13: Back Stowage
Back stowage Info: Info: To achieve satisfactory settings the back compartment should be packed with the things you will take when flying. For a The BIPRO 3 back pocket is lined with bright, orange-red material realistic flying position the reserve should also be installed. which provides best visibility inside. -
Page 14: Selfie-Stick Holder
Selfie-Stick Holder The BIPRO 3 has a useful, broadly adjustable Selfie-Stick holder with Neoprene scabbard . Two velcros on the harness mean that it can be fastened on left or right side. It is premounted on the left side. To move it to the other side, first release the Bullet Toggle on the bottom of the scabbard from the BIPRO 3. -
Page 15: Packing The Harness
Packing the harness The Easy Fold feature is an obvious folding line next to the pro- tector, and this makes the BIPRO 3 easy to fold and compact when packed. Step 1: Lay all straps and paddings inside. Step 2: Fold the back section over on to the Legpads and push the- se in front for a more compact result. -
Page 16: Fitting The Optional Spreaders
Fitting the optional Spreaders Three optional spreader versions are available to go with the BIPRO 3: Hard Trim, Soft, and Soft Trim. Hard Trim and Soft Trim versions can be used with Quickout paraglider carabiners. Caution: The two Maillon Rapide 5 mm carabiners (650 kg load capacity and /3 .250 kg breaking strain) are exclusively for use for connecting spreaders to the BIPRO 3 harness! Hard Hybrid Spreades ( 295 g*) - Page 17 Soft Spreaders (175 g*) Soft-Spreaders have three different main support points for the tan- dem glider. The supplied Maillon Rapide quicklinks (incl. Neoprene covers ) are each used to connect a pilot’s spreader end to the BIPRO 3. Reserve connection lines are fixed to a spreader below the main at- tachment point .
- Page 18 Soft Trim Spreaders (237 g*) The Soft Trim spreaders have a single support point for the tandem gli- . The pilot’s height position can be adjusted during flight by me- ans of trimmers , to compensate for the passenger’s weight and meet the pilot’s requirements.
-
Page 19: Bipro 3 Use With Other Spreaders
BIPRO 3 use with other spreaders The harness can be used with other spreaders, and an optional reser- ve connection kit is available. The kit consists of two reserve connec- tion lines, two 5 mm Maillon Rapide quicklinks and two Neoprene co- vers for the quicklinks. -
Page 20: Installing The Reserve
Installing the reserve Caution: When installation is complete only a test release/ compatibility check can confirm that the actual reserve/BIPRO 3 General advice combination will work . The reserve compartment is in the BIPRO 3 lower back region. Caution: A reserve parachute volume can expand by up to Caution: Installing the reserve must be done by a suitably 30 % when it has been newly folded . - Page 21 In general Packing the reserve in the inner container The reserve handle and the four-flap inner container are fixed togeth- Always fold your reserve to the shape and dimensions of the inner con- er and this combination is designed so that the pull of the handle acts tainer supplied with the BIPRO 3.
- Page 22 Closing the inner container Close the container flap in the order indicated (1-3). Secure the final container flap (3) with a 5 to 6 cm line loop (ca. 3 finger widths). Now Now close the outer container flap (red border) with two similar line check the tension of the bungee loop and adjust if necessary.
- Page 23 Connecting the reserve to the harness Connect both spreader reserve connection lines to your reserve bridle with a quicklink of 2400 daN minimum working load (Pic. 1). These two lines must be stabilised at the maillon, for example by using a rubber O ring, to prevent the webbings slipping round and cross-loading the maillon during a reserve deployment.
- Page 24 Putting the inner container in the reserve compartment First lay the harness V-connection in the compartement, then put the inner container on top. It is essential that the inner container closure flaps face the bottom (when in flight) of the harness. Follow the direc- tions indicated on the inner container and the inside of the reserve compartement.
- Page 25 Closing the reserve container The outer container flaps are closed by loops and cable. Outer con- tainer design supplies the necessary tensions and pressures on the closure loops and cable. First thread two short packing assist lines through the left hand ou- ter container flap white closure loops.
-
Page 26: Compatibility Check
Stowing the reserve handle Fold the top container flap (with the Neoprene pocket for the handle) down. Then push the reserve handle into the open side of this pocket, leading the two yellow cables out through the slots at the bottom. Run the packing lines through the metal eyelets at either side of the flap, pull the white closure loops through and secure them with the yellow cables. - Page 27 when not sitting in the harness as for flight. The release procedure Info: A successful compatibility test can reinforce the tester’s must take place in the flying position, without hindrance, and in ac- confidence in the reserve system . cordance with the requirements of this manual. The force required Caution: Before every flight check that the reserve handle is in to release the reserve must not be less than 4 daN and not more its correct position, and that the yellow cables are correctly sited .
-
Page 28: Use In Practice
Use in practice Flying in general Airspace and field of view clear? The BIPRO 3 is flown in an upright attitude which gives the pilot the Solo flying best view. The BIPRO 3 design makes it suitable for solo flying. This tandem harness has many trump cards to play. -
Page 29: Other Brand Paraglider Models
Other brand paraglider models Care and maintenance after landing in water After contact with water all the BIPRO 3 protectors should be taken The harness can be flown with any paraglider. There is no restriction. out. Then harness, protectors and reserve inner container should be When using other spreaders attention should be paid to the correct carefully laid out in the shade outside to dry, or, even better, the empty routeing of the connection lines. -
Page 30: Maintenance, Repairs And Care
Maintenance, repairs and care Maintenance in general The life of your harness can be greatly extended if you observe the fol- lowing points: The BIPRO 3 was designed for high loading and extreme demands. § Allow a wet or damp harness to dry completely at room temperature, The requirements for the choice of materials were accordingly set or outside in the shade. -
Page 31: Check
Most reserve parachute manufacturers recommend an inspection Repairs and repacking every six months, so as to guarantee a fast and rou- As a general rule you should not attempt to repair a harness yourself. tine opening every time. If the reserve gets wet, damp or overheated The various seams are made with great precision, and, for this reason, it must definitely be repacked. -
Page 32: Technical Data
Technical Data Data BIPRO 3 Pilot height 155–185 175–202 Harness weight 2.05 Protector weight Reserve container weight Selfie-Stick holder weight Back pocket volume Main support height EN 1651 / LTF 91/09, 120 kg Certification... -
Page 33: Material Description
Material description Description Name & Dimension Manufacturer Breaking load Leg strap 80005 - 25 mm - Polyester Güth & Wolf 800 kg Back strap 62694 - 15 mm - Polyamid Techni Sangle 1‘320 kg Shoulder strap 62694 - 15 mm - Polyamid Techni Sangle 1‘320 kg Two buckle closure system... -
Page 34: Service
Service ADVANCE Service Centres § find out about new safety-related knowledge and advice concerning ADVANCE products ADVANCE operates two company-owned Service Centres that car- § download an application form in PDF format which you can use ry out checks and repairs of all types. The workshops based in when sending your glider in for a check at ADVANCE. - Page 35 replacement of the product ). This warranty is valid for three years from the date of purchase of the product. Warranty and Service Intervals begin from the date of the glider’s first flight, recorded on the identifi- cation plate. If no date is evident the applicable date is that on which the glider was transferred from ADVANCE to the ADVANCE dealer.
- Page 37 a d v a n c e t h u n a g f o n + 41 3 3 225 70 10 w w w. a d v a n c e.c h u t t i g e n g s t r a s s e 87 f a x + 41 3 3 225 70 11 i n f o @ a d v a n c e.c h c h 3 6 0 0 t h u n...
Need help?
Do you have a question about the BiPro3 and is the answer not in the manual?
Questions and answers