Table of Contents
Advertisement
Available languages
Available languages
Advertisement
Chapters
Table of Contents

Related Manuals for Advance acoustic iMPRESS 2


Summary of Contents for Advance acoustic iMPRESS 2
- Page 1 iM PR ESS Betriebshandbuch User manual Manuel d’utilisation...
- Page 2 Edition 05-2008...
- Page 3 Deutsch Seite 5 – 26 English Page 27 – 48 Français Page 49 – 70...
-
Page 5: Table Of Contents
Entwickelt vom Profi - bewährt in der Praxis ........ 8 Entsorgung.................. 23 Eine Philosophie – ein Konzept ............ 8 Technische Angaben ..............24 Herausragende Merkmale des iMPRESS 2 ........9 Technische Daten ................24 Sicherheitshinweise ...............11 Verwendete Materialien .............. 25 Allgemeine Hinweise zum Gleitschirmfliegen .......11 Zulassung .................. -
Page 6: Thank You For Flying Advance
Dieses Betriebshandbuch ist ein wichtiger Bestandteil des Gurtzeu- ges. Solltest du dein iMPRESS 2 später einmal weiterverkaufen, bit- ten wir dich, dieses Handbuch dem neuen Besitzer weiterzugeben. Wir wünschen dir viel Freude mit dem iMPRESS 2 und immer «happy landing». Team ADVANCE... -
Page 7: Über Advance
Über ADVANCE ADVANCE ist einer der weltweit führenden Gleitschirmhersteller mit Bei ADVANCE hat die Betreuung der Kunden nach dem Kauf einen Sitz in der Schweiz. Seit der Gründung im Jahre 1988 verfolgt das Un- grossen Stellenwert. Dafür sorgt ein weltweit ausgebautes Service- ternehmen konsequent eigene Wege und Konzepte, sowohl bei der netz. -
Page 8: Das Impress 2
Komforts dieses Modells zu verändern. Eine Philosophie – ein Konzept Die Ausführung iMPRESS 2+ verfügt über einen dickeren, LTF zuge- Ebenso wie die Gleitschirme sind auch die Gurtzeuge von ADVANCE lassenen Rückenprotektor und bietet dadurch noch mehr Schutz und Hi-Tech-Produkte aus erstklassigen Materialien. -
Page 9: Herausragende Merkmale Des Impress 2
Alle Modelle wurden entsprechend der DIN EN 1651 auf 120 kg • Einhängegewicht geprüft und zugelassen Herausragende Merkmale des iMPRESS 2 Aerodynamisch optimiert Polaren OMEGA 7/28 bei 100 kg Abfl uggewicht Umfassende Studien und Tests im Windkanal der Technischen Hoch- iMPRESS 2, Ausführung Standard... - Page 10 Der Beschleuniger kann im Flug jederzeit und einfach erreicht wer- • den. Vielseitig einsetzbar Dank den drei Grundversionen ist das iMPRESS 2 vielseitig einsetz- bar: Ausstattung mit Beinsack: Optimale Aerodynamik und perfekte • Isolation, bietet den besten Komfort auf langen Flügen.
-
Page 11: Sicherheitshinweise
Sicherheitshinweise Gleitschirmgurtzeuge wie auch alle handelsüblichen Rettungsgeräte dem Flug die meteorologischen Bedingungen richtig einschätzen zu sind aufgrund ihrer Konstruktionsmerkmale absolut nicht für den Frei- können. Seine Fähigkeiten müssen den Anforderungen des gewähl- fall geeignet! Der Notschirm und die Aufhängung der Notschirmver- ten Gleitschirmes entsprechen. -
Page 12: Inbetriebnahme Des Gurtzeuges
Beschleunigungssystem mit Kugellagerrollen Kurzfi lme über die Einstellungen fi ndest du unter www.advance.ch . • Funktasche Der Designer und Weltcupsieger Chrigel Maurer zeigt dir hier höchst • Betriebshandbuch mit Garantiekarte und Serviceheft persönlich, wie dein iMPRESS 2 optimal eingestellt wird. •... - Page 13 Starten auch mit Beinsack bei voller Zuladung (Wasserballast) und www.advance.ch. Der Designer und Weltcupsieger Chrigel garantiert dir, dass du nach dem Start problemlos und bequem die Maurer zeigt dir hier höchst persönlich, wie dein iMPRESS 2 gewünschte Sitzposition einnehmen kannst. optimal eingestellt wird.
-
Page 14: Einbauen Des Komfortschaums/Protektors
position schnell und unkompliziert verstellen. Öffne das Protektorfach des Gurtzeuges und schiebe den kom- pletten Komfortschaum in das dafür vorgesehene Fach. Eine dünne PVC-Platte zur Formgebung und als Durchdringungsschutz ist be- Die Lendenstütze kannst du fein justieren; damit verhinderst du eine reits ab Werk im Gurtzeug fi... -
Page 15: Anbringen Des Windskirt
Ziehe die Beschleunigerleine durch die drei seitlichen Rollen und die Öffnung des Speedbag. Spanne das Speedsystem mit Hilfe des Elastikzuges beim Fussbrett, je nach persönlicher Vorliebe zur linken oder rechten Seite, nach vorne ab. Bewusst wurde eine fl exible Variante ausgewählt, die den Einsatz mit einem Bein und in zwei Stu- fen erlaubt. - Page 16 Der Klett unterhalb des Sitzbrettes frontseitig beim Ballastfach fi xiert das Wind-Skirt passgenau am Gutzeug und verhindert das Flattern oder Verrutschen der Verkleidung. Ziehe die Beschleunigerleine durch die drei seitlichen Rollen und die Öffnung des Wind-Skirts. Schlaufe anschliessend den Beinstrecker in die beiden unteren Metallringe.
-
Page 17: Einbauen Des Notschirms
Einbauen des Notschirms Das Modell iMPRESS 2 ist vorbereitet für das Anbringen des Notschirmes an aerodynamisch idealer Position nahe beim Körperschwerpunkt. Die korrekte Montage eines Notschirms ist nicht kompliziert; du musst sie aber genau und sorgfältig ausführen – es geht um deine Si- cherheit. - Page 18 Lege zuerst die Verbindungsgurte und Leinenschlaufen ins Fach und schiebe anschliessend den Innencontainer ins Gurtzeug. Die Ver- schlusslappen des Innencontainers sollten nach unten zu stehen kommen. Der Notschirmgriff wird auf der rechten Seite fi xiert; er ist gut sichtbar und einfach zu erreichen. Info: Der Auslösegriff der Ausführung Standard und der Aus- führung PLUS ist nicht austauschbar.
- Page 19 Die Betätigung des Rettungsgerätes muss aus der Flugposition heraus einwandfrei und entsprechend den Vorgaben der Bauvor- schriften möglich sein. Tipp: Das ADVANCE Team empfi ehlt dir vor und nach jedem Start einen kurzen Kontrollgriff zur Notschirmauslösung, so kennst du seine Position. Hinweis für steuerbare Retter Für steuerbare Rettungsgeräte sind unter der Abdeckung der Schul- terpartie beidseitig die notwendigen Aufhängepunkte vorbereitet...
-
Page 20: Flugbetrieb (Praktische Anwendung)
Flugbetrieb - praktische Anwendung Fliegen mit Speedbag In dieser Version spielt das iMPRESS 2 alle seine Trümpfe aus. Wenn das Gurtzeug richtig eingestellt ist, werden die Informationen des Schirmes direkt auf den Lendenbereich des Piloten übermittelt. Das Gewicht wird von den Oberschenkeln bis zu den Schulterblättern gleichmässig verteilt. -
Page 21: Benützen Des Beschleunigers
Die Pilotenposition ist in dieser Version deutlich aufrechter, und das Sitzbrett muss wesentlich steiler eingestellt werden (nach oben zie- Das Gurtzeug iMPRESS 2 eignet sich aufgrund seiner Dimension / hen). Der integrierte Rückholer kann auch für den herkömmlichen Funktion grundsätzlich nicht für doppelsitziges Fliegen – weder für Fussbeschleuniger eingesetzt werden –... -
Page 22: Wartung, Reparaturen Und Pflege
Wartung, Reparaturen und Pfl ege Das Gurtzeug nach jeder erhöhten Belastung (z.B. ernsthaftem • Wartung Aufprall) von einer Fachperson überprüfen lassen. Die Hauptverbindungsleinen zwischen Gurtzeug und Notschirm Ultraviolette Strahlung, Hitze, Feuchtigkeit, Salzwasser, aggressive • nach jeder Notschirmöffnung überprüfen. Reinigungsmittel, unsachgemässe Lagerung sowie mechanische Be- lastungen (Schleifen am Boden) beschleunigen den Alterungspro- Die meisten Notschirm-Hersteller empfehlen eine Wartung bzw. -
Page 23: Reparaturen
Anschliessend wird der Gesamtzustand des Gurtzeuges bewertet und im Serviceheft des Handbuches festgehalten. Weitere Informationen über den Jahrescheck fi ndest du in diesem Handbuch im Kapitel «Service» oder auf www.advance.ch. Reparaturen Grundsätzlich dürfen Reparaturen an Gurtzeugen nie selber ausge- führt werden. Die verschiedenen Nähte sind mit grösster Präzision gefertigt worden. -
Page 24: Technische Angaben
Gewicht Sitzbrett Light 0.24 0.26 1 In aufrechter Sitzposition mit dem iMPRESS 2 gilt es aufgrund der längeren Rückenlänge tendenziell ein grösseres Gurtzeug auszuwählen. 2 Die Gewichtsangaben der Gurtzeuge sind ohne Notschirm, Schaum und Sitzbrett jedoch inklusive Powerfl y Karabiner. -
Page 25: Verwendete Materialien
Verwendete Materialien Zulassung Laufend überprüfen und testen wir die Vielfalt der angebotenen Beide Ausführungen wurden nach LTF / DIN EN 1651 bis 120 kg ge- Werkstoffe. Wie alle ADVANCE Produkte wurde auch das iMPRESS prüft und zugelassen. Die Ausführung PLUS ist mit einem LTF zertifi- 2 nach neusten Erkenntnissen und Verfahren entworfen und herge- zierten Rückenprotektor ausgestattet. -
Page 26: Service
Service ADVANCE Service Centre dich über neue, sicherheitsrelevante Erkenntnisse über ADVANCE • Produkte ins Bild zu setzen, ADVANCE betreibt zwei fi rmeneigene Service Centre, die Jahres- ein Antragsformular für den Check bei ADVANCE als PDF • checks und Reparaturen jeglicher Art ausführen. Die in der Schweiz herunter zu laden, um deine Gleitschirmausrüstung einsenden zu bzw. -
Page 27: Garantiekarte
Ansonsten umfasst die ADVANCE Garantie keine weiteren Ansprü- che. Insbesondere werden keine Garantieleistungen für Beschädi- gungen gewährt, welche aus unsorgfältigem oder fehlerhaftem Ge- brauch des Produktes resultieren (z.B. ungenügende Wartung, ungeeignete Lagerung, Überbelastung, Aussetzen an extreme Tem- peraturen usw.). Dasselbe gilt für Schäden, die auf einen Unfall oder auf normale Abnützung zurückzuführen sind. - Page 29 Flying with Speedbag ..............44 Flying with stirrup and Windskirt ..........44 Use of the speed system ............45 Flying the iMPRESS 2 without stirrup or Speedbag (freestyle) ... 45 Using with other glider brands ........... 45 Launching by winch ..............45...
-
Page 30: Thank You For Flying Advance
This user manual is an important part of the harness. If you sell your iMPRESS 2 at a later date, please pass this manual on to the new owner. We hope you will derive a great deal of pleasure from your iMPRESS 2 - with many memorable fl... -
Page 31: About Advance
About ADVANCE ADVANCE - a company based in Switzerland - is one of the world’s ADVANCE attaches great importance to looking after its customers leading paraglider manufacturers. Since it was founded in 1988, the after the sale and has built up a worldwide service network for this company has consistently pursued its own directions and concepts, purpose. -
Page 32: Xc Harness Advance Impress 2
The iMPRESS 2 is derived from the very successful iMPRESS. How- Impressive evidence of its comfort and performance! ever, the iMPRESS 2 is available now in three sizes allowing more ver- satility for fi tting pilots of different heights. Some details have been One philosophy –... -
Page 33: Outstanding Features Of The Impress 2
• sheet penetration protection, often making for quite ’voluminous’ profi les, the iMPRESS 2 incorporates comfort foam and penet- ration protection that doesn’t modify its aerodynamic form. All models are certifi ed according DIN EN 1651 on 120 kg clip in •... -
Page 34: Important Details
Compact Confi guration without stirrup; ideal for freestyle use and in winter if • fl ying with skis. A ballast system close to the harness’ centre of gravity and the cen- tral position of the safety chute make launching very easy. The weight Important details of any additional ballast that the pilot chooses to carry is transmitted directly to the carabiners, allowing the harness and pilot to be a ho-... -
Page 35: Safety Remarks
Safety remarks Paragliding harnesses and safety chutes are absolutely not suita- requirements of the selected paraglider. Wearing an adequate hel- ble for use in free fall! The chute and the attachment points on the met, suitable shoes and clothing as well as carrying an emergency harness are not constructed for such shock loads, as they have no reserve parachute are pre-requisites for paragliding. -
Page 36: Using The Harness The First Time
• Package Contents Perfectly fi tting, detachable, short Neoprene cover with integrated cockpit, adjustable step speed system with stirrup for fl ying the Included with the iMPRESS 2 : harness without leg cover. Harness iMPRESS 2 including lightweight seatboard Familiarisation •... - Page 37 Adjustments of the shoulder straps functionality of a Safe-T-System. The shoulder straps of the iMPRESS 2 harness permit easy adjust- Caution: Ensure that the quick buckles are correctly ment of the desired seating position for various pilot sizes. The neo-...
-
Page 38: Back Protection/Comfort Foam Installation Instructions
Attach the Speedbag to the matching velcro on the rear of the har- back part of the thigh. When using the iMPRESS 2 for freestyle wi- ness. Close both side zippers and fix the reserve handle (be sure it is thout Speedbag or stirrup, you need to get a more angled position in the correct position). - Page 39 When you are adjusting the speedbag’s length whilst on the ground, pass the webbing through the metal ‘pass-through’ buckle without doubling it back through. This allows you to fine-tune it in the air. When you are satisfied you have got the optimal position, you can fix the setting by doubling the webbing back through the buckle to lock it off.
-
Page 40: Fitting The Windskirt
Fitting the Windskirt Attach the neoprene Windskirt to the matching velcro on the rear of the harness. Close both side zippers and fi x the reserve handle (be sure it is in the correct position). The velcro located under the front of the seat board for additional bal- last also fi... -
Page 41: Installing The Emergency Parachute
Info: Because of the different harness circumference the windskirt for the STANDARD version is not interchangeable with the PLUS version. Installing the emergency parachute The iMPRESS model is prepared for the attachment of the emergen- cy parachute in an aerodynamically ideal position and close to the centre of gravity. - Page 42 Inner bag and deployment handle The parachute should be packed in a square shape that matches the size of the delivered deployment bag. The handle is to be looped on- to the deployment bag. Check that during the installation of the re- serve, the attachment between the handle and the container is loca- ted at the side.
- Page 43 Compatibility testing Every new combination of emergency parachute and harness should be checked by either by the manufacturer of the harness or a quali- fi ed person. The deployment of the reserve parachute must be freely possible from the fl ying position and according to the manufacturer’s require- ments.
-
Page 44: Flight Characteristics
Flight characteristics Flying with Speedbag In its Speedbag confi guration, the iMPRESS 2 is fulfi lling its job as ef- fi ciently as possible. When correctly set up, the harness transmits in- formation from the wing directly to your lumbar area and enables you to fl... -
Page 45: Use Of The Speed System
Flying the iMPRESS 2 without stirrup or Speedbag (freestyle) The impress 2 harness is not suitable for tandem fl ying due to its de- sign – whether for the pilot or passenger. You can fl y the iMPRESS 2 in a more upright position if required. You need to tilt the seatboard to seat you more vertically. -
Page 46: Maintenance, Repairs And Care
Maintenance, repairs and care Maintenance Have the harness examined by an expert if it was subjected to • increased stress (such as a tree landing). Ultraviolet light, heat, moisture, salt water, aggressive cleaning agents, improper storage or mechanical stress (dragging the harness Most safety chute manufacturers advise regular check ups every 6 over the ground) will accelerate the ageing process. -
Page 47: Repairs
Repairs You should not attempt to repair a harness yourself as a general rule. The various parts made with great precision and careful geometry. For this reason, only the manufacturer or an authorised service cen- tre may fi t identical replacement parts or make repairs to the harness’ structure.. -
Page 48: Technical Details
0.24 0.26 1 If you intend to fl y mostly in an upright position (freestyle) in your iMPRESS 2, we suggest stepping-up a harness size due to the greater length in the back that is required from sitting upright. 2 The weight of the harnesses are without rescue, comfortfoam / back protection, seatboard but inclusive Powerfl y carabiners. -
Page 49: The Materials
We are continuously checking and testing the materials that we use. DIN EN 1651 to 120 kg. The PLUS version is fi tted with a LTF certifi ed Like all ADVANCE products, the iMPRESS 2 was developed and back protector. -
Page 50: Service
Service ADVANCE Service Centre to inform yourself about new safety-related expertise concerning • ADVANCE products, ADVANCE operates two company-owned service centres that car- to download an application form in PDF format which you can use • ry out annual checks and repairs of all types. The workshops based to send in your paragliding equipment for a check at ADVANCE, in Switzerland and France are offi... - Page 51 The ADVANCE warranty does not cover any claims other than those listed above. Claims in respect of damage resulting from careless or incorrect use of the product (e.g. inadequate maintenance, unsuitable storage, overloading, exposure to extreme temperatures, etc.) are ex- pressly excluded.
- Page 53 Remarques sur la sécurité ............59 Matériaux utilisés .................74 Indications générales concernant la pratique du parapente ..59 Homologation ................74 Première utilisation de la sellette iMPRESS 2 ......60 Service ..................75 Livraison ..................60 ADVANCE Service Centre ............75 Prise en mains ................
-
Page 54: Thank You For Flying Advance
Ce manuel d’utilisation est une partie importante de ta sellette. Si un jour tu décides de revendre ton iMPRESS 2 , nous te prions de le transmettre à son nouveau propriétaire. A présent, nous te souhaitons beaucoup de plaisir avec ton iMPRESS 2 et toujours un «happy landing». -
Page 55: A Propos D'advance
À propos d’ A DVANCE ADVANCE est l’un des plus importants et des plus anciens fabricants savoir-faire d’ADVANCE est de plus directement intégré dans le déve- d’ailes au monde. Le siège de la société se trouve en Suisse. Depuis loppement de nouveaux matériaux. sa création en 1988, l’entreprise poursuit de manière conséquente ses propres voies et concepts, tant dans le développement que dans Chez ADVANCE, le suivi de la clientèle après l’achat revêt une grande... -
Page 56: La Sellette Impress 2
Speedbag. Il est facile à pilotes qui volent sous des ailes d’autres marques. retirer et fait de l’iMPRESS 2 un des rares modèles qui peut aussi être utilisé pour le vol freestyle et le vol à skis. -
Page 57: Point Remarquable De L'impress 2
2 intègre une mousse de confort ainsi qu’une plaque anti-perforation qui n’altère pas sa forme aérodynamique. Tous les tailles de l’iMPRESS 2 sont labellisés selon la norme • DIN EN 1651 jusqu’à 120 kg (poids pilote). - Page 58 Compacte Détails importants Une poche à ballast proche du centre de gravité et la position cen- Un système d’hydratation peut facilement être installé, poche et • trale du parachute de secours facilitent la course de décollage. Le passage de tuyau sont prévus. Le pilote peut ainsi toujours poids d’un éventuel ballast est transmis directement aux maillons, s’hydrater en vol.
-
Page 59: Remarques Sur La Sécurité
Remarques sur la sécurité Les sellettes et les parachutes de secours pour parapente ne sont Indications générales concernant la pratique du parapente absolument pas utilisable en chute libre ! Les parachutes de secours et les points de fi xation sur les sellettes, bien que surdimensionnés et Pour pratiquer le vol en parapente, il est obligatoire d’être au bénéfi... -
Page 60: Première Utilisation De La Sellette Impress 2
Première utilisation de la sellette iMPRESS 2 Livraison Options Ta sellette iMPRESS 2 doit être contrôlée par ton revendeur offi ciel Speedbag • ADVANCE et réglée avant que tu n’en prennes possession. Merci de Protection complète des jambes en néoprène, amovible, avec noter que la carte de garantie doit être remplie et renvoyée pour être... - Page 61 Réglage des sangles d’épaules Attention : avant le décollage, toujours s’assurer que les Les sangles d’épaules de la sellette iMPRESS 2 permettent un boucles sont correctement vérouillées en tirant énergique- ajustement facile en fonction des différentes tailles de pilotes. Les ment dans le sens inverse à...
-
Page 62: Instructions De Montage De La Mousse Dorsale/Protection
Réglage de la position assise Instructions de montage de la mousse dorsale/protection La position relativement haute des sangles latérales qui prolongent la La mousse dorsale de confort est un élément important pour améli- sangle ventrale procure un support important du dos et supprime orer le confort lors des longs vols et ne doit pas être supprimée. -
Page 63: Montage Du Speedbag
Montage du Speedbag Fixer le Speedbag au velcro à l’arrière de la sellette (sous la poche du parachute de secours). Attacher les deux fermetures latérales à glis- sière. Passer les quatre sangles internes au Speedbag dans les boucles si- tuées à l’avant de la planchette et sous les maillons Powerfl y et les tendre jusqu’à... -
Page 64: Montage Du Windskirt
Info pratique : la taille du Speedbag est adaptée à la taille de droite ou vers la gauche (selon préférence personnelle). la sellette et ne peut être échangé. Passer les mousquetons Powerfl y au travers des 2 petites ouvertures Info pratique : compte tenu de la différence de dimension en haut du Windskirt. -
Page 65: Montage Du Parachute De Secours
Montage du parachute de secours La sellette iMPRESS 2 est pré-équipée pour l’installation du parachu- te de secours, dans une position aérodynamique idéale et proche du centre de gravité. Le montage correct d’un parachute de secours nécessite un mini- mum de compétences car il en va de ta sécurité. En cas de doute, n’hésite pas à... - Page 66 Liaison avec la sellette Pour relier le parachute de secours à la sellette, tu dois attacher la sangle de la sellette à la sangle de ton parachute de secours à l’aide d’un mousqueton à vis. Attention : l’immobiliser à l’aide d’un élastique de forte section.
- Page 67 est visible et facile à prendre. Vérifi er en tirant sur la poignée que les câbles sortent de leurs boucles respectives et que le parachute peut être extrait de son logement. Info pratique : la poignée de secours ne peut pas être échangée entre les modèles STANDARD et PLUS.
- Page 68 Le jet du parachute de secours doit être possible librement dans la position de vol choisie par le pilote, en enchaînant prise de la poi- gnée, extraction et jet dans un même geste (méthode la plus rapide et la plus effi cace). Conseil : Le team ADVANCE suggère des exercices de prise de la poignée lors de chaque vol (sans l’enlever), afi...
-
Page 69: Caractéristiques De Vol
Caractéristiques de vol Voler avec le Speedbag Dans sa version avec Speedbag, la sellette iMPRESS 2 rempli son rôle aussi effi cacement que possible. Lorsque les réglages sont cor- rects, elle transmet les informations provenant de l’aile directement dans la zone lombaire et permet de voler avec beaucoup de sensibi- lité. -
Page 70: Voler Sans Speedbag Et Sans Repose-Pieds (Freestyle)
Procéder de la même façon lors du vol avec repo- se-pieds. La sellette ADVANCE iMPRESS 2 n’est pas utilisable pour le vol bi- place en raison de son design, ni pour le pilote, ni pour le passager. Voler sans Speedbag et sans repose-pieds (freestyle) La sellette iMPRESS 2 peut être utilisée aussi avec une position du... -
Page 71: Maintenance Et Réparations
Maintenance et réparations Maintenance après chaque sollicitation importante (par exemple atterrissage • dans un arbre ou crash au sol), la faire contrôler par un spécialiste Le rayonnement ultraviolet, la chaleur, l’humidité, l’eau salée, les pro- duits de nettoyage agressifs, le stockage incorrect ainsi que les solli- La plupart des fabricants de parachutes de secours préconise un citations mécaniques (en particulier les frottements au sol) accélèrent service d’aération et de reconditionnement tous les 6 mois afi... -
Page 72: Réparations
Réparations En principe, il ne faut jamais effectuer soi-même des réparations sur les sellettes. Les différentes coutures ont été fabriquées avec une précision maximale. C’est pourquoi seul le fabricant ou un cen- tre de service agréé peut apposer des pièces de rechange de même construction. -
Page 73: Données Techniques
Données techniques Fiche technique iMPRESS 2 Taille du pilote 155 - 172 168 - 187 183 - 202 Largeur de la planche 30/32 32/34 34/36 Profondeur de la plance Hauteur des points d ancrage Poids de la sellette STANDARD Poids du Speedbag... -
Page 74: Matériaux Utilisés
Comme tous les produits ADVANCE, la sel- jusqu’à 120kg. lette iMPRESS 2 a aussi été développée et construite avec les tech- niques les plus modernes et les meilleurs matériaux. Ceux retenus Le modèle PLUS est équipé d’une protection dorsale certifi ée LTF. -
Page 75: Service
Service ADVANCE Service Centre securité de nos produits, de télécharger un formulaire de demande pour le contrôle chez • ADVANCE exploite deux propres Service Centres qui effectuent des ADVANCE sous forme de PDF afi n de pouvoir envoyer ton aile, contrôles complets et des réparations en tous genres. - Page 76 dommages découlant d’une utilisation négligente ou inappropriée du produit (p. ex. maintenance insuffi sante, stockage inadéquat, surcharge, exposition à des températures extrêmes, etc.). La mê- me chose s’applique pour les dommages résultant d’un accident ou d’une usure normale. Chaque sellette ADVANCE est livrée avec sa carte de garantie. Afi n que tu puisses profi...
-
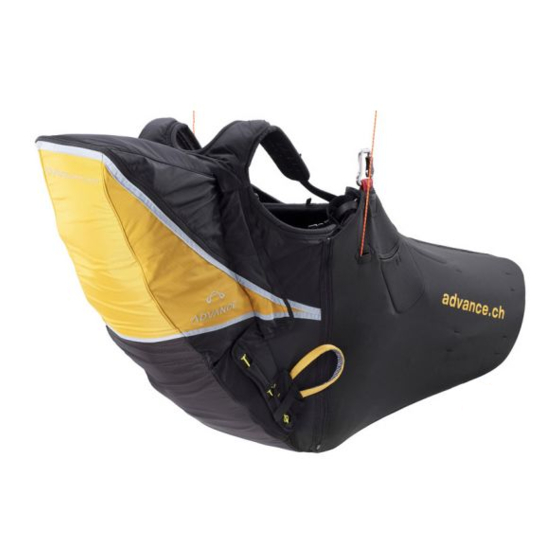
Page 78: Gurtzeugaufbau
2 Frontansicht Schultergurte parallel laufend Brustgurt Hauptaufhängung Verstellbares Safe-T-Verschluss-System (Brustbereich zwischen 42 und 54 cm) Leicht verstellbare Beingurten mit Polster Individuelle Einstellung der Sitzbrettneigung Leichtlaufende Umlenkrollen für Speedsystem mit Stopper Befestigungsringe für Cockpit Schnalle zum Fixieren des Speedbag oder Beinstreckers Klett-Befestigung für Solario-Vario... - Page 79 Front view Vue de face Padded shoulder straps Sangles d’épaules rembourrées Chest strap Sangle ventrale Central connection Mousquetons de fi xation des élévateurs de l’aile Adjustable Safe-T fastener (chest – and leg straps) Boucles de fi xation de la sangle ventrale avec les sangles de Adjustable padded leg straps cuisses, avec Safe-T-System (anti-oubli) Angle adjustment strap...
- Page 80 Seitenansicht Abdeckung Verbindungsgurt für Rettungssystem Auslösegriff für Rettungssystem Grosser Stauraum für Packsack im Rückenteil, Komfort- schaum plus Rückeninnentasche für Trinksystem (Camelbag oder Platypus) und Führungskanals für Trinkschlauch) Funktasche Side view Covered emergency system connection Emergency parachute handle Big storage compartment with hydration system fi xation and back protector radio holder Vue de côté...
- Page 82 a d v a n c e t h u n a g f o n + 41 33 225 70 10 w w w. a d v a n c e.c h s e e s t r a s s e 14 f a x + 41 33 225 70 11 i n f o @ a d v a n c e.c h c h 3 6 02 t h u n...
Need help?
Do you have a question about the iMPRESS 2 and is the answer not in the manual?
Questions and answers