Table of Contents
Advertisement
Advertisement
Table of Contents

Related Manuals for Advance acoustic SUCCESS 4


Summary of Contents for Advance acoustic SUCCESS 4
- Page 1 Manual Edition 1 / 11_2016...
-
Page 3: Table Of Contents
Using the speedbar ........26 SUCCESS 4 – Safety & Comfort first ......6 Flying with the foot stirrup . -
Page 4: Thank You For Flying Advance
If you have any further questions or problems please contact your dealer or get in touch directly with ADVANCE. Now we wish you a lot of enjoyment with your SUCCESS 4, and al- ways «happy landings». Team ADVANCE... -
Page 5: About Advance
About ADVANCE ADVANCE, based in Switzerland, is one of the world’s leading para- glider manufacturers. Since it was founded in 1988, the company has consistently pursued its own directions and concepts, both in develop- ment and production. The results are quality products with distinctive characteristics. -
Page 6: Success 4 - Safety & Comfort First
SUCCESS 4 – Safety & Comfort first Maximum Safety – maximum Comfort Outstanding features The SUCCESS 4 is more than just a new addition to the popular Three protectors for maximum safety SUCCESS family: its outstanding level of safety - far exceeding the SUCCESS 4 safety reaches new heights: the main protector extends general protector certification criteria –... -
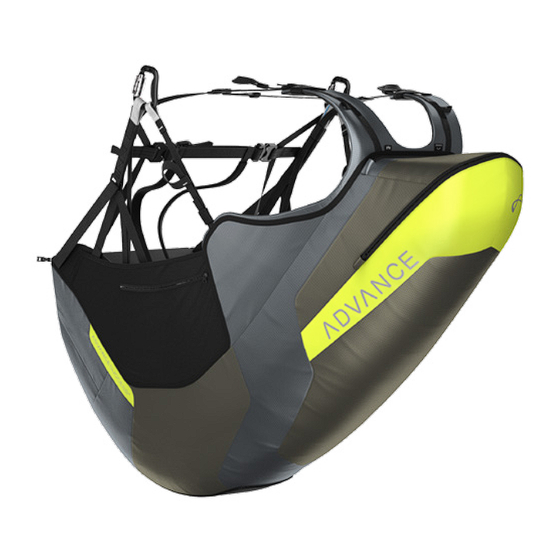
Page 7: Features At A Glance
Features at a glance Side view Shoulder strap Velcros (e.g. for a Solario) Reserve V-connection channel with zip Drink tube opening Pocket inside for drink system Outer container with Labyrinth closure 2 side pockets: 1 zip-up outside pocket (left), 1 inside mesh pocket (right) - Page 8 Front view Popular 2-buckle closure system Easy Connect System Attachment for optional foot stirrup 10 Cockpit or front container attachment 11 Markings on the straps for basic settings 12 Neoprene covers on the leg straps 13 Speed system with carbon speedbar...
-
Page 9: Protectors At A Glance
A LTF (91/09) certified main protector, additional lumbar and mid spine protectors (both multi-chamber foam) together with visco-elastic SAS- TEC side protection give the SUCCESS 4 a degree of impact defence far in excess of the general certification criteria. Main protector... -
Page 10: Safety Information
All harness adjustments should be made before the harness is flown. the weather conditions at the chosen site before taking off. His abilities Correct adjustment of the SUCCESS 4 greatly contributes to safety, must be sufficient for the demands of the selected paraglider. -
Page 11: Preparing The Product
We ask you to complete this form on the ADVANCE website under “Warranty”, within 10 days of purchase. Delivery package Delivery of a SUCCESS 4 harness contains: § SUCCESS 4 with carbon seatboard § 1 EN/LTF certified foam protector (LTF 91/09) and 1 lumbar/upper back foam protector §... -
Page 12: Adjusting The Harness
The SUCCESS 4 is easy to adjust. Put the harness on, close the chest strap and leg straps (2-buckle sys- tem) and hang the SUCCESS 4 up by its carabiners in a harness stand. Neoprene covers protect the shoulder, back and chest strap buckles. - Page 13 Setting the shoulder straps The SUCCESS 4 shoulder straps can be adjusted to suit the pi- position when clear of the ground. To adjust the leg straps tilt the seat lot’s height and desired sitting position.
- Page 14 Replacing parts The SUCCESS 4 comes with its five protection components already in- stalled. These are the two foam protectors in the back, the comfort foam in the upper back and the two SAS-TEC crash defences by the...
- Page 15 Multi-chamber foam protectors All the protectors have their own compartments which can be opened by zip fastener. The main protector’s compartment is under the seat, and above it is the mid back protector’s place. Both of these can be removed and replaced via the harness back pocket. They should be refitted in order, larger end first, then pushed down into place and their zip fastener closed.
-
Page 16: Fitting The Foot Stirrup
Fitting the foot stirrup The optional foot stirrup, included in SUCCESS 4 LTF 91/09 certifica- tion, should be fitted as follows: Attach the black-edged loops to the small tape loops under the carabi- ners using quicklinks (Maillons Rapide). The short ends go through the metal rings on the outside of the seat sidewalls near the front of the seatboard, and are secured through the plastic buckles. -
Page 17: Installing The Reserve
Steerable reserves culiarities. To ensure reliable functioning it is essential that pilot and The SUCCESS 4 can be used with a steerable reserve. The reserve packer are familiar with the system before the reserve is installed. We risers connect to the coloured supports under the covers on the har-... - Page 18 Always fold your reserve to the shape and dimensions of the inner con- The reserve handle and the four-flap inner container are fixed together tainer supplied with the SUCCESS 4. At the final packing stage put the and this combination is designed so that the pull of the handle acts line bundles opposite the reserve handle.
- Page 19 Close the container flap in the order indicated (1-3). Secure the final Closing the inner container container flap (3) with a 5 to 6 cm line loop (ca. 3 finger widths). Now Now close the outer container flap (red border) with two similar line check the tension of the bungee loop and adjust if necessary.
- Page 20 Connecting the reserve to the harness Caution: Don‘t use sticky tape instead of O rings for locating the loops on the maillon. The reserve bridle and the harness connection must be connected to each other by the means of a suitable quicklink of at least 2.400 daN Info: when looping a COMPANION reserve to the SUCCESS 4 safe load (fig.
- Page 21 Putting the inner container in the reserve compartment First lay the harness V-connection in the compartment, then put the inner container on top. It is essential that the inner container closure flaps face the bottom (when in flight) of the harness. Follow the direc- tions indicated on the inner container and the inside of the reserve compartment.
- Page 22 Closing the reserve container The outer container flaps are closed by loops and cable. Outer con- tainer design supplies the necessary tensions and pressures on the closure loops and cable. First fold the outer container sides in. The left side goes between the flaps of the right side (Labyrinth seal).
- Page 23 It is also possible to do this for the SUCCESS 4 without the help of the packing lines. Remove these lines carefully, leading them under the yellow cables to avoid damaging the white loops by friction.
-
Page 24: Compatibility Check
§ The reserve volume was suitable for the harness when first fitted in Compatibility check the new harness, but after a repack it is too big. Correct installation of a reserve must always be tested by a test re- § Pilot arm length is a factor: short pilots with short arms can some- lease. -
Page 25: General
ADVANCE paraglider to the SUCCESS 4. The pilot only has to make sure that the red and blue The SUCCESS 4 can be made very agile, or strongly damped in flight. -
Page 26: Takeoff And Landing/Balance Strap System
90 cially designed for the SUCCESS 4, and the only model to have been degree angle to the body. Without the help of the hands the pilot then included in the LTF 91/09 certification process. -
Page 27: Flying With Ballast
Because of its size the SUCCESS 4 is not suitable for tandem flying – ped agility from the harness in flight and quick standing up before lan- either for pilot or passenger. -
Page 28: Landing In Water
If an unintentional water landing takes place, outside the protection of the SIV environment, the harness buckles must be unfastened immedi- ately and the SUCCESS 4 taken off. Otherwise the risk of drowning is very high. As general advice ADVANCE recommend that the SUCCESS 4 is not flown over water. -
Page 29: Maintenance, Repairs And Care
The life of your harness can be greatly extended if you observe the fol- lowing points: The SUCCESS 4 was designed for high loading and extreme demands. § Allow a wet or damp harness to dry completely at room temperature, The requirements for the choice of materials were accordingly set or outside in the shade. -
Page 30: Check
Most reserve parachute manufacturers recommend an inspection Repairs and repacking every six months, so as to guarantee a fast and rou- As a general rule you should not attempt to repair a harness yourself. tine opening every time. If the reserve gets wet, damp or overheated The various seams are made with great precision, and, for this reason, it must definitely be repacked. -
Page 31: Technical Data
Technical Data SUCCESS 4 Pilot height 155–172 165–187 175–202 Seatboard width 34.0 35.5 37.0 Seatboard depth Support point height 42–54 42–54 42–54 Chest strap width 3.90 4.00 4.20 Harness weight Load test LTF 1651, 120kg 4-chamber foam protector certification LTF 91/09 Colours Coffee Brown/Fusion Yellow –... -
Page 32: Material Description
Material description Description Name & Dimension Manufacturer Breaking load Leg strap 70337 – 15 mm – Polyamid Güth & Wolf 1‘000 kg Back strap 70337 – 15 mm – Polyamid Güth & Wolf 1‘000 kg Shoulder Strap 70337 – 15 mm – Polyamid Güth &... -
Page 33: Service
Service ADVANCE Service Centres § find out about new safety-related knowledge and advice concerning ADVANCE products ADVANCE operates two company-owned Service Centres that car- § download an application form in PDF format which you can use ry out checks and repairs of all types. The workshops based in when sending your glider in for a check at ADVANCE. - Page 34 replacement of the product ). This warranty is valid for three years from the date of purchase of the product. Warranty and Service Intervals begin from the date of the glider’s first flight, recorded on the identifi- cation plate. If no date is evident the applicable date is that on which the glider was transferred from ADVANCE to the ADVANCE dealer.
- Page 36 a d v a n c e t h u n a g f o n + 41 3 3 225 70 10 w w w. a d v a n c e.c h u t t i g e n g s t r a s s e 87 f a x + 41 3 3 225 70 11 i n f o @ a d v a n c e.c h c h 3 6 0 0 t h u n...
Need help?
Do you have a question about the SUCCESS 4 and is the answer not in the manual?
Questions and answers