Table of Contents
Advertisement
Quick Links
Advertisement
Table of Contents

Subscribe to Our Youtube Channel
Related Manuals for Advance acoustic Progress 3


Summary of Contents for Advance acoustic Progress 3
- Page 1 Manual Edition 1 / 01_2018...
-
Page 3: Table Of Contents
Contents Thank you for flying ADVANCE....... . . 4 Takeoff and landing ........27 About ADVANCE . -
Page 4: Thank You For Flying Advance
If you have any further questions or problems please contact your dealer or get in touch directly with ADVANCE. Now we wish you a lot of enjoyment with your PROGRESS 3, and al- ways «happy landings». Team ADVANCE... -
Page 5: About Advance
About ADVANCE ADVANCE, based in Switzerland, is one of the world’s leading para- glider manufacturers. Since it was founded in 1988, the company has consistently pursued its own directions and concepts, both in develop- ment and production. The results are quality products with distinctive characteristics. -
Page 6: Outstanding Features
– as well as their clean outlines. The effect is doubled in the case of the PROGRESS 3. When a harness, its ergonomic seat surface and Legpads conform to the pilot’s shape in flight: as a rucksack its shoul-... -
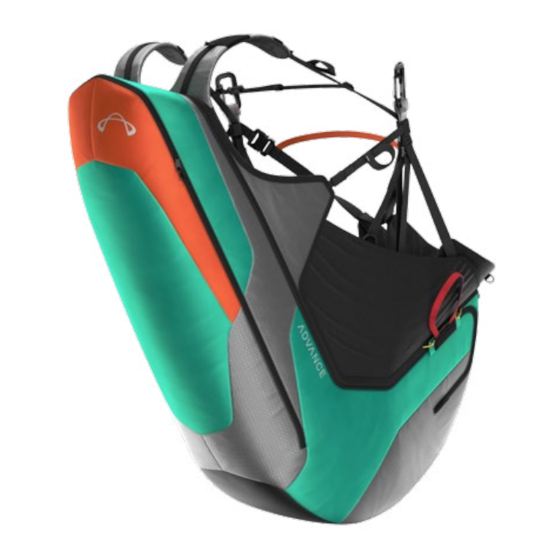
Page 7: Harness Overview
Harness Overview Side view Shoulder harness Velcro (right - e.g. for mounting a Solario) and drink tube guide (left) Drink tube opening Large back pocket V-connection channel with zip Reserve container in protector compartment Compact Edelrid FORAS carabiners with wide opening and Antitwist carabiner fixer Holdback for speedbar... - Page 8 Frontview Small chest strap Traditional 2-buckle closure system 10 Easy Connect System 11 Attachment for optional Footrest 12 Can take Cockpit or Front Container 13 Adjustment buckles for upper body recline 14 Setting for seat angle (lower back support adjusts automatically by running strap) 15 Distance between Legpads 16 2 Side Pockets: 1 exterior zip (left),...
-
Page 9: Rucksack Overview
Rucksack overview Detachable helm net Ergonomically shaped, adjustable shoulder harness Ergonomically shaped Waist Strap with elasticated side pockets (le.) 2 elastic medium side pockets (rt., one above the other). Top has room for a 1.5 ltr drink bottle. Rucksack handle Large elastic side pocket (le.), e.g. -
Page 10: Safety Information
All harness adjustments should be made before the harness is flown. the weather conditions at the chosen site before taking off. His abilities Correct adjustment of the PROGRESS 3 greatly contributes to safety, must be sufficient for the demands of the selected paraglider. When correct function and comfort in flight. -
Page 11: Preparing The Product
ADVANCE warran- ty (see under “Warranty” in the section” Service”). The PROGRESS 3 internal Air-Foam Hybrid-Protector has a sophistica- We ask you to complete this form on the ADVANCE website under ted inner structure and requires no special treatment. When the ruck- “Warranty”, within 10 days of purchase. -
Page 12: Adjusting The Harness
Adjusting the harness The PROGRESS 3 is easy to adjust.Put the harness on, close the chest strap and leg straps (2-buckle system) and hang the PROGRESS 3 up by its carabiners in a harness stand. Shoulder and back strap buckles have Neoprene and light Neoprene covers and allow for continuous adjustment, so that sitting position can be quickly and easily modified in flight. - Page 13 The distance between the leg straps and LegPads on the Seatstrap setting PROGRESS 3 can be set to suit the individual, and is adjustable The seat strap is adjusted to individual requirements because the during flight. When pulled in, leg strap pressure on the inside of the seating area adapts itself precisely to the body shape.
-
Page 14: Exchanging Components
Air-Foam Hybrid-Protektor sition for takeoff and landing. The appropriate width can be set as The PROGRESS 3 comes with the Air-Foam Hybrid-Protector built in. required. If you prefer not to use the mini chest strap it can be un- Its compartment is under the seat surface with the Legpads. You can looped and removed. - Page 15 Fitting the optional foot stirrup The optional foot stirrup, included in PROGRESS 3 LTF 91/09 certifica- tion, should be fitted as follows: The black loops at the ends of the stirrup support lines attach to the small tapes loops below the carabiners with small quick- links (Maillons Rapides).
-
Page 16: Installing The Reserve
The certified reserve volume for the PROGRESS 3 depends on harness sizes. S + M size: 2.5–6 Liter, L size: 3–6.5 Liter. Info: for a general approximation of a reserve volume, its weight in kilos x 2.7 gives a volume in litres. - Page 17 Steerable reserves Packing the reserve in the inner container The PROGRESS 3 can be used with a steerable reserve. The reserve Always fold your reserve to the shape and dimensions of the inner con- risers connect to the coloured supports under the covers on the har- tainer supplied with the PROGRESS 3.
- Page 18 Closing the inner container Close the container flap in the order indicated (1-3). Secure the final container flap (3) with a 5 to 6 cm line loop (ca. 3 finger widths). Now Now close the outer container flap (red border) with two similar line lo- check the tension of the bungee loop and adjust if necessary.
- Page 19 Connecting the reserve to the harness Caution: don‘t use sticky tape instead of O rings for locating the loops on the maillon! The reserve bridle and the harness connection must be connected to each other by the means of a suitable quicklink of at least 2400 daN Info: when looping a COMPANION reserve to the PROGRESS 3 safe load (fig.
- Page 20 Putting the inner container in the reserve compartment Lead the reserve V-connection lines up from their stitched attach- ments on the shoulder supports, then down to the reserve compart- ment via the opened V-connection channel that runs down the si- de of the harness.
- Page 21 Again remove the help line slowly to avoid friction – and stow the end of the cable in its channel Info: even without the packing lines the PROGRESS 3 yellow cables are easy to guide through their white closure loops.
- Page 22 Tuck the base of the reserve handle into its neoprene pocket. .Then close the right hand zipper , Then close the right hand zipper by running it all the way round, into its zipper garage. Close the left hand zip: run it up the side of the harness to the top of the harness – this closes the V-connection channel –...
-
Page 23: Compatibility Check
Compatibility check § The reserve volume was suitable for the harness when first fitted in the new harness, but after a repack it is too big. Correct installation of a reserve must always be tested by a test relea- § Pilot arm length is a factor: short pilots with short arms can so- se. -
Page 24: Reversing Technique
Packing the rucksack rucksack as well. The PROGRESS 3 is delivered with a COMPRESSBAG – a compres- sion bag – so that the paraglider can be efficiently packed in the ruck- Tip: to save space, drinks can be carried in cartons instead of sack. -
Page 25: Setting Up The Rucksack Mode
Tip: put the glider at the bottom of the rucksack, to fill up this space. Pull the lower section of the rucksack lid over the glider The PROGRESS 3 rucksack function is designed to hold a paraglider, pack, then pull up the side zips to this level and stand the ruck- helmet and some clothes. -
Page 26: General
ADVANCE paraglider to the PROGRESS 3. The pilot only has to make sure that the red and blue The PROGRESS 3 has plenty of trump cards to play. Weight is distri-... -
Page 27: Takeoff Preparation And Check
ADVANCE recommends that you only use the optional foot stirrup spe- possible. Loosened seat straps make it easy to slip back into the har- cially designed for the PROGRESS 3, and the only model to have be- ness after lift off. To take up the landing position just straighten the en included in the LTF 91/09 certification process. -
Page 28: Flying With Ballast
The PROGRESS 3 was not designed with ballast in mind, and does not have a special compartment for it. If you wish to increase your in-flight Acro flying weight by carrying water the two loops below the chest straps are pos- sible attachment points. -
Page 29: Landing In Water
Landing in water Maintenance and care after landing in water After contact with water the PROGRESS 3 Protector should be taken In general, caution is advised when flying over water, whether it be out. The harness, protector and reserve inner container should be ca- crossing a lake during a cross country, or during SIV safety training. -
Page 30: Care, Check & Repair
Care, check & repair Care The life of your harness can be greatly extended if you observe the fol- lowing points: Weight minimisation was a priority when it came to the choice of mate- § Allow a wet or damp harness to dry completely at room temperature, rials. -
Page 31: Air-Foam Hybrid-Protector Care
Most reserve parachute manufacturers recommend an inspection care. Finally the overall condition of the paraglider is assessed and re- and repacking every six months, so as to guarantee a fast and rou- corded on the test record. tine opening every time. If the reserve gets wet, damp or overheated You can find more information about the check in this manual in sec- it must definitely be repacked. -
Page 33: Technical Data
Technical Data PROGRESS 3 Pilot height 155–172 165–183 178–202 Seating width N. A.* N. A.* N. A.* Seating depth ~ 35* ~ 38* ~ 40* Chest strap width ~ 47* ~ 48* ~ 50* ~ 44* ~ 46* ~ 48* Support point height Harness weight incl. -
Page 34: Material Description Harness
Material Description Harness Description Name & Dimension Manufacturer Breaking Load Leg strap 86160 – 25 mm – Polyamid Güth & Wolf 20 kN Back strap 62694 – 15 mm – Polyamid Techni Sangle 13.2 kN Shoulder strap 70337 – 15 mm – Polyamid Techni Sangle 13.2 kN Two buckle closure system... -
Page 35: Material Description Rucksack
Aussenstoff Nylon-Robic 100D & 240T diagonal Ripstop&LNT 16008 Seung Hee Bodenstoff Cordura 210D Seung Hee Certification The PROGRESS 3 was tested and certified in accordance with DIN EN-Norm 1651 at 120 kg supported weight. The Airfoam-Hybrid- Protector has LTF certification. -
Page 36: Service
Service ADVANCE Service Centres § find out about new safety-related knowledge and advice concerning ADVANCE products ADVANCE operates two company-owned Service Centres that car- § download an application form in PDF format which you can use ry out checks and repairs of all types. The workshops based in when sending your glider in for a check at ADVANCE. - Page 37 Warranty As part of the ADVANCE warranty, we undertake to rectify any de- fects in our products that are attributable to manufacturing faults. In order for a warranty claim to be made, ADVANCE must be notified im- mediately on discovery of a defect, and the defective product sent in for inspection.
- Page 39 a d v a n c e t h u n a g + 41 3 3 225 70 10 i n f o @ a d v a n c e.c h u t t i g e n g s t r a s s e 87 w w w.
Need help?
Do you have a question about the Progress 3 and is the answer not in the manual?
Questions and answers