Grundfos ALPHA1 model B Installation And Operating Instructions Manual
Hide thumbs
Also See for ALPHA1 model B:
- Instructions manual (36 pages) ,
- Installation and operating instructions manual (26 pages) ,
- Manual (19 pages)
Table of Contents
Advertisement
Available languages
Available languages
Advertisement
Chapters
Table of Contents

Related Manuals for Grundfos ALPHA1 model B


Summary of Contents for Grundfos ALPHA1 model B
- Page 1 GRUNDFOS INSTRUCTIONS ALPHA1 Model B Installation and operating instructions...
- Page 3 ALPHA1 English (GB) Installation and operating instructions ............4 Deutsch (DE) Montage- und Betriebsanleitung .
-
Page 4: Table Of Contents
Scope of delivery 1.2 Hazard statements Installing the product The symbols and hazard statements below may appear in Mechanical installation Grundfos installation and operating instructions, safety Control box positions instructions and service instructions. Insulating the pump housing Electrical installation DANGER... -
Page 5: Notes
1.3 Notes 3. Installing the product The symbols and notes below may appear in Grundfos 3.1 Mechanical installation installation and operating instructions, safety instructions and service instructions. Observe these instructions for explosion-proof products. 3.1.1 Mounting the product A blue or grey circle with a white graphical symbol indicates that an action must be taken. -
Page 6: Control Box Positions
3.2 Control box positions 3.2.3 Changing the control box position CAUTION Hot surface Minor or moderate personal injury - Position the pump so that persons cannot accidentally come into contact with hot surfaces. CAUTION Pressurised system Minor or moderate personal injury - Before dismantling the pump, drain the system or close the isolating valve on either side of the pump. -
Page 7: Insulating The Pump Housing
3.3 Insulating the pump housing 4. Electrical installation DANGER Electric shock Death or serious personal injury - Switch off the power supply before starting any work on the product. Make sure that the power supply cannot be accidentally switched on. Fig. -
Page 8: Assembling The Plug
4.1 Assembling the plug Step Action Illustration Step Action Illustration 0.5 - 1.5 mm 12 mm Screw the cable Fit the cable gland gland onto the and plug cover to power supply plug. the cable. Strip the cable conductors 7 mm as illustrated. -
Page 9: Dismantling The Plug
4.2 Dismantling the plug 5. Starting up the product 5.1 Before startup Step Action Illustration Do not start the pump until the system has been filled with liquid and vented. Make sure that the required minimum inlet pressure is available at the pump inlet. See section 9. -
Page 10: Venting The Pump
5.3 Venting the pump 5.4 Venting the heating system 10 Min. 10 Min. Fig. 8 Venting the pump Fig. 9 Venting of the heating system The pump is self-venting through the system. You do not have to Vent the heating system via a vent valve installed above the vent the pump before startup. -
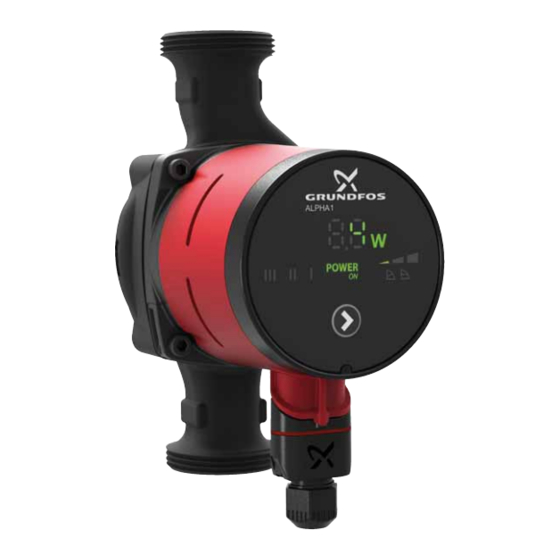
Page 11: Product Introduction
6. Product introduction 6.1 Product description Max. 95 % RH IPX4D Min./Max. +2 °C / +110 °C Max. 1.0 MPa (10 bar) Fig. 12 Model type on the nameplate 6.2 Applications Min./Max. 0 °C / +40 °C The pump is designed for the circulation of water in heating systems, domestic hot-water systems as well as air-conditioning and cold-water systems. -
Page 12: Pumped Liquids
6.3 Pumped liquids 6.4 Identification In heating systems, the water must meet the requirements of 6.4.1 Nameplate accepted standards on water quality in heating systems, for example the German standard VDI 2035. The pump is suitable for the following liquids: •... -
Page 13: Control Functions
6.4.2 Type key 7.3 Light fields indicating the pump setting The pump has nine performance settings which you can select Example ALPHA1 25 -40 N 180 with the button (5). See fig. 14. Pump type The pump setting is indicated by nine light fields in the display. [ ]: Standard version See fig. -
Page 14: Control Modes
7.5 Control modes 7.5.2 Pump setting for one-pipe heating systems 7.5.1 Pump setting for two-pipe heating systems Fig. 18 Selection of pump setting for system type Recommended and alternative pump settings according to fig. Pump setting Heating system Recommended Alternative Constant-pressure Fig. - Page 15 7.5.3 Pump setting for underfloor heating systems 7.5.4 Pump setting for domestic hot-water systems Fig. 20 Selection of pump setting for system type Fig. 22 Selection of pump setting for system type Recommended and alternative pump settings according to fig. Recommended and alternative pump settings according to fig.
-
Page 16: Pump Performance
7.6 Pump performance Relation between pump setting and pump performance. Figure shows the relation between pump setting and pump performance by means of curves. See also section 10. Performance curves. Fig. 24 Pump setting in relation to pump performance Setting Pump curve Function Lowest... -
Page 17: Fault Finding The Product
8. Fault finding the product DANGER Electric shock Death or serious personal injury - Switch off the power supply before starting any work on the product. Make sure that the power supply cannot be accidentally switched on. CAUTION Pressurised system Minor or moderate personal injury - Before dismantling the pump, drain the system or close the isolating valves on either side of the... -
Page 18: Technical Data
9. Technical data 9.1 Data and operating conditions Supply voltage 1 x 230 V ± 10 %, 50 or 60 Hz, PE Motor protection The pump requires no external motor protection. Enclosure class IPX4D Insulation class Relative humidity Maximum 95 % RH System pressure Maximum 1.0 MPa, 10 bar, 102 m head Liquid temperature... -
Page 19: Dimensions
9.2 Dimensions Dimensional sketches and table of dimensions. Fig. 25 ALPHA1 model B Dimensions Pump type ALPHA1 15-40 ALPHA1 15-50* ALPHA1 15-60 ALPHA1 15-80 ALPHA1 25-40 G1 1/2 ALPHA1 25-40 N G1 1/2 ALPHA1 25-40 G1 1/2 ALPHA1 25-40 N... -
Page 20: Performance Curves
10. Performance curves 10.1 Guide to performance curves Each pump setting has its own performance curve. A power curve, P1, belongs to each performance curve. The power curve shows the pump power consumption in watt at a given performance curve. The P1 value corresponds to the value that you can read from the pump display. -
Page 21: Performance Curves, Alpha1, Xx-40 (N)
10.3 Performance curves, ALPHA1, XX-40 (N) Q [m³/h] Q [m³/h] Fig. 27 ALPHA1, XX-40 Setting Min. 0.04 Max. 0.18... -
Page 22: Performance Curves, Alpha1, Xx-50 (N)
10.4 Performance curves, ALPHA1, XX-50 (N) Q [m³/h] Q [m³/h] Fig. 28 ALPHA1, XX-50 Setting Min. 0.04 Max. 0.24... -
Page 23: Performance Curves, Alpha1, Xx-60 (N)
10.5 Performance curves, ALPHA1, XX-60 (N) 0.0 0.2 0.4 0.6 0.8 1.0 1.2 1.4 1.6 1.8 2.0 2.2 2.4 2.6 2.8 3.0 Q [m³/h] 0.0 0.2 0.4 0.6 0.8 1.0 1.2 1.4 1.6 1.8 2.0 2.2 2.4 2.6 2.8 3.0 Q [m³/h] Fig. -
Page 24: Performance Curves, Alpha1, Xx-80 (N)
10.6 Performance curves, ALPHA1, XX-80 (N) Q [m³/h] Q [m³/h] Fig. 30 ALPHA1, XX-80 Setting Min. 0.04 Max. 0.44... -
Page 25: Accessories
11. Accessories 11.1 Unions Product numbers, unions Ball valve with Union nut with internal Union nut with Ball valve with internal compression Union nut with soldering fitting threads external threads threads fitting ∅22 ∅28 ∅18 ∅22 ∅28 ∅42 1 1/4 1 1/4 1 1/4 25-xx... -
Page 26: Insulating Shells
3 % incineration • 5 % depositing. Dispose of this product or parts of it in an environmentally sound way according to local regulations. See also end-of-life information at www.grundfos.com/product-recycling. Fig. 32 Insulating shells 11.3 ALPHA plugs Product Pos. Description... -
Page 27: Allgemeine Informationen
Isolieren des Pumpengehäuses Die folgenden Symbole und Sicherheitshinweise werden ggf. in Elektrischer Anschluss den Montage- und Betriebsanleitungen, Sicherheitsanweisungen Zusammenbauen des Steckers und Serviceanleitungen von Grundfos verwendet. Auseinanderbauen des Steckers Inbetriebnahme des Produkts GEFAHR Vor der Inbetriebnahme Kennzeichnet eine Gefahrensituation, die, wenn sie Erstinbetriebnahme nicht vermieden wird, zu ernsthaften Personenschä-... -
Page 28: Hinweise
3. Produktinstallation Die folgenden Symbole und Hinweise werden ggf. in den Mon- 3.1 Montage tage- und Betriebsanleitungen, Sicherheitsanweisungen und Ser- viceanleitungen von Grundfos verwendet. Diese Sicherheitsanweisungen sind bei explosions- geschützten Produkten unbedingt zu befolgen. 3.1.1 Montieren des Produkts Ein blauer oder grauer Kreis mit einem weißen grafi- schen Symbol weist darauf hin, dass eine Maß-... -
Page 29: Position Des Schaltkastens
3.2 Position des Schaltkastens 3.2.3 Verändern der Position des Schaltkastens VORSICHT Heiße Oberfläche Leichte oder mittelschwere Personenschäden - Stellen Sie die Pumpe so auf, dass Personen nicht versehentlich mit heißen Oberflächen in Berüh- rung kommen können. VORSICHT Anlage unter Druck Leichte oder mittelschwere Personenschäden - Entleeren Sie die Anlage oder schließen Sie die Absperrventile auf beiden Seiten der Pumpe,... -
Page 30: Isolieren Des Pumpengehäuses
3.3 Isolieren des Pumpengehäuses 4. Elektrischer Anschluss GEFAHR Stromschlag Tod oder ernsthafte Personenschäden - Schalten Sie die Stromversorgung ab, bevor Sie Arbeiten am Produkt beginnen. Stellen Sie sicher, dass die Stromversorgung nicht versehentlich wie- Abb. 6 Isolieren des Pumpengehäuses der eingeschaltet werden kann. Sie können die Wärmeverluste über die Pumpe verringern, indem GEFAHR Sie das Pumpengehäuse mithilfe der mitgelieferten Wärme-... -
Page 31: Zusammenbauen Des Steckers
4.1 Zusammenbauen des Steckers Schritt Maßnahme Abbildung Schritt Maßnahme Abbildung 0,5-1,5 mm Bringen Sie die Schrauben Sie die Kabelverschrau- 12 mm Kabelverschrau- bung und die Ste- bung auf den Ste- ckerabdeckung am cker für die Strom- Kabel an. Entfernen versorgung. Sie die Isolation an 7 mm den einzelnen Lei-... -
Page 32: Auseinanderbauen Des Steckers
4.2 Auseinanderbauen des Steckers 5. Inbetriebnahme des Produkts 5.1 Vor der Inbetriebnahme Schritt Maßnahme Abbildung Schalten Sie die Pumpe erst ein, wenn die Anlage vollständig mit Flüssigkeit befüllt und entlüftet wurde. Stellen Sie sicher, dass der erforderliche Mindesteingangsdruck am Pumpeneinlass vorliegt. Siehe Abschnitt 9. -
Page 33: Entlüften Der Pumpe
5.3 Entlüften der Pumpe 5.4 Entlüften der Heizungsanlage 10 Min. 10 Min. Abb. 8 Entlüften der Pumpe Abb. 9 Entlüften der Heizungsanlage Die Pumpe ist eigenbelüftet. Die Entlüftung erfolgt über die Entlüften Sie die Heizungsanlage über ein oberhalb der Pumpe Anlage. -
Page 34: Produkteinführung
6. Produkteinführung 6.1 Produktbeschreibung Max. 95 % RH IPX4D Min./Max. +2 °C / +110 °C Max. 1.0 MPa (10 bar) Abb. 12 Modelltyp auf dem Typenschild 6.2 Verwendungszweck Min./Max. 0 °C / +40 °C Die Pumpe ist für das Umwälzen von Wasser in Heizungsanla- gen, Trinkwarmwasseranlagen sowie Klima- und Kaltwasseranla- gen bestimmt. -
Page 35: Fördermedien
6.3 Fördermedien 6.4 Produktidentifikation In Heizungsanlagen muss das Wasser die Anforderungen aner- 6.4.1 Typenschild kannter Normen erfüllen, die für die Wasserqualität in Heizungs- anlagen gelten (wie z. B. die VDI 2035). Die Pumpe ist für folgende Medien geeignet: • Reine, dünnflüssige, nicht aggressive und nicht explosive ALPHA1 XX-XX XXX Medien ohne feste oder faserige Bestandteile •... -
Page 36: Regelungsfunktionen
6.4.2 Typenschlüssel 7.3 Leuchtfelder zum Anzeigen der Pumpeneinstellung Beispiel ALPHA1 25 -40 N 180 Die Pumpe verfügt über neun Leistungseinstellungen, die über die Taste (5) ausgewählt werden können. Siehe Abb. 14. Pumpentyp [ ]: Standardausführung Die Pumpeneinstellung wird durch neun Leuchtfelder im Display angezeigt. -
Page 37: Regelungsarten
7.5 Regelungsarten 7.5.2 Pumpeneinstellung für Einrohr-Heizungsanlagen 7.5.1 Pumpeneinstellung für Zweirohr-Heizungsanlagen Abb. 18 Auswählen der Pumpeneinstellung in Abhängigkeit vom Anlagentyp Empfohlene und alternative Pumpeneinstellung entsprechend Abb. 18: Pumpeneinstellung Heizungsanlage Empfohlen Alternativ Abb. 16 Auswählen der Pumpeneinstellung in Abhängigkeit Konstant- vom Anlagentyp Konstantkennlinie/kon- druck-Kennlinie, Einrohr-Anlage... - Page 38 7.5.3 Pumpeneinstellung für Fußbodenheizungsanlagen 7.5.4 Pumpeneinstellung für Trinkwarmwasseranlagen Abb. 20 Auswählen der Pumpeneinstellung in Abhängigkeit Abb. 22 Auswählen der Pumpeneinstellung in Abhängigkeit vom Anlagentyp vom Anlagentyp Empfohlene und alternative Pumpeneinstellung entsprechend Empfohlene und alternative Pumpeneinstellung entsprechend Abb. 20: Abb. 22: Pumpeneinstellung Pumpeneinstellung Anlagentyp...
-
Page 39: Pumpenleistung
7.6 Pumpenleistung Verhältnis zwischen Pumpeneinstellung und Pumpenleistung Abb. zeigt das Verhältnis zwischen der Pumpeneinstellung und der Pumpenleistung anhand der Kennlinien. Siehe auch Abschnitt Leistungskennlinien. Abb. 24 Pumpeneinstellung im Verhältnis zur Pumpenleistung Einstellung Pumpenkennlinie Funktion Der Betriebspunkt der Pumpe bewegt sich in Abhängigkeit vom Wärmebedarf auf der unteren Untere Proportional- Proportionaldruck-Kennlinie auf und ab. -
Page 40: Störungssuche Beim Produkt
8. Störungssuche beim Produkt GEFAHR Stromschlag Tod oder ernsthafte Personenschäden - Schalten Sie die Stromversorgung ab, bevor Sie Arbeiten am Produkt beginnen. Stellen Sie sicher, dass die Stromversorgung nicht versehentlich wie- der eingeschaltet werden kann. VORSICHT Anlage unter Druck Leichte oder mittelschwere Personenschäden - Entleeren Sie die Anlage oder schließen Sie die Absperrventile auf beiden Seiten der Pumpe, bevor Sie die Pumpe demontieren. -
Page 41: Technische Daten
9. Technische Daten 9.1 Daten und Betriebsbedingungen Versorgungsspannung 1 x 230 V ± 10 %, 50 oder 60 Hz, PE Motorschutz Die Pumpe benötigt keinen externen Motorschutz. Schutzart IPX4D Wärmeklasse Relative Luftfeuchtigkeit Maximal 95 % Systemdruck Maximal 1,0 MPa, 10 bar, 102 m Förderhöhe Medientemperatur Mindesteingangsdruck ≤... -
Page 42: Abmessungen
9.2 Abmessungen Maßskizzen und Abmessungen Abb. 25 ALPHA1, Modell B Abmessungen Pumpentyp ALPHA1 15-40 ALPHA1 15-50* ALPHA1 15-60 ALPHA1 15-80 ALPHA1 25-40 G1 1/2 ALPHA1 25-40 N G1 1/2 ALPHA1 25-40 G1 1/2 ALPHA1 25-40 N G1 1/2 ALPHA1 25-50* G1 1/2 ALPHA1 25-50 N* G1 1/2... -
Page 43: Leistungskennlinien
10. Leistungskennlinien 10.1 Erläuterungen zu den Pumpenkennlinien Jede Pumpeneinstellung verfügt über eine eigene Leistungskenn- linie. Zu jeder Leistungskennlinie (P1) gehört eine Kennlinie der Leis- tungsaufnahme. Die Kennlinie der Leistungsaufnahme zeigt die Leistungsaufnahme der Pumpe in Watt für eine gegebene Leis- tungskennlinie an. -
Page 44: Kennlinien, Alpha1, Xx-40 (N)
10.3 Kennlinien, ALPHA1, XX-40 (N) Q [m³/h] Q [m³/h] Abb. 27 ALPHA1, XX-40 Einstellung Min. 0,04 Max. 0,18... -
Page 45: Kennlinien, Alpha1, Xx-50 (N)
10.4 Kennlinien, ALPHA1, XX-50 (N) Q [m³/h] Q [m³/h] Abb. 28 ALPHA1, XX-50 Einstellung Min. 0,04 Max. 0,24... -
Page 46: Kennlinien, Alpha1, Xx-60 (N)
10.5 Kennlinien, ALPHA1, XX-60 (N) 0.0 0.2 0.4 0.6 0.8 1.0 1.2 1.4 1.6 1.8 2.0 2.2 2.4 2.6 2.8 3.0 Q [m³/h] 0.0 0.2 0.4 0.6 0.8 1.0 1.2 1.4 1.6 1.8 2.0 2.2 2.4 2.6 2.8 3.0 Q [m³/h] Abb. -
Page 47: Kennlinien, Alpha1, Xx-80 (N)
10.6 Kennlinien, ALPHA1, XX-80 (N) Q [m³/h] Q [m³/h] Abb. 30 ALPHA1, XX-80 Einstellung Min. 0,04 Max. 0,44... -
Page 48: Zubehör
11. Zubehör 11.1 Verschraubungen Produktnummern, Verschraubungen und Ventilsätze Überwurfmutter Kugelventil mit Überwurfmutter mit Kugelventil mit Innenge- mit Außenge- Klemmringver- Überwurfmutter mit Lötfitting Innengewinde winde winde schraubung ∅22 ∅28 ∅18 ∅22 ∅28 ∅42 1 1/4 1 1/4 1 1/4 25-xx 529921 529922 529821 529925 529924 G 1 1/2 25-xx N 529971 529972... -
Page 49: Wärmedämmschalen
• 5 % müssen auf einer Deponie entsorgt werden Dieses Produkt oder Teile davon müssen entsprechend den ört- lich geltenden Vorschriften umweltgerecht entsorgt werden. Siehe auch die Informationen zur Entsorgung auf www.grundfos.com/product-recycling. Abb. 32 Wärmedämmschalen 11.3 ALPHA-Stecker Produkt- Pos. Beschreibung... -
Page 50: Généralités
Positions du coffret de commande mentionnés dans la notice d'installation et de fonctionnement, Isoler le corps du circulateur dans les consignes de sécurité et les instructions de service Installation électrique Grundfos. Montage de la prise Démontage de la prise DANGER Démarrage... -
Page 51: Remarques
Les symboles et les remarques ci-dessous peuvent être mention- 3.1 Installation mécanique nés dans la notice d'installation et de fonctionnement, dans les consignes de sécurité et les instructions de service Grundfos. Observer ces instructions pour les pompes antidéfla- grantes. 3.1.1 Montage du produit Un cercle bleu ou gris autour d'un pictogramme blanc indique qu'il faut agir. -
Page 52: Positions Du Coffret De Commande
3.2 Positions du coffret de commande 3.2.3 Modification de la position du coffret de commande PRÉCAUTIONS Surface brûlante Accident corporel mineur ou modéré - Positionner le circulateur de sorte que personne ne puisse entrer accidentellement en contact avec ses surfaces chaudes. PRÉCAUTIONS Système sous pression Accident corporel mineur ou modéré... -
Page 53: Isoler Le Corps Du Circulateur
3.3 Isoler le corps du circulateur 4. Installation électrique DANGER Choc électrique Mort ou blessures graves - Avant toute intervention sur le produit, couper l'ali- mentation électrique. S'assurer que celle-ci ne peut pas être réenclenchée accidentellement. Fig. 6 Isoler le corps du circulateur DANGER Vous pouvez atténuer les pertes de chaleur du circulateur en iso- Choc électrique... -
Page 54: Montage De La Prise
4.1 Montage de la prise Étape Action Illustration Étape Action Illustration 0,5 - 1,5 mm Visser le Raccorder le 12 mm presse-étoupe sur presse-étoupe et la prise d'alimen- le couvercle de la tation. prise au câble. Dénuder les 7 mm conducteurs comme illustré. -
Page 55: Démontage De La Prise
4.2 Démontage de la prise 5. Démarrage 5.1 Avant la mise en service Étape Action Illustration Ne jamais démarrer la pompe si l'installation n'est pas remplie de liquide et purgée. Vérifier que la pression d'aspiration minimale requise est disponible à l'entrée du circulateur. Voir paragraphe 9. -
Page 56: Purge Du Circulateur
5.3 Purge du circulateur 5.4 Purge de l'installation de chauffage 10 Min. 10 Min. Fig. 8 Purge du circulateur Fig. 9 Purge de l'installation de chauffage La purge du circulateur est automatique. Le circulateur n'a pas Purger l'installation de chauffage via une vanne de purge instal- besoin d'être purgé... -
Page 57: Présentation Du Produit
6. Présentation du produit 6.1 Description Max. 95 % RH IPX4D Min./Max. +2 °C / +110 °C Max. 1.0 MPa (10 bar) Fig. 12 Type de modèle sur la plaque signalétique 6.2 Applications Min./Max. 0 °C / +40 °C Le circulateur est conçu pour la circulation de l'eau dans les ins- tallations de chauffage, d'eau chaude sanitaire, d'eau froide et de climatisation. -
Page 58: Liquides Pompés
6.3 Liquides pompés 6.4 Identification Dans les installations de chauffage, l'eau doit répondre aux 6.4.1 Plaque signalétique normes de qualité des installations de chauffage. Le circulateur est conçu pour le pompage des liquides suivants : • Liquides clairs, non agressifs et non explosifs, ne contenant aucune particule solide ni fibre. -
Page 59: Fonctions De Régulation
6.4.2 Désignation 7.3 Voyants lumineux indiquant le réglage du circulateur Exemple ALPHA1 25 -40 N 180 Le circulateur a 9 réglages de performance qui peuvent être sélectionnés à l'aide du bouton (5). Voir fig. 14. Type de circulateur [ ]: Version standard Les réglages du circulateur sont indiqués par 9 voyants lumineux. -
Page 60: Modes De Régulation
7.5 Modes de régulation 7.5.2 Réglage du circulateur pour les installations de chauffage mono-tubes 7.5.1 Réglage du circulateur pour les installations de chauffage bi-tubes Fig. 18 Sélection du réglage du circulateur en fonction du type d'installation Réglage recommandé et alternatif en fonction de la fig. Installation Réglage du circulateur de chauf-... - Page 61 7.5.3 Réglage du circulateur pour les installations de 7.5.4 Réglage du circulateur pour les installations d'eau chauffage au sol chaude sanitaire Fig. 20 Sélection du réglage du circulateur en fonction du type Fig. 22 Sélection du réglage du circulateur en fonction du type d'installation d'installation Réglage recommandé...
-
Page 62: Performance Du Circulateur
7.6 Performance du circulateur Relation entre le réglage et la performance du circulateur. La figure illustre la relation entre le réglage et la performance du circulateur au moyen de courbes. Voir aussi paragraphe 10. Courbes de performance. Fig. 24 Réglage du circulateur en fonction de ses performances Réglage Courbe du circulateur Fonction Le point de consigne monte ou descend sur la courbe de pression proportionnelle la plus basse,... -
Page 63: Dépannage
8. Dépannage DANGER Choc électrique Mort ou blessures graves - Avant toute intervention sur le produit, couper l'ali- mentation électrique. S'assurer que celle-ci ne peut pas être réenclenchée accidentellement. PRÉCAUTIONS Système sous pression Accident corporel mineur ou modéré - Vidanger l'installation ou fermer les robinets d'arrêt de chaque côté... -
Page 64: Caractéristiques Techniques
9. Caractéristiques techniques 9.1 Caractéristiques et conditions de fonctionnement Tension d'alimentation 1 x 230 V ± 10 %, 50 ou 60 Hz, PE Protection moteur Le circulateur ne nécessite aucune protection externe du moteur. Indice de protection IPX4D Classe d’isolation Humidité... -
Page 65: Dimensions
9.2 Dimensions Schémas cotés et tableau des dimensions. Fig. 25 ALPHA1 modèle B Dimensions Type de pompe ALPHA1 15-40 ALPHA1 15-50* ALPHA1 15-60 ALPHA1 15-80 ALPHA1 25-40 G1 1/2 ALPHA1 25-40 N G1 1/2 ALPHA1 25-40 G1 1/2 ALPHA1 25-40 N G1 1/2 ALPHA1 25-50* G1 1/2... -
Page 66: Courbes De Performance
10. Courbes de performance 10.1 Guide des courbes de performance Chaque réglage possède sa propre courbe de performance. Une courbe de puissance (P1) est indiquée pour chaque courbe de performance. La courbe de puissance représente la consom- mation électrique du circulateur en Watt pour une courbe de per- formance donnée. -
Page 67: Courbes De Performance, Alpha1, Xx-40 (N)
10.3 Courbes de performance, ALPHA1, XX-40 (N) Q [m³/h] Q [m³/h] Fig. 27 ALPHA1, XX-40 Réglage Min. 0,04 Max. 0,18... -
Page 68: Courbes De Performance, Alpha1, Xx-50 (N)
10.4 Courbes de performance, ALPHA1, XX-50 (N) Q [m³/h] Q [m³/h] Fig. 28 ALPHA1, XX-50 Réglage Min. 0,04 Max. 0,24... -
Page 69: Courbes De Performance, Alpha1, Xx-60 (N)
10.5 Courbes de performance, ALPHA1, XX-60 (N) 0.0 0.2 0.4 0.6 0.8 1.0 1.2 1.4 1.6 1.8 2.0 2.2 2.4 2.6 2.8 3.0 Q [m³/h] 0.0 0.2 0.4 0.6 0.8 1.0 1.2 1.4 1.6 1.8 2.0 2.2 2.4 2.6 2.8 3.0 Q [m³/h] Fig. -
Page 70: Courbes De Performance, Alpha1, Xx-80 (N)
10.6 Courbes de performance, ALPHA1, XX-80 (N) Q [m³/h] Q [m³/h] Fig. 30 ALPHA1, XX-80 Réglage Min. 0,04 Max. 0,44... -
Page 71: Accessoires
11. Accessoires 11.1 Raccords unions : Codes articles, raccords unions Clapet à bille Écrou-union Écrou-union avec file- Clapet à bille avec file- avec avec filetage Écrou-union avec raccord soudé tage interne tage interne raccord de com- externe pression ∅22 ∅28 ∅18 ∅22 ∅28... -
Page 72: Coquilles D'isolation
Mettre ce produit et ses pièces au rebut dans le respect de l'envi- ronnement, conformément à la réglementation locale. Voir également les informations relatives à la fin de vie du produit sur www.grundfos.com/product-recycling. Fig. 32 Coquilles d'isolation 11.3 Prises ALPHA Pos. - Page 73 I simboli e le indicazione di pericolo riportati di seguito possono Installazione meccanica essere visualizzati nelle istruzioni di installazione e funziona- Posizioni del quadro di controllo mento di Grundfos, nelle istruzioni di sicurezza e nelle istruzioni Isolamento del corpo pompa di servizio. Installazione elettrica...
- Page 74 3. Installazione del prodotto I simboli e le note di seguito possono essere visualizzati nelle 3.1 Installazione meccanica istruzioni di installazione e funzionamento di Grundfos, nelle istruzioni di sicurezza e nelle istruzioni di servizio. Osservare queste istruzioni per i prodotti antidefla- granti.
- Page 75 3.2 Posizioni del quadro di controllo 3.2.3 Cambiamento della posizione del quadro di controllo ATTENZIONE Suoerficie calda Lesioni personali di lieve o moderata entità - Posizionare la pompa in modo tale che le persone non possano accidentalmente venire a contatto con le superfici calde.
- Page 76 3.3 Isolamento del corpo pompa 4. Installazione elettrica PERICOLO Scossa elettrica Morte o gravi lesioni personali - Prima di iniziare a lavorare sul prodotto, disinserire l'alimentazione. Assicurarsi che l'alimentazione elettrica non possa essere ripristinata accidental- Fig. 6 Isolamento del corpo pompa mente.
- Page 77 4.1 Montaggio della spina Fase Azione Illustrazione Fase Azione Illustrazione 0,5 - 1,5 mm Montare il passa- 12 mm Avvitare il passa- cavo e la coper- cavo sulla spina di tura della spina alimentazione. del cavo. Spellare i conduttori del 7 mm cavo come illu- strato.
- Page 78 4.2 Smontaggio della spina 5. Avviamento del prodotto 5.1 Prima dell'avviamento Fase Azione Illustrazione Non avviare la pompa finché l'impianto non è stato riempito e sfiatato. Assicurarsi che la pressione di aspirazione minima richiesta sia sufficiente sull'aspirazione della pompa. Vedi sezione 9.
- Page 79 5.3 Sfiato della pompa 5.4 Sfiato dell'impianto di riscaldamento 10 Min. 10 Min. Fig. 8 Sfiato della pompa Fig. 9 Sfiato dell'impianto di riscaldamento La pompa viene sfiatata automaticamente attraverso l'impianto. Sfiatare l'impianto di riscaldamento tramite una valvola di sfogo Non è...
- Page 80 6. Presentazione del prodotto 6.1 Descrizione del prodotto Max. 95 % RH IPX4D Min./Max. +2 °C / +110 °C Max. 1.0 MPa (10 bar) Fig. 12 Tipo di modello sulla targhetta di identificazione 6.2 Applicazioni Min./Max. 0 °C / +40 °C La pompa è...
- Page 81 6.3 Liquidi pompati 6.4 Identificazione Negli impianti di riscaldamento, l’acqua deve rispondere agli 6.4.1 Targhetta di identificazione standard del settore relativi alla qualità dell’acqua, come ad es. la norma tedesca VDI 2035. La pompa è adatta per i seguenti liquidi: •...
- Page 82 6.4.2 Codice modello 7.3 Segmenti luminosi indicanti l'impostazione della pompa Esempio ALPHA1 25 -40 N 180 La pompa presenta nove opzioni di impostazione che possono essere selezionate con il pulsante (5). Vedi fig. 14. Mod. pompa [ ]: Versione standard Le impostazioni della pompa sono indicate da nove segmenti luminosi sul display.
- Page 83 7.5 Modalità di regolazione 7.5.2 Impostazione pompa in impianti monotubo di riscaldamento 7.5.1 Impostazione pompa in impianti di riscaldamento bitubi Fig. 18 Selezione impostazione pompa per tipo di impianto Impostazione pompa consigliata e alternativa, come da fig. 18: Impianto di Impostazione pompa riscalda- Consigliata...
- Page 84 7.5.3 Impostazione pompa per impianti di riscaldamento a 7.5.4 Impostazione pompa in impianti di acqua calda pavimento. sanitaria Fig. 20 Selezione impostazione pompa per tipo di impianto Fig. 22 Selezione impostazione pompa per tipo di impianto Impostazione pompa consigliata e alternativa, come da fig. 20: Impostazione pompa consigliata e alternativa, come da fig.
- Page 85 7.6 Prestazioni della pompa Relazione tra l'impostazione e le prestazioni della pompa. La figura illustra, mediante curve, la relazione tra l'imposta- zione della pompa e le sue prestazioni. Vedi anche sezione 10. Curve di prestazione. Fig. 24 Rapporto tra l'impostazione della pompa e le sue prestazioni Impostazione Curva della pompa Funzione...
- Page 86 8. Ricerca di guasti nel prodotto PERICOLO Scossa elettrica Morte o gravi lesioni personali - Prima di iniziare a lavorare sul prodotto, disinserire l'alimentazione. Assicurarsi che l'alimentazione elettrica non possa essere ripristinata accidental- mente. ATTENZIONE Impianto pressurizzato Lesioni personali di lieve o moderata entità - Prima di smontare la pompa, svuotare l'impianto o chiudere le valvole di intercettazione su entrambi i lati della pompa.
- Page 87 9. Dati tecnici 9.1 Dati e condizioni di funzionamento Tensione di alimentazione 1 x 230 V ± 10 %, 50 o 60 Hz, PE Protezione del motore La pompa non richiede alcuna protezione esterna del motore. Grado di protezione IPX4D Classe di isolamento Umidità...
- Page 88 9.2 Dimensioni Disegni dimensionali e tabella delle dimensioni. Fig. 25 Modello ALPHA1 B Dimensioni Mod. pompa ALPHA1 15-40 ALPHA1 15-50* ALPHA1 15-60 ALPHA1 15-80 ALPHA1 25-40 G1 1/2 ALPHA1 25-40 N G1 1/2 ALPHA1 25-40 G1 1/2 ALPHA1 25-40 N G1 1/2 ALPHA1 25-50* G1 1/2...
- Page 89 10. Curve di prestazione 10.1 Guida alle curve di prestazione Ogni impostazione della pompa presenta una propria curva di prestazione. Ad ogni curva di prestazione appartiene una curva di potenza, P1. La curva di potenza indica l'assorbimento di potenza della pompa in Watt, in corrispondenza di una determinata curva di prestazione.
- Page 90 10.3 Curve di prestazione, ALPHA1, XX-40 (N) Q [m³/h] Q [m³/h] Fig. 27 ALPHA1, XX-40 Impostazione Min. 0,04 Max. 0,18...
- Page 91 10.4 Curve di prestazione, ALPHA1, XX-50 (N) Q [m³/h] Q [m³/h] Fig. 28 ALPHA1, XX-50 Impostazione Min. 0,04 Max. 0,24...
- Page 92 10.5 Curve di prestazione, ALPHA1, XX-60 (N) 0.0 0.2 0.4 0.6 0.8 1.0 1.2 1.4 1.6 1.8 2.0 2.2 2.4 2.6 2.8 3.0 Q [m³/h] 0.0 0.2 0.4 0.6 0.8 1.0 1.2 1.4 1.6 1.8 2.0 2.2 2.4 2.6 2.8 3.0 Q [m³/h] Fig.
- Page 93 10.6 Curve di prestazione, ALPHA1, XX-80 (N) Q [m³/h] Q [m³/h] Fig. 30 ALPHA1, XX-80 Impostazione Min. 0,04 Max. 0,44...
- Page 94 11. Accessori 11.1 Bocchettoni Codici prodotto, bocchettoni Valvola a sfera Dado di rac- Dado di raccordo con Valvola a sfera con filet- Dado di raccordo con raccordi a cordo con filet- filettature interne tature interne raccordo a com- saldare tature esterne pressione ∅22 ∅28...
- Page 95 • 5 % deposito. Smaltire questo prodotto, o parti di esso, nel rispetto dell'ambiente e conformemente alle normative locali. Vedi anche le informazioni fine vita di ciclo utile sul sito www.grundfos.com/product-recycling. Fig. 32 Gusci isolanti 11.3 Spine ALPHA Codice Pos.
- Page 99 Unit 1, Ground floor Turkey Av. Humberto de Alencar Castelo Branco, Siu Wai Industrial Centre GRUNDFOS Pumper A/S GRUNDFOS POMPA San. ve Tic. Ltd. Sti. 29-33 Wing Hong Street & Strømsveien 344 Gebze Organize Sanayi Bölgesi CEP 09850 - 300...
- Page 100 99352881 0118 ECM: 1226637 www.grundfos.com...
Need help?
Do you have a question about the ALPHA1 model B and is the answer not in the manual?
Questions and answers