JCM GEN5 Manual
Hide thumbs
Also See for GEN5:
- Operation and maintenance manual (70 pages) ,
- Quick reference manual (23 pages)

Related Manuals for JCM GEN5


Summary of Contents for JCM GEN5
- Page 1 September, 2017 TRAINING ® OVERVIEW GEN5 Printer ™ Phone (800) 683-7248 (702) 651-0000 Fax (702) 651-0214 E-mail support@jcmglobal.com www.jcmglobal.com ® © 2017 JCM American Corporation Part No. 960-000193R_Rev. A...
-
Page 2: Table Of Contents
Printing a Configuration Ticket ............... 10 JCM Printer Basic Driver ............11 About GEN5 Firmware ............13 GEN5 Firmware Identification ..............13 GEN5 Firmware Identification (IGT) ............13 USB Firmware Types ................13 Using the JCM DFU Downloader ......... 14 BlueWaveDX Tool Download ..........16 Setup for the BlueWaveDX Tool.............. -
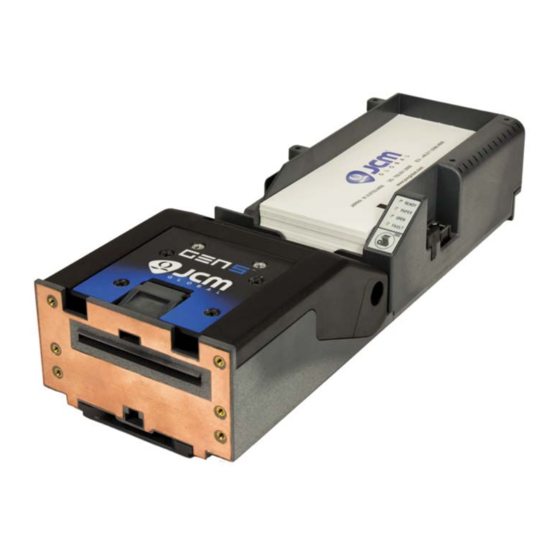
Page 3: Overview
Table 1 GEN5 Printer Versions Device Version Difference PSA-66-ST5 RS-232, Netplex, USB NOTE: The GEN5 protocol is configured with Firmware. The firmware determines the protocol and speed. GEN5 P RINTER Figure 1 illustrates the GEN5 Printer Unit. Figure 1 Typical GEN5 Printer Unit NOTE: For GEN5 Printer Component Locations, refer to page 4. -
Page 4: Component Locations
(Figure 2 j) adjacent to the USB Update Port (Figure 2 k). The DIP Switches are used to set operational parameters, and vary by manufacturer. NOTE: To verify the correct DIP Switch settings for the GEN5 Printer Unit, refer to the Software Information Sheet for the Manufacturer and installed Firmware version. -
Page 5: Cleaning Procedures
Wipes, Cleaning Swabs, and feed-through Cleaning Cards. Figure 3 JCM Printer Cleaning Kit (P/N 350-00292-100) NOTE: GEN5 Printer Sensor Cleaning Methods are listed in Table 2 below. Refer to Figure 4 on the following page for Sensor locations. Table 2 GEN5 Printer Sensor Cleaning Methods... - Page 6 4. Rotate the Print Head Release Lever (Figure 5 a) leftward, then gently press down on the Lever to lower the Print Head. Figure 5 GEN5 Print Head Release Lever 5. Wipe the Print Head surface clean using a new cleaning swab (refer to Figure 6 page 7).
- Page 7 Rollers (Figure 7 b), turn the Rollers by hand while wiping them with a new Clean- ing Wipe or a clean Microfiber cloth (slightly dampened with Isopropyl Alcohol). Figure 7 Clean Print Head Rollers and Feed Rollers Part No. 960-000193R_Rev. A © 2017 JCM American Corporation...
-
Page 8: Cleaning Card Procedure
September, 2017 LEANING ROCEDURE The Cleaning Card can be used for a quick cleaning of the GEN5 Print Head and Paper Path. NOTE: Make sure the Printer’s Power Supply is properly connected. To use the Cleaning Card, follow this procedure: 1. -
Page 9: Gen5 Communications
To disable the GEN5 Printer’s Ticket Low Sensor, proceed as follows: 1. Pull the Ticket (Figure 9 a) out of the GEN5 Printer Ticket In Slot (Figure 9 b). 2. Press the Upper Lid Release Lever (Figure 9 c) toward the rear of the GEN5 Printer to open the Upper Lid. -
Page 10: Printing A Configuration Ticket
ONFIGURATION ICKET To print a Ticket with the current Configuration and Firmware information, proceed as follows: 1. Ensure Ticket Paper is loaded into the GEN5 Printer. 2. Press the Button twice within two (2) seconds to print the FEED Configuration Ticket (refer to Figure 9 on page 9). -
Page 11: Jcm Printer Basic Driver
JCM® Training Overview GEN5™ Printer JCM PRINTER BASIC DRIVER The JCM Printer Basic Driver is used to test and troubleshoot the GEN5 Printer. To test the GEN5 Printer, proceed as follows: 1. Remove power from the GEN5 Printer Unit. 2. Connect the GEN5 Printer to a PC using the Evaluation Harness DB-9 Connector. - Page 12 (not shown). When the condi- Active tion is cleared, the highlight disappears from the display. Printer Status Figure 11 JCM Printer Basic Driver Printer Status Section Lecture Notes Part No. 960-000193R_Rev. A © 2017 JCM American Corporation...
-
Page 13: About Gen5 Firmware
† Refer to Table 5 for USB Firmware Type descriptions. GEN5 F (IGT) IRMWARE DENTIFICATION GEN5 Printer Firmware for IGT is identified as shown in Table 4 below. Table 4 GEN5 Firmware Identification (IGT) Identifier Example Printer Type - First two characters 'G5' = GEN5 e.g., 'G5'... -
Page 14: Using The Jcm Dfu Downloader
4. If no Printer is detected, Drivers will need to be installed. (Drivers are installed automatically when the Printer is connected to a PC.) NOTE: If Printer Drivers need to be installed manually, contact JCM Technical Support at (800) 683-7248. - Page 15 14). Full Upgrade 9. When the Printer status indicates (Figure 13 ***Printer Successfully Updated.*** a), the Firmware Update is complete. Figure 13 JCM DFU Downloader Firmware Update Complete Lecture Notes Part No. 960-000193R_Rev. A © 2017 JCM American Corporation...
-
Page 16: Bluewavedx Tool Download
BLUEWAVE™DX DOWNLOAD The JCM offers an alternate method for BlueWave™DX Tool (P/N 214780) updating the Firmware on the GEN5 Printer. To do so, proceed as follows: DX T ETUP FOR THE 1. Within the BlueWaveDX Tool’s root directory, create a new folder... -
Page 17: Bezel Led Indications
Slow Blink Paper Low or Printer Error Fast Blink Ticket Printing/Ticket in Chute Printer Power is OFF STATUS LED INDICATIONS The Status LEDs will indicate the operational state of the GEN5 Printer. Table 7 Status LED Indications Ready Paper Open Fault... -
Page 18: Error Conditions
Index Mark is rotated 180 degrees). Results when the Printer detects an error in the Open the Printer Head and Paper Jam Paper Path. inspect the Paper Path for a Jammed Ticket. Lecture Notes Part No. 960-000193R_Rev. A © 2017 JCM American Corporation... -
Page 19: Maintenance Equipment
Cleaning Kit 150-00013-100 Evaluation Harness 350-00258-100 24VDC Power Supply 302-100010R USB Cable Male A to Male B 302-100004R USB to Serial Adapter JU-H30812-S1 4 Port Hub 214780 BlueWave™DX (DT-300) Unit Lecture Notes Part No. 960-000193R_Rev. A © 2017 JCM American Corporation... -
Page 20: Personal Notes And Comments
"JCM American Corporation has been accredited as an Authorized Provider by the International Association for Continuing Education and Training (IACET)” JCM is a registered trademark of JCM American Corporation. All other product names mentioned herein may be registered trademarks or trademarks of their respective companies.
Need help?
Do you have a question about the GEN5 and is the answer not in the manual?
Questions and answers