Table of Contents
Advertisement
Quick Links
Advertisement
Table of Contents

Subscribe to Our Youtube Channel
Related Manuals for X-Rite 552


Summary of Contents for X-Rite 552
- Page 1 S P E C T R O P H O T O M E T E R Getting Started...
- Page 3 Model No.: Directive(s) Conformance: EMC 89/336/EEC LVD 73/23/EEC RoHS/WEEE X-Rite products meet the Restriction of Hazardous Substances (RoHS) Directive 2002/95/EC and European Union – Waste Electrical and Electronic Equipment (WEEE) Directive 2002/96/EC. Please refer to www.xrite.com more information on X-Rite’s compliance with the RoHS/WEEE directives.
- Page 4 FCC (USA)sur l'émission. WARNING: This instrument is not for use in explosive environment. CAUTION: Operational hazard exists if battery charger other than X-Rite SE30-177 (100- 240V) is used. Use only X-Rite battery pack SE15-26, other types may burst causing personal injury.
-
Page 5: Table Of Contents
Getting Started This document is designed to get you familiarized with your 552 Spectrophotometer. If you need any further instructions or information, you can find a complete Operator's Manual in a Portable Document Format (PDF) file on the CD that is shipped with your instrument. -
Page 6: What To Do First
Remove the instrument from the shipping carton. Be sure to keep the original carton. If shipment is necessary, the instrument should be packaged in the original carton. Contact X-Rite if you need a new shipping carton. · Inspect the instrument for any damage. If any damage occurred during shipment, immediately contact the transportation company. -
Page 7: Charge The Battery Pack
Charge the Battery Pack Only use the AC Adapter supplied or the optional battery charger (X-Rite P/N 500CHG). The battery pack must remain in the instrument at all times to operate. Before initial “remote” use of the instrument, charge the battery pack for approximately three hours. -
Page 8: Instrument Description & Features
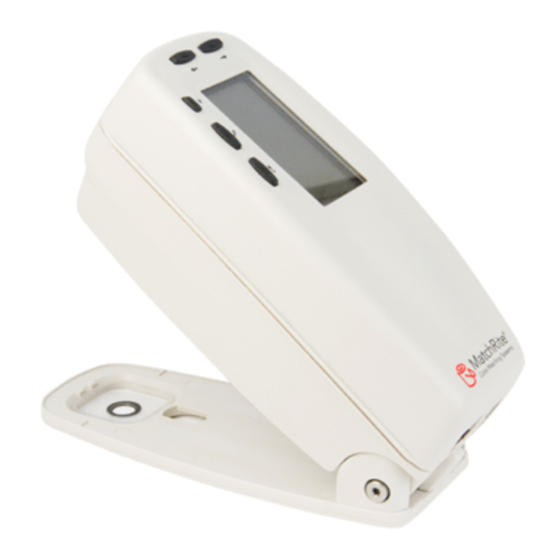
G E T T I N G S T A R T E D Instrument Description & Features The 552 Spectrophotometer is used to measure and store sample color readings. When samples are stored, the instrument is used in conjunction with a ColorDesigner software package. -
Page 9: Measure Mode Screens
5 5 2 S P E C T R O P H O T O M E T E R Tab Down key – advances the highlighted bar (reverse image) to the next available “tab stop.” A “tab stop” indicates an item that can be acted on further, such as a measurement or a setting option. - Page 10 G E T T I N G S T A R T E D Bedroom Pressing the Enter # key when (user defined Door Trim location name) or (user defined sample name) is highlighted provides access to the location names or sample names stored in the instrument. §...
-
Page 11: Using The Instrument
5 5 2 S P E C T R O P H O T O M E T E R Using the Instrument Opening a Mode or Menu Opening a mode or menu gives you access to additional items related to the menu or specific information for a mode. –... -
Page 12: Using The Location/Sample Editor
G E T T I N G S T A R T E D N e w L o c a t i o n N a m e A - H C l e a r Editor ¯ o o o o o o o o o 0 0 0 0 0 0 0 0 0 0 ¯... -
Page 13: Important Measurement Techniques
5 5 2 S P E C T R O P H O T O M E T E R Important Measurement Techniques The variety of items that the instrument can measure is almost endless. However, to obtain accurate and repeatable measurements, the bottom of the shoe must be on the surface to be measured. -
Page 14: Calibrating The Instrument
G E T T I N G S T A R T E D Calibrating the Instrument Under normal circumstances, the instrument should be calibrated at least once a day. The calibration procedure consists of a white cal reading. Make sure the calibration reference is clean before use. Carefully clean the ceramic disk with a dry, lint-free cloth. -
Page 15: Configuring The Instrument
5 5 2 S P E C T R O P H O T O M E T E R Configuring the Instrument You may set up your instrument according to your specific needs. This is done through the Configuration menu. The top level configuration menu has three main option categories that access several sub menus. - Page 16 G E T T I N G S T A R T E D Security Enables (on) or disables (off) the entire Configuration options menu. See following steps to access the Configuration menu when Security is enabled. To gain access to the Configuration menu if Security is enabled: 1.
-
Page 17: User Dialog Error Messages
5 5 2 S P E C T R O P H O T O M E T E R Error Messages Errors encountered during a measurement are displayed on the instrument screen. All errors are accompanied by a long beep and flashing yellow light. - Page 18 G E T T I N G S T A R T E D...
- Page 20 Fax (+41) 44 842 22 22 Corporate Headquarters - Asia Room 808-810 Kornhill Metro Tower, 1 Kornhill Road Quarry Bay, Hong Kong Phone (+852) 2 568 6283 Fax (+852) 2 885 8610 Please visit www.xrite.com for a local office near you. P/N 552-601 Rev. H...
Need help?
Do you have a question about the 552 and is the answer not in the manual?
Questions and answers