Korenix JetBox 8100 Quick Installation Manual
Industrial communication computer
Hide thumbs
Also See for JetBox 8100:
- User manual (33 pages) ,
- User manual (50 pages) ,
- User manual (9 pages)

Subscribe to Our Youtube Channel
Related Manuals for Korenix JetBox 8100


Summary of Contents for Korenix JetBox 8100
- Page 1 JetBox 8100 Industrial Communication Computer Quick Installation Guide Tel:+886-2-82193000 Fax:+886-2-82193300 Business service:sales@korenix.com Customer service:koreCARE@korenix.com www.korenix.com V1.0 CPQ000B8100000...
-
Page 2: Packing List
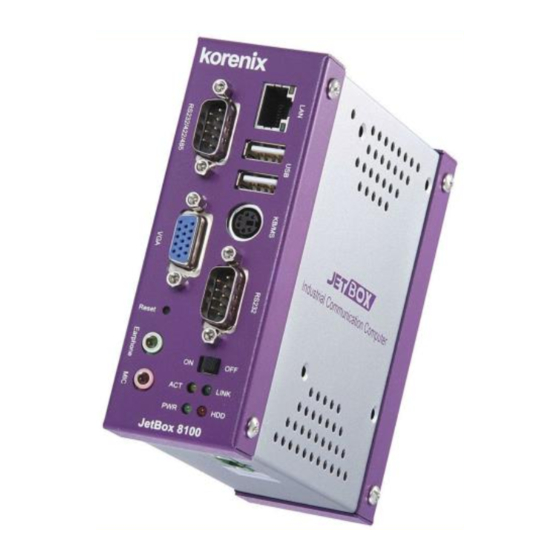
Power Connector: JetBox 8100 Connect the DC power line to JetBox 8100’s DC terminal block and turn on the power switch. PS/2 Keyboard/Mouse adapter cable If there power is properly supplied, the power LED will show a solid Green color when the OS 2-pin terminal block is ready. - Page 3 If you are installing hardware option, you can remove the rear panel and bottom cover. The following figure will guide you how to install 2.5" HDD inside the JetBox 8100 and how to install the JetBox 8100 fixers.
- Page 4 2.5” HDD JetBox 8100 DC ACT : LED ( LINK LINK: LED ( PWR: LED ( HDD: LED ( : CF 3.3V CF Micro / (master/slave) slave master/slave COM 1 COM 2 BIOS RS-232 ,RS-422 RS-485 JetBox8100 2.5" RS-485 JetBox...
- Page 5 Verpackungsinhalt Power Connector / Stromstecker: JetBox 8100 Schließen Sie ein DC Stromkabel an dem JetBox 8100 DC Terminalblock an und drücken Sie PS/2 Tastatur/Maus Adapterkabel den Stromknopf. Bei richtigem Anschluss und wenn das BS bereit ist, leuchtet Strom LED 2-pin Anschlussblock permanent rot.
-
Page 6: Vue D'ensemble
Vermeiden Sie dieselbe Master/Slave Einstellung am IDE Anschluss, wenn Sie gleichzeitig CF und HDD Festplatte benutzen. Um Komponenten im den JetBox 8100 zu zufügen oder zu entfernen, entfernen Sie das Industrial Communication Computer hintere und das Bodenpaneel. Die folgende Skizze zeigt die Montage einer HDD Festplatte Reset 2,5’’... - Page 7 Connexion Alimentation : Si vous installez un module Compact Flash, vous avez besoin d'enlever la face de devant. L’alimentation DC du JetBox 8100 se raccorde par un bornier et la mise en fonctionnement (S'il vous plaît faites référence au diagramme dessous.) se fait par interrupteur.
- Page 8 El embalaje del equipo incluye Conector de alimentación: JetBox 8100 Conectar el cable de alimentación DC al terminal de entrada del JetBox 8100 y encender el Cable adaptador PS/2 Teclado/Mouse interruptor. Si la alimentación es correcta y el sistema operativo se encuentra instalado, se Terminal de 2 pins iluminará...
- Page 9 Para añadir o desinstalar hardware en el JetBox 8100, retire el panel posterior y la tapa inferior. La figura siguiente indica cómo instalar el disco duro de 2,5” en el JetBox-8100.
- Page 10 LINK 1 2 3 4 5 Pin No# RS-232 RS-422 RS-485 RxD-(A) Data-(A) RxD+(B) Data+(B) 6 7 8 9 TxD-(A) TxD+(B) 6 8 10 6 8 10 6 8 10 RS-232 Factouy Default RS-485 RS-422 6 8 10 6 8 10 6 8 10 Pin 1,2 Close:Terminator Pin 1,3 Close:Terminator...
- Page 11 JetBox 8100 JetBox 8100 DC PS/2 ×4 ×3 ACT : LAN LED ( LINK LINK: :LAN LED ( ) CD-ROM PWR: LED ( ) Overview HDD: HDD LED ( ) COM 1 COM 2 BIOS COM1 RS-232/RS-422/RS-485 RS-485 1 2 3 4 5...
- Page 12 3.3V close CF IDE JetBox 8100 JetBox 8100 JetBox8100 fixers...
Need help?
Do you have a question about the JetBox 8100 and is the answer not in the manual?
Questions and answers