Table of Contents
Advertisement
Quick Links
JetBox 5300‐w Quick Installation Guide
Packing List
•JetBox 5300‐w
•Serial cable (RJ45 to DB9 male, 150cm) x1
•Attached 4‐pin power terminal block
•Attached 10‐pin DIO terminal block
•Attached blanket to cover SD card slot
•Quick installation guide
•Documentation and software CD‐ROM
Overview
Dimension: 66(D) x149(H) x 120.5(W) mm
Net weight: 800g
Operating Temp:
‐40 ~ 80 ℃, 5 to 95% RH
JetBox 5300-w QIG v0.8
1
Advertisement
Table of Contents

Related Manuals for Korenix JetBox 5300 w


Summary of Contents for Korenix JetBox 5300 w
- Page 1 JetBox 5300‐w Quick Installation Guide Packing List •JetBox 5300‐w •Serial cable (RJ45 to DB9 male, 150cm) x1 •Attached 4‐pin power terminal block •Attached 10‐pin DIO terminal block •Attached blanket to cover SD card slot •Quick installation guide •Documentation and software CD‐ROM Overview Dimension: 66(D) x149(H) x 120.5(W) mm Net weight: 800g Operating Temp: ‐40 ~ 80 ℃, 5 to 95% RH JetBox 5300-w QIG v0.8...
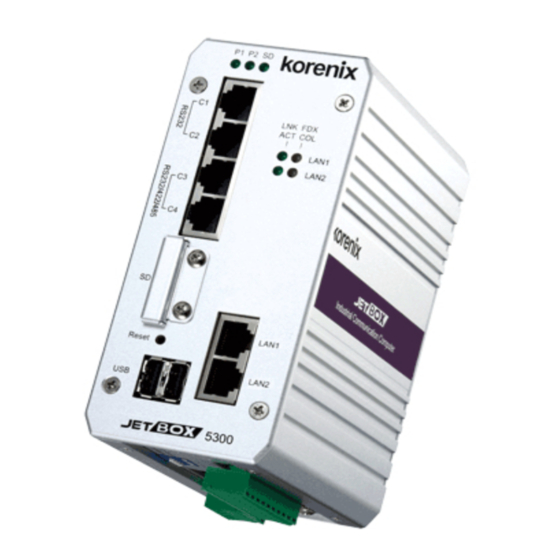
- Page 2 JetBox 5300‐w Quick Installation Guide DIN rail Mount: The aluminum DIN rail attachment on the back of JetBox 5300‐w is used to snap into the DIN rail plate. Interfaces: 2 x 10/100 Based‐Tx 2 x USB 2.0 (Host) 2 x RS232/422/485 and 2 x RS232 4 x DI and 4x DO LED per unit: Power On/off x2 (Green on/off) SD card x1 (Green plug/unplug) LED per port: Link/Activity x2 (Green on/Green blinking) Full Duplex/ Collision x2 (Orange on/ Orange blinking) Power Supply: DC input: 12 ~ 48 V dual inputs with reverse protection and redundancy Power consumption: 6.5W Notice: Improper power input will damage the device. Hardware Interface Power switch On/Off Power Connector: Connect the DC power line to the DC terminal block at the bottom of JetBox 5300‐w and turn on the power switch. If the power is properly supplied, the power LED (P1 or P2 or both) on the front panel will show a solid green color. JetBox 5300-w QIG v0.8...
- Page 3 JetBox 5300‐w Quick Installation Guide COM port with RJ45 connector COM1: Full RS232 COM2: Half RS232 COM3: Half RS232/422/485 COM4: Half RS232/422/485 Long Range Termination Switch Four Digital inputs: Low (0V), High (2~5V) DI max input current = 5uA Four Digital outputs: Low (0V), High (2.5~3.3V) Max. 24mA@3V ★Notice: Over voltage current for digital input will damage JetBox. Grounding Connecting grounding screw to the earth ground will help to reduce the interference of noise. JetBox 5300-w QIG v0.8...
- Page 4 JetBox 5300‐w Quick Installation Guide Software Specifications (Linux2.6.21) The entire JetBox 5300‐w system can be controlled by SNMP Device Drivers: SD Card, USB, Watchdog Timer, UART, Ethernet Linux Tool Chain: Gcc, uClibc Serial service modes: TCP server Management Interface On a standard PC Host with Windows Operation system, follow the steps to login into Linux interface of JetBox 5300‐w Go to Start| Run, type in “cmd” and then press Enter. Telnet JetBox 5300‐iw IP address (the default IP address of LAN port is 192.168.10.1) ★Note: the PC and JetBox 5300‐w need to be in the same network IP area. Enter the username and password for login. The default username is root and no password. System upgrade The system can be updated through TFTP server. It takes a few minutes depending on the file size. Copyright@2010 Korenix Technology Co., Ltd. All rights reserved. Reproduction without permission is prohibited. Specification subjects to change without notice. Customer Service: KoreCARE@korenix.com JetBox 5300-w QIG v0.8...
Need help?
Do you have a question about the JetBox 5300 w and is the answer not in the manual?
Questions and answers