SAFERA Aurora PCU6.3-F Installation Manual
Stove guard
Hide thumbs
Also See for Aurora PCU6.3-F:
- User and installation manual (32 pages) ,
- Installation manual (28 pages) ,
- Installation manual (15 pages)

Related Manuals for SAFERA Aurora PCU6.3-F


Summary of Contents for SAFERA Aurora PCU6.3-F
- Page 1 PCU6.3-F PCU6.1-F PCU6.1-P PCU6.3-P PCU6.1-S Installation manual Safera Aurora Stove Guard For PCU software versions x.x.18 and onwards 22026_01-A...
-
Page 2: Table Of Contents
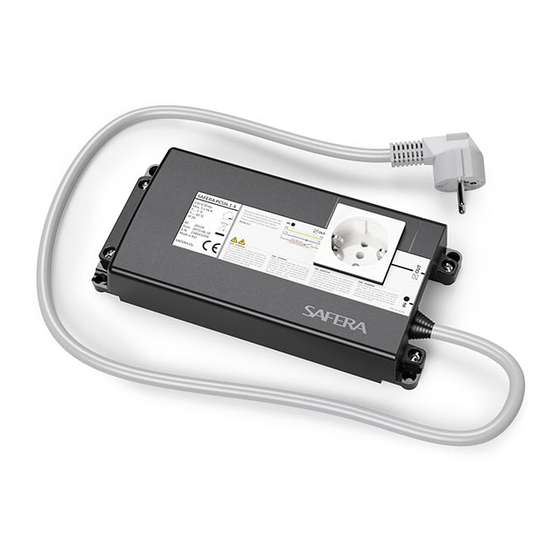
ѥ WARNING ❹ Compatibility Follow instructions marked with a ❸ warning accurately to prevent injury Safera Stove Guard is compatible with to persons and damage to property. most electrical cookers, hobs and ovens meant for household use: ⚐ ATTENTION •... - Page 3 2. Installation - Step 1/3 Mount the Power Control Unit Ⓒ Install the power control unit Ⓒ according to the following instructions. PCU6.3-F PCU6.1-P Fixed 3-phase connection. 1-phase, 3-pin plug OUT. See pages 6-7. See pages 12-13. PCU6.3-P PCU6.1-S Perilex-connectors. Schuko-connectors.
- Page 4 PCU6.3-F - Installation Fixed 3-phase connection. 78 mm 60 mm 225,5 mm 42 mm Optional AUX and water sensor connections. MICRO DISCONNECTION See chapter 5. ѥ WARNING Do not install the power control unit 5 x 2,5 mm where it will be exposed to excessive Make sure that there is no power sup- heat: See operational ambient tem- ply to the cooker and the oven by re-...
- Page 5 PCU6.3-P - Installation 3-phase, Perilex-connectors. Mount the power con- trol unit Ⓒ on the wall behind the cooker or into the cabinet next to the cooker. 225,5 mm 51 mm + Perilex MICRO DISCONNECTION ѥ WARNING Do not install the power control unit where it will be exposed to excessive Make sure that there is no power sup- heat: See operational ambient tem-...
-
Page 6: Installation
PCU6.1-F - INSTALLATION Fixed 1-phase connection. 78 mm 60 mm Optional AUX and water sensor connections. 225,5 mm See chapter 5. 42 mm 230 V MAX. 25 / 32 A * MICRO DISCONNECTION * Check specifications on the cover of the power control unit. ѥ... - Page 7 PCU6.1-P - Installation 4xA A 1-phase, 3-pin plug. Optional AUX and water sensor connections. See chapter 5. 226 mm 40 mm 230 V MAX. 25 / 32 A * MICRO DISCONNECTION * Check specifications on the cover of the power control unit. Connect the stove with 3-pin...
- Page 8 PCU6.1-S - Installation 1-phase, Schuko-connectors. Mount the power control unit Ⓒ on the wall behind the cooker or into the cabinet next to the cooker. 225,5 mm Optional AUX and water sensor connections. See chapter 230 V MAX. 16 A MICRO DISCONNECTION ѥ...
- Page 9 2. Installation - Step 2/3 Mount the Sensor unit Ⓐ Notice the sensor direction and viewing angle: Ensure that there are no obstacles blocking the sensor view: ѥ WARNING Ensure that the sensor unit has clear line of sight to the whole cooktop and that Example 1: there are no obstacles blocking its view.
- Page 10 Max. 2,6 m (1:3) installation instruction on pages 18-19. installation instruction on pages 20-21. ѥ WARNING ѥ WARNING Safera Aurora is compatible with Safera Aurora is compatible with cookers no wider than 90 cm. cookers no wider than 90 cm.
- Page 11 Sensor installation Install the mounting bracket Leveled ceiling 0...5° 1. Remove the mounting bracket Ⓑ from the sensor unit Ⓐ (see user manual 4.3). Cooker width max. 90 cm 2. Install the mounting bracket Ⓑ in the selected mounting location and loosely tighten the mounting screws.
- Page 12 Sensor installation Install the mounting bracket Sloped ceiling 5...18° (1:3) 1. Remove the mounting bracket Ⓑ from the sensor unit Ⓐ. Cooker width max. 90 cm 2. Install the mounting bracket Ⓑ in the selected mounting location and loosely tighten the mounting screws. 3.
- Page 13 2. Installation - Step 3/3 Setup the stove guard Mount the sensor unit on the mounting bracket Remove the battery slip from the sensor unit Ⓐ Ⓑ Ⓐ Mount the sensor unit Ⓐ on the mount- ing bracket Ⓑ by a) guiding it to the four pins and then b) sliding it gently towards the sensors until the unit is...
-
Page 14: Installation Troubleshooting
3. Installation Troubleshooting 4. Manual adjustment mode To enable the fast installation, the default settings of Safera Aurora are suitable for Problem Remedy the most typical installations. In case you need to install the sensor unit outside the Problems with checking •... - Page 15 4.3 Mode 3: Manual calibration of the cooker type Table 2. The new alarm limit is indicated as shown in the table below: Color of the indicator light ❹ Number of beeps Alarm Limit When the indicator light ❹ is blinking yellow-green, you may manually calibrate the •••...
-
Page 16: Optional Features
When the indicator light ❹ is blinking white (normal AUX-mode) or blinking red (in- versed AUX-mode, see chapter 5.1.), you may: 5.1 AUX-connection (optional) Safera PCU6.3 and PCU6.1 power control units Ⓒ are equipped with two auxiliary out- • Test the AUX-connection (default is OFF): put signals AUX1 and AUX2 compatible with most automation and security systems. - Page 17 • Simple ON/OFF information for a fault condition. This can be read directly when tery operated external clients. However, it will not affect the Safera system's own both AUX1 and AUX2 are connected in series to the same line. battery life.
-
Page 18: Water Leakage Sensor
5.2 Water leakage sensor (optional) Stove Guard can be equipped with max. four Safera water leakage sensors. The sensors are placed in the typical leak- age areas, e.g. under the dishwasher or sink. Attach the sensors Ⓕ in place. Attach the plug Ⓖ of the leakage sensor to the power control unit Ⓗ.
Need help?
Do you have a question about the Aurora PCU6.3-F and is the answer not in the manual?
Questions and answers