PICO Neo 2 Series User Manual
Virtual reality all-in-one headset
Hide thumbs
Also See for Neo 2 Series:
- User manual (53 pages) ,
- User manual (38 pages) ,
- Quick start manual (4 pages)
Advertisement
Available languages
Available languages
Quick Links
Advertisement

Related Manuals for PICO Neo 2 Series


Summary of Contents for PICO Neo 2 Series
- Page 1 A New Reality Virtual Reality All-In-One Headset USER GUIDE ユーザガイド 사용 설명서...
- Page 2 USER GUIDE ユーザガイド 사용 설명서...
- Page 3 User Guide USB-C 2.0 1 USB-C...
- Page 4 • • • • • • • • •...
- Page 7 • • • • • • • • •...
- Page 8 • • • • • • •...
- Page 9 HOME • • • • •...
- Page 10 • • • • • • •...
- Page 11 • • • •...
- Page 12 • • • • • • • • • • • • • • • • • • • •...
- Page 13 • • • • • • • • • • • • • • • • • • • • • • • • • • •...
- Page 14 • • • •...
- Page 15 © • • • • https://www.pico-interactive.com/terms/user_terms.html https://www.pico-interactive.com/terms/privacy.html service@picovr.com www.pico-interactive.com 400-6087-666 A7 10/A7 10/A7...
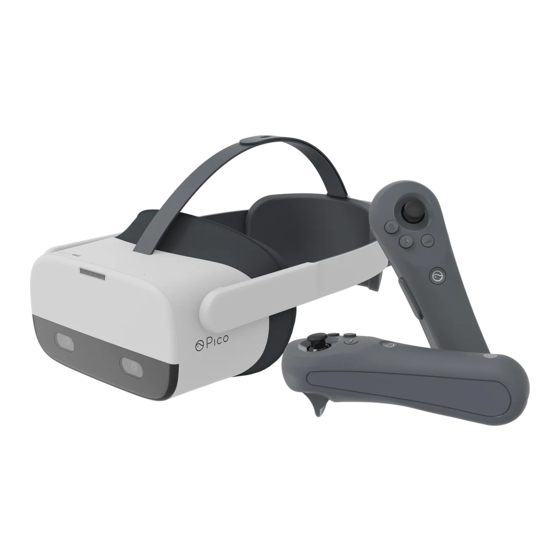
- Page 16 In The Box VR Headset USER GUIDE For Pico Neo 2 Series Controller User Guide AC Adapter User Guide USB-C 2.0 Data Two-in-one Controller Lens Cleaning Cable USB-C Controller Lanyard Cloth Charging Cable...
- Page 17 6 Degrees of Freedom VR Important Health & Safety Notes The device can track your translational and rotational movements in all directions • This product is designed and intended to be used in an open and safe indoor (up/down, left/right, forward/backward, pitch, roll, and yaw). Your movements in area, free of any tripping or slipping hazards.
- Page 18 Quick Guide Power on the Controller Power on the VR Headset Press the HOME button for 1 second. Press the POWER button for 2 seconds. The status indicator will flash blue once powered on. The status indicator will be a steady blue once powered on.
- Page 19 Wearing VR Headset Adjust the Wearing Position Turn the strap dial counter clockwise to loosen the VR Headset. Rotate the strap down over your head. Turn the strap dial Rotate the strap up to ensure the enough space for head. clockwise to tighten the VR Headset in a comfortable position.
- Page 20 Pico Neo 2 VR Headset Details Proximity Sensor The system wakes up when VR Headset is put on, Left Speaker Right Speaker 3.5mm Power Jack Face Cushion 2nd Mic versions and regions Removable Top Strap Removable and three steps adjustable...
- Page 21 • Head Control Mode • The VR Headset adjustment If the Controller is not connected, you can interact with the home screen by This device has no myopia adjustment function. The VR Headset allows wearing moving your head to direct the crosshairs over your intended selection and most standard glasses with a frame width of less than 160mm.
- Page 22 Left Right Left Right Thumbstick Clickable TRIGGER Button Confirm APP/BACK Button Return previous screen Can be set as other functions in specific applications. GRIP Button HOME Button Grab • Power on: short press • 6 seconds • Reset: long press for 16 seconds •...
- Page 23 • Thumbstick operation • Switch the pointer of the master Controller Four directions are available for page-turning; Pressing down is available. In the home screen, short press the TRIGGER button of the corresponding Con- troller to switch the pointer of the master Controller. •...
-
Page 24: Product Care
Please contact customer surface of the product until the surface is wet and wait at least 5 minutes, then service at service@picovr.com, or a Pico authorized service provider or your dry the surface with a microfiber dry cloth. -
Page 25: Safety Warnings
Safety Warnings if you experience any discomfort. • Please read the following warnings and information carefully before using the VR astigmatism or far-sightedness, it is suggested that you wear glasses to cor Headset and follow all guidelines on safety and operation. Failure to follow these rect your eyesight when using VR headset. - Page 26 • When charging is completed, disconnect the charger from the equipment and of the product and the relevant regulations of the country where the product unplug the charger from the power outlet. is located. For approved accessories, please contact Pico Customer Service...
-
Page 27: Eu Regulatory Conformance
The battery can only be replaced by Pico or Pico authorized or human injury. The battery can only be replaced by Pico or Pico authorized waste stream with household garbage. -
Page 28: Fcc Statement
Devices can be repaired, free of charge, within 12 months of the purchase date. B digital device, pursuant to part 15 of the FCC Rules. These limits are designed Please contact Pico’s support if you require repair services. to provide reasonable protection against harmful interference in a residential in- Limited warranty stallation. -
Page 29: Laws And Regulations
Read our privacy policy. Product Name: VR All-In-One Headset Headset Model: A7B10/ A7C10/A7D10 Controller Model: C1610 For more information about Pico's products, policy and authorized servers, please www.pico-interactive.com Company Name: Pico Technology Co., Ltd. Company Address: Room 2101, Shining Tower, No.35Xueyuan Road, HaiDian District, Beijing, P.R.China... - Page 30 セット内容 HMD本体 使用説明書 For Pico Neo 2 Series コントローラー User Guide ACアダプター 使用説明書 (本書) USB Type-C データケ コントローラー充 コントローラー用 クリーニングクロス ーブル 電用ケーブル (USB ストラップ (レンズ用) Type-C) ...
- Page 31 6軸自由度対応VR (6DoF) ご使用前の注意事項 • 本製品は十分な広さでかつ障害物のない安全な室内での使用を目的としております。 本製品はご使用者様の全方向への動作を検知します。(上下左右、前後、回転運動 不慮の事故を避けるため、 バーチャル空間を体感いただいている際は常に.周囲に十分 等) ご使用者様の実際の動作がアプリケーション中でリアルタイム反映されます。 な広さがあることを確認し、 周囲への配慮をお願い致します。 コントローラーをお使い 周囲に障害物のない安全な環境下でご使用ください。 の際はストラッ プのご使用を推奨しております。 ご使用の際はご使用者様が両腕を伸ば がないようにご使用ください。 • 本製品は12歳以下のお子様のご使用を推奨しておりません。12歳以上のお子様 がご使用される場合は、必ず保護者の監督下でお願いします。 • 本製品は眼鏡やコンタクトなどの視力矯正を装着した状態でご使用いただけま す。 HMD本体のレンズと眼鏡のレンズがぶつかったり、 擦れないようご注意の上ご使用 く だ さ い ( 。 詳 細 は ペ ー ジ に...
- Page 32 クイックガイド HMD本体を起動してください コントローラーを起動してください 本体の電源ボタンを2秒以上長押ししてください。 ホームボタンを長押しするとインジケーターラン インジケーターランプが青色に点灯し、 HMD本体が起動します。 プが青色に点滅し、コントローラーが起動します。...
- Page 33 HMD本体を装着してください HMD本体の装着位置を調整してください ストラップ後頭部にあるストラップ調整ダイヤルを反時計回りに回してストラップ ストラッ プの位置を水平に戻し、 後頭部のストラッ プ調整ダイヤルを時計回りにお締めくだ を緩め、ストラップを上に引き上げながらご使用者様の顔面に装着してください。 さい。 HMD本体をご使用者様の快適な位置に調整ください。 *Note: Nearsighted users can use this product with prescription glasses.
- Page 34 Pico Neo 2 VR Headset Details 近接センサー ご使用者様の装着をセンサーが感知し、 スピーカー (左) スピーカー (右) 自動でスリープから起動、 HMDを顔から外すと自動でスリープモードとなります。 3.5mm充電ポート バージョン及び国や地域 フェイスパッド マイ ク によって異なります ヘッドバンド バックパッド USB Type-Cポート インジケーター ランプ 電源ボタン 電源ON : 電源OFF時に • 2秒以上長押し 電源OFF:電源ON時に5 • 秒以上長押し HMD本体のリセッ • ト : 10秒以上長押し スリープモード (再度押...
- Page 35 • HMDコントロールモード • 視力補正について コントローラー非接続時、 HMD本体側面のボタンと頭部の動きで操作が可能です。 本製品には視力補正機能は搭載しておりません。 眼鏡、 コンタクトレンズ等を装着され たまま使用いただけます。 ( 眼鏡のフレームサイズは左右幅が160mm以下のものを推 • リセンター 奨しております。 ) 装着時、 ご使用者様の視界から画面中央の位置にずれが生じた場合は、 HMD側面の ホームボタンを1秒以上長押しするとご使用者様の正面に画面中央が再度セットされ ます。 • 音量調整方法 HMD本体下部にある音量ボタンで、 音量の調節が可能です。 • リセット方法 映像が固まってしまった場合や、 ホームボタン、 決定ボタンを押しても画面が反応しな い際は電源ボタンを10秒以上長押しすることでHMD本体をリセッ トいただけます。 • スリープモード ①近接センサー使用: ご使用者様の顔面からHMD本体を外すと、...
- Page 36 コントローラー コントローラー (左) (右) コントローラー コントローラー (左) (右) 操作スティック クリックも可能 トリガーボタン 決定ボタン 戻るボタン 直前の画面に戻る グリッ プボタン ホームボタン Grab 電源ON : 2秒以上長押し • 電源OFF : 6秒以上長押し • コントローラーのリセッ • ト : 16秒以上長押し ホーム画面に戻る • リセンター : 1秒以上 • 長押し インジケーターランプ Controller Status Indicator Legend 青: HMD本体に接続中 ...
- Page 37 • 操作スティックの使い方 • ポインターリセット方法 上下左右への移動やページ送り、 クリック (決定ボタン) が可能です。 ポインターリセット方法コントローラーご使用中、 スクリーン上のポインターの動作と 実際のコントローラーの動作にずれが生じる場合がございます。 ホーム画面上でご使 用中のコントローラーのトリガーボタンをクリックすると、 ポインターがリセットし、 動作 を改善いただけます。 • リセンター HMD本体を装着したまま正面を向き、 コントローラーのホームボタンを1秒以上長押 しすると、 スクリーンをご使用者様の正面に配置いただけます。 • 接続解除方法 インジケーターランプが赤になるまでコントローラーのホームボタンを長押ししてくだ さい。 コントローラーの電源がOFFとなり、 ペアリングは自動で切断されます。 - 以下の場合バッテリー節約のため自動で電源がOFFとなります。 - HMDがスリープモードになってから一定時間経過後 (ご使用者様がHMD本 体を取り外してから一定時間経過後) ...
- Page 38 お手入れ方法 3. HMD 本体 ( レンズ、 フェイスパットを除く ) 及びコントローラーのクリーニング 方法 ウェットティッシュ ( アルコールが含まれていても問題ございません ) を使用するか、 本制品のフェイスパッドやベルトはご自身で交換可能です。 付属品の購入をご希望され る場合、 HPにてお問合せ頂くかPico正式代理店へご連絡下さい。 のしっとりした状態を維持し、 自然乾燥にて乾かしてください。 天日干しはできませ ん。 1. レンズの管理方法 クリーング時に浸水しないようにお気を付けください。 • ご使用時及び保管される際は、 レンズに固形物で触れないようにお願いします。 レ 4. 顔を替えて綿を浸す ンズの破損に繋がります。 HMD 本体の鼻の位置を合わせ、 HMD 本体のフェイスパッド取付溝に沿ってフェイ • 付属のレンズクリーニングクロスに市販のレンズクリーニング剤を含ませ、 HMD本 スパッド内側の端をしっかりとはめ込みます。 ※接着剤等は使用しないでください。...
- Page 39 お肌に赤みや腫れ、 炎症等が見られた場合には直ちに使用を中止し、 上記の症状に 安全上の注意 ついてお医者様にご相談ください。 HMD本体およびコントローラーをご使用の前に以下の注意事項をよく読み、 安全上 • 本制品のご使用時は30分間のご使用毎に10分間の休憩を取ってください。 不快感 の注意に沿ったご使用をお願い致します。 取扱説明書に記載のない使用方法をされた 等の症状が見られた場合は休憩を取るか、 ご使用時間を調整してください。 視力に 関しての異常 (複視、 視界のゆがみ、 目の不快感や痛み等)、 過度の発汗、 吐き気、 場合 (感電、 火災や他の傷害を含む) 重大な損害を生じる可能性がございます。 また、 めまい、 動悸、 認識障害、 バランス感覚障害等がみられた場合には直ちにご使用を ご自身以外が本制品をご使用する場合は、 ご使用者様に使用上の注意とマニュアルを 中止してください。 ご理解頂いた上でご使用ください。 • 本制品はバーチャルコンテンツ体験を提供しておりますが、 内容によってはご使用 健康と安全面の注意事項 者様に不快感を引き起こす恐れがございます。...
- Page 40 • ヘッドホン使用時はなるべく小さなボリュームでのご使用をお願いします。 継続して • HMD本体のレンズに直射日光が差し込まないようご注意ください。 特に窓際やダ 大音量でのご使用をされますと、 ご使用者様の聴力に関して重大な損害を起こす可 ッシュボード、 その他強い光源のそばでは保管しないでください。 能性があります。 • 本制品は雨や水等を避けてご保管、 ご使用ください。 • 本制品は裸火、 電熱器、 電子レンジ、 湯沸かし器、 ストーブや蝋燭等、 熱源の近くに 危険な場所でのご使用について は置かないでください。 機器が過熱する原因となる場合がございます。 • 本制品はガソリンスタンドや可燃制品、 化学薬品類等の危険物を含む場所でのご使 • 本制品には高圧をかけないでください。 制品やレンズの破損原因となる可能性がご 用はお控えください。 これらの場所にて本制品を所持している際には下記の指示に ざいます。 従ってください。 危険な状況下での本制品のご使用は爆発や火災の原因となる可能 ...
- Page 41 〇E-Mail 個人情報保護法については: https://www.pico-interactive.com/terms/privacy.html をご覧ください。 プライバシーポリシーをご一読ください。 保証規定 • 取扱説明書に従った正常な使用状態で故障した場合には、 保証の記載内容に基づき 公式サイト: www.pico-interactive.com 交換いたします。 Pico サービスホットライン : 400-6087-666 • 保証期間内でも次の場合は保証対象外となります。 Eメール : 制品型番: service@picovr.com A7B10/ A7C10/A7D10 - 本保証書をご提示されない時。 - 名の表示および捺印の無い時。 - 火災、 地震、 水害、 落雷その他天災地変による故障および損害。...
- Page 42 구성품 확인하기 VR헤드셋 용 설명서 시리즈 컨트롤러 User Guide AC어댑터 설명서 USB-C 2.0 2in1 USB-C 컨트롤러 렌즈 세척용 천 데이터 케이블 충전 케이블 연결 줄...
- Page 43 360° 자유 각도 VR체험 사용 전 유의 사항 • VR헤드셋의 광학렌즈가 빛이나 직사광선에 노출될 경우(특히 야외, 베란다, 창문가, 자동 이 제품은 VR헤드셋과 컨트롤러의 앞, 뒤, 좌, 우, 위, 아래 및 회전 운동을 인식하여 사용자 의 신체 반응을 실시간으로 가상 세계에 반영합니다. 케이블이 없기 때문에 사용 전 반드시 차...
- Page 44 간단한 사용 설명 전원 켜기 컨트롤러 연결 VR헤드셋의 전원 버튼 2초 동안 길게 누르기 홈 버튼 짧게 누르기 (상태 표시등: 파란색) (상태 표시등: 파란색 깜빡임)
- Page 45 VR헤드셋 착용 편안한 위치에 맞춰 착용 조절 다이얼을 시계방향으로 돌려 머리 밴드 머리 밴드를 아래위로 움직여 얼굴보호쿠션을 머리 뒤쪽에 맞춘 뒤 시야가 를 위로 올린 후 충분한 공간 확보 깨끗해질 때까지 밴드 길이와 위치 조절 TIP: 이 제품에는 근시 조절 기능이 없으므로 근시 사용자는 안경을 착용해주세요.
- Page 46 노란색: 충전 중, 배터리 90% 이하 빨간색 깜빡임: 배터리 20% 이하 음량조절버튼 Micro SD 이어폰 포트 카드 슬롯 빨간색: 충전 중, 배터리 20% 이하 꺼짐: 슬립모드 또는 전원 꺼짐 시선 추적 * Pico Neo 2 Eye만 지원 녹색: 충전 완료, 배터리 90% 이상...
- Page 47 • 근시 사용자 착용 안내 • VR헤드셋 컨트롤 모드 이 제품에는 근시 조절 기능이 없습니다. 안경테 너비가 16cm 이하인 표준 사이즈 안경의 컨트롤러를 연결하지 않아도 머리를 움직이거나 VR헤드셋 버튼을 눌러 조작이 가능합 경우, 안경을 쓴 상태로 VR헤드셋을 착용할 수 있습니다. 니다.
- Page 48 왼쪽 오른쪽 왼쪽 오른쪽 조이스틱 트리거 버튼 클릭 가능함 메인 컨트롤러 변경, 확인 또는 사 격 버튼. 앱/뒤로 가기 버튼 앱에 따라 다른 기능으로 동작 그립 버튼 할 수 있음 그립 전용 홈 버튼 • 켜기: 짧게 누름 • 끄기: 6초 이상 길게 누름 •...
- Page 49 • 조이스틱 조작 • 메인 컨트롤러 조준선 전환 네 가지 방향으로 드래그하여 다음으로 넘어가기 등 조작을 할 수 있습니다. 메인 화면에서 컨트롤러의 트리거를 짧게 누르면 메인 컨트롤러의 조준선을 전환할 수 있습니다. 가운데 클릭 조작도 가능합니다. • 컨트롤러 연결 끊기 컨트롤러 상태 표시등에 빨간색 불이 들어올 때까지 컨트롤러의 홈 버튼을 길게 누른 다 음...
- Page 50 제품케어 3. 헤드셋(렌즈 및 안면스펀지 제외), 컨트롤러 및 악세사리의 청결 소독 티슈(알콜성분 함유 가능)나 극세사섬유에 75%농도의 알콜을 소량으로 뭍혀 피부와 닿는 본 제품의 안면 스펀지와 밴드는 자체분리가 가능합니다. 단독으로 구매를 원하는 경우 당사 대리점 부분 및 주변을 살살 닦아줍니다. 약간 표면이 촉촉하게 5분정도 유지시킨 다음 마른 극세사천으 혹은...
- Page 51 안전 정보 • VR헤드셋 착용 시 30분마다 휴식을 권장합니다. 불편함이 느껴질 경우 개인 생활습관에 따라 휴식 빈도나 시간을 늘리고 한 번에 최소 10분 이상 휴식하세요. 시각적 이상 증세(화면이 겹치 제품을 사용하기 전 아래 유의 사항과 설명을 읽고 제품 안전 및 조작 지침을 준수해주세요. 지침 거나...
- Page 52 • 기기 충전 시 전원 콘센트는 기기 근처 또는 손쉽게 닿을 수 있는 곳에 있어야 합니다. 구성품 관련 요구사항 • 충전이 완료되었거나 충전하지 않을 경우 충전기와 기기의 연결을 해제하고 전원 콘센트에서 • 화재, 폭발 및 기타 위험을 방지하기 위해 Pico에서 지정한 이동 장치 구성품, 인증된 호환 가능 충전기를 분리하세요. 한 전원, 데이터 케이블을 사용하세요.
- Page 53 고 있습니다 . • 이 제품에는 분리 불가능한 배터리가 내장되어 있습니다. 배터리 임의 교체 시 배터리 손상, 과열, 화재 또는 신체 상해 등 돌발 사고가 발생할 수 있습니다. 배터리는 Pico 또는 Pico가 지 그러나 일상생활에서는 최대출력보다 현저히 낮은 출력상태에서 통신이 이루어지므로 전자파흡...
- Page 54 - 화재, 수해, 낙뢰 등 불가항력에 의한 파손. - 보증 유효 기간을 초과한 경우. 기기를 임의로 분해, 교체, 수리하면 제품 보증을 받을 수 없습니다. 보증 서비스가 필요할 경우, 고객센터로 연락하거나 Pico가 지정한 서비스 센터에서 수리하세요. www.pico-interactive.com Service Tel: 1800-7342 Service Mail: service.korea@picovr.com...
- Page 56 Copyright © 2015-2020 Pico Technology Co., Ltd. All Rights Reserved.
Need help?
Do you have a question about the Neo 2 Series and is the answer not in the manual?
Questions and answers