Table of Contents
Advertisement
Quick Links
PFlux 3
EN Operating Instructions
(translation of the original instructions)
DE Gebrauchsanweisung
(Übersetzung der Originalgebrauch
sanweisung)
CZ Návod k obsluze
(překlad původního návodu)
SK Návod na obsluhu
(preklad pôvodného návodu)
HU Használati útmutató
(eredeti használati útmutató fordítása)
PL Instrukcja obsługi
(tłumaczenie oryginalnej instrukcji)
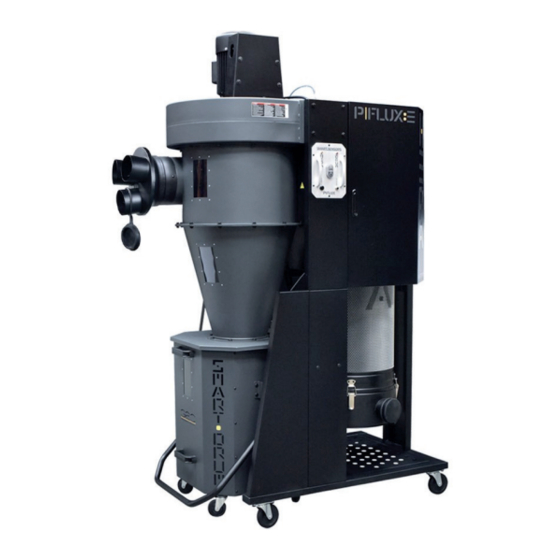
SF-351AX-L
Cyclone Dust Collector
Zyklon-Absauganlage
Cyklonová odsávací jednotka
Cyklónová odsávacia jednotka
Ciklonos elszívó egység
Cyklonowe urządzenie odciągowe
Producer / Hersteller / Výrobce / Výrobca / Gyártó / Producent:
Laguna Tools Inc
2072 Alton Pkwy
Irvine, CA 92606,
USA
Phone: +1 800-234-1976
Website: www.lagunatools.com
Distributor / Distributor / Distributor / Distribútor / Forgalmazó / Dystrybutor:
IGM nástroje a stroje s.r.o.
Ke Kopanině 560, 252 67, Tuchoměřice, Praha-západ
Česká republika
Tel: 220 950 910
Email: prodej@igm.cz
www.igm.cz
2019-30
Advertisement
Chapters
Table of Contents

Related Manuals for IGM LAGUNA PFlux3

Summary of Contents for IGM LAGUNA PFlux3
- Page 1 2072 Alton Pkwy Irvine, CA 92606, Phone: +1 800-234-1976 Website: www.lagunatools.com Distributor / Distributor / Distributor / Distribútor / Forgalmazó / Dystrybutor: IGM nástroje a stroje s.r.o. Ke Kopanině 560, 252 67, Tuchoměřice, Praha-západ Česká republika Tel: 220 950 910 Email: prodej@igm.cz www.igm.cz...
-
Page 2: Declaration Of Conformity
** EN ISO 12100: 2010, EN 60204-1: 2006 / AC: 2010 Technical documentation processed by: TUV Rheinland LGA Products GMBH Certificate no.: BM50418591 & BM50418592 2019-11 Ivo Mlej, CEO IGM nástroje a stroje s.r.o., Ke Kopanině 560, 252 67 Tuchoměřice, Česká republika www.igmtools.com... -
Page 3: Table Of Contents
IGM Tools & Machinery strives to always deliver high-quality machinery. • Do not leave appliance when plugged in. Unplug from outlet when not in The warranty is governed by the valid terms and conditions of IGM Tools & use and before servicing. -
Page 4: General Rules
• Do not use to pick up flammable or combustible liquids, such as • Give your work undivided attention. Looking around, carrying on a gasoline, or use in areas where they may be present. conversation and “horse-play” are careless acts that can result in serious injury. -
Page 5: Motor Specifications
Disconnecting power supply. Turn the switch off, disconnect the disconnect it from power, and immediately replace it with a new one. dust collector from the power supply, and allow the impeller to come to a complete stop before leaving the machine unattended or doing any Electrical Circuit Requirements service, cleaning, maintenance, or adjustments. -
Page 6: Assembly
2. Press the BLACK set button on the bottom of the remote switch until you hear two beeps. 3. Press the Remote set button on your hand held controller simultaneously with the BLACK button until you hear three beeps to complete the set up. 5.2 General Tool Assembly This step requires two adults. - Page 7 Pic. 11 Pic. 8 Step 8: Secure the (3) upright support reinforcement plates using (12) 5/16”*3/4” hex bolts and (12) 5/16”*OD18*2t flat washers. Step 5: Attach the intake cylinder to the dust chute using (4) 5/16”*5/8” hex spring bolts. Then, attach the cyclone barrel onto the dust chute using (12) 5/16”*3/4”...
- Page 8 Step Fourteen: Secure the lower triangular support plate to the base using 5/16”*3/4” hex bolts and (4) 5/16”*OD18*2t flat washers. Follow the same steps for the opposite side. Step 11: Attach the canister filter cover plate to the dust chute using (12) 3/16”*1/2”...
- Page 9 Pic. 24 Pic. 21 Step 21: Secure the topping to the nut on the foot peddle bar. Follow Step Eighteen: Secure the base of the foot pedal bar to the triangular support Step 18: Secure the base of the foot pedal bar to the triangular support this step on the opposite side.
- Page 10 drum lid located behind the cyclone funnel. When securing the sensor make sure the end of the sensor is not longer then the drum lid rim. If it extends longer passed the rim, the detection will not function correctly. Bottom end Bottom end of sensor of sensor...
- Page 11 Step 33: Take the Octagon base panel with wheels and secure on to the bottom of the drum using M4*12mm sheet metal thread bolts. Pic. 33 Step 30: Take the Octagon drum side panels and assemble together, secure with (40) M4*12mm sheet metal thread bolts. Take note of the left and right panels;...
- Page 12 Pic. 40 Pic. 43 Step Forty: Lift the foot peddle bar. Align the Octagon drum window to the center Step 37: Attach the rubber gasket to the top inner edges of the Step 40: Lift the foot peddle bar. Align the Octagon drum window to the Step Forty: Lift the foot peddle bar.
- Page 13 securing the vacuum suction pipe to assemble the cover plates. The vacuum suction pipe on the drum will be removed for this. It will not have a purpose if you block off the negative pressure. Cover plates Cover plates Foam tape Foam tape Plug Plug...
- Page 14 Remove the flex hose and clamps from the cyclone cone in Step Forty Eight: step forty one. Locate the plug provided inside the hardware box and attach over the vacuum suction tube as shown in the picture on the right below. the next section to remove the end cap to empty out any dust left inside.
- Page 15 7. Troubleshooting guide Machine does not start or a breaker trips. Possible Cause Possible Solution 1. Power supply switched OFF or is faulty. 1. Ensure power supply is ON and has the correct voltage. 2. Wall fuse/circuit breaker is blown/tripped. 2.
- Page 16 ** EN ISO 12100: 2010, EN 60204-1: 2006 / AC: 2010 Technische Dokumentation erstellt von: TUV Rheinland LGA Products GMBH Číslo certifikátu: BM50418591 & BM50418592 2019-11 Ivo Mlej, CEO IGM nástroje a stroje s.r.o., Ke Kopanině 560, 252 67 Tuchoměřice, Česká republika www.igmtools.com -16-...
- Page 17 Sie das Produkt erst, wenn Sie den Hersteller kontaktiert und von ihm Auskünfte erhalten haben. 1.1 Gewährleistung Die IGM nástroje a stroje s.r.o. strebt danach, stets ein hochwertiges Bei Verwendung der Maschine sollen stets grundlegende Maßnahmen und leistungsfähiges Produkt zu liefern. Die Inanspruchnahme der beachtet werden, einschließlich der folgenden:...
-
Page 18: Allgemeine Sicherheitsregeln
• Die Anlage ausschließlich bestimmungsgemäß verwenden. Wenn die nicht fallen oder sich gegen die Absauganlage lehnen. Arbeit nicht hastig Anlage anders als bestimmungsgemäß verwendet wird, schließen die IGM durchführen und keine übermäßige Kraft anwenden, egal für welche nástroje a stroje s.r.o. sowie die Laguna Tools Inc. jegliche Gewährleistung Operation. -
Page 19: Zusätzliche Sicherheitsmaßnahmen
VOR WARTUNG MASCHINE VON STROMVERSORGUNG TRENNEN. Explosion oder Brand verursachen. Um dieses Risiko zu vermeiden, ist dafür zu sorgen, dass alle Staubleitungen mit einem Erdungsdraht MASCHINENTEILE AUF BESCHÄDIGUNG ÜBERPRÜFEN. Die Anlage angemessen geerdet sind. ordnungsmäßig reparieren oder alle beschädigten Teile austauschen, bevor sie weiter verwendet wird. -
Page 20: Motor
PROPERLY GROUNDED. IF YOU ARE NOT SURE, HAVE A QUALIFIED ELECTRICIAN CHECK THE RECEPTACLE. IN ALL CASES, MAKE CERTAIN THE RECEPTACLE IN QUESTION IS PROPERLY GROUNDED. IF YOU ARE NOT SURE, HAVE A QUALIFIED ELECTRICIAN CHECK UNPACKING 240 VOLT Single-Phase Operation THE RECEPTACLE. - Page 21 Schritt 5: Absaugreduktion mit Schrauben (4) 8 mm*16 mm an den Staubtrichter befestigen. Anschließend die Zyklontrommel mit Schrauben (12) 8 mm*19 mm und Unterlegscheiben (12) 8 mm*OD18*2T an den Staubtrichter aufsetzen. Danach den Zyklonkegel mit Schrauben (12) 8 mm*19 mm, Unterlegscheiben (24) und Muttern (12) 8 mm auf die Zyklontrommel aufsetzen.
- Page 22 Richtung der Bandklemme spielt keine Rolle. Abb. 12 Schritt 9: Mit Hilfe einer anderen Person die Anlage vorsichtig heben - mit Motor oben und Rädern unten. Abb. 16 Schritt 13: Filterendabdeckung an das HEPA Filter mit Clips (4) befestigen. Öffnung in der Abdeckung (100 mm) mit Deckel (100 mm) schließen.
- Page 23 and securing the U channel provided onto the foot pedal bar using (2)5/16”*1-3/4” Step Fifteen: Locate the two foot pedal bars provided. There is a left side and Step Eighteen: Secure the base of the foot pedal bar to the triangular support hex bolts, (4) 5/16”*OD18*2t flat washers and (2) 5/16”...
- Page 24 Step Twenty Four: Secure the movable supporting brace on the foot pedal bar with the octagon foot pedal using (2) 3/8”*21mm hex bolts. Make sure the bolt head is on the inside of the octagon foot pedal. Adjust the tightness of this bolt accordingly.
- Page 25 Abb. 31 Abb. 34 Schritt 28: Das scharfe Ende des weißen Kunststoffbolzens in den oberen Schritt 31: Einzelne Teile sind mit Buchstaben R (rechts) und L (links) Teil des Sensors auf der Oberseite des Deckels einführen. Finden Sie ein markiert, damit der Abfallbehälter richtig zusammengebaut wird. Nach der kleines Loch: damit können Sie gegen und im Uhrzeigersinn drehen.
- Page 26 Abb. 40 Schritt 37: Gummidichtung in den oberen Rand des Abfallbehälters Abb. 37 einfädeln. Die höhere Seite der Dichtung sollte zum oberen Rand des Step Twenty Four: Secure the movable supporting brace on the foot pedal bar Abfallbehälters gerichtet sein. Nach der Fertigstellung die restliche Schritt 34: Mit Kunstsoff-Abschlusskappen (40) alle herausragende Gummidichtung mit Schere oder Messer abschneiden.
- Page 27 Abb. 46 Abb. 43 Step Forty: Lift the foot peddle bar. Align the Octagon drum window to the center Schritt 43: Schaumband an den Staubtrichter kleben, bevor der point of the drum lid and push the drum in. Lower the foot peddle bar to seal Schritt 40: Hebel des Hebesystems des Abfallbehälters heben.
-
Page 28: Instandhaltung
Remove the flex hose and clamps from the cyclone cone in Step Forty Eight: securing the vacuum suction pipe to assemble the cover plates. The vacuum step forty one. Locate the plug provided inside the hardware box and attach over suction pipe on the drum will be removed for this. -
Page 29: Störungsbehebung
3. Nachdem das Filter mit Druckluftpistole gereinigt wird, nach ABFALLBEHÄLTER DES ZYKLONS ENTLEEREN nachfolgenden Anweisungen verfahren und den Endverschluss trennen, Der Inhalt des Abfallbehälters des Zyklons ist regelmäßig zu überprüfen um sämtlichen restlichen Staub zu entfernen. und nach Bedarf zu entleeren. Überprüfung des Abfallbehälters: FILTER ENDVRSCHLUSS ENTLEEREN 1. - Page 30 ** EN ISO 12100: 2010, EN 60204-1: 2006 / AC: 2010 Technickou dokumentaci zpracoval: TUV Rheinland LGA Products GMBH Číslo certifikátu: BM50418591 & BM50418592 2019-11 Ivo Mlej, CEO IGM nástroje a stroje s.r.o., Ke Kopanině 560, 252 67 Tuchoměřice, Česká republika www.igm.cz -30-...
- Page 31 Vážený zákazníku, děkujeme za Váš nákup a vítejte ve skupině vlastníků strojů Laguna PFlux3. Rozumíme, že se na současném trhu nalézá nespočet dřevoobráběcích značek a vážíme si toho, že jste se rozhodli zakoupit právě stroj značky Laguna Tools od IGM.
- Page 32 • Odsavač nepoužívejte k jinému než určenému použití. Pokud je • Údržbu strojů provádějte s opatrností. Dodržujte pokyny pro promazání a odsavač použit jinak než k určenému použití, IGM nástroje a stroje s.r.o. údržbu příslušenství. a Laguna Tools Inc. vypovídají jakoukoliv záruku a nenesou jakoukoliv zodpovědnost za zranění, která...
- Page 33 Zástrčku nijak neupravujte, pokud nepasuje do zásuvky, kontaktujte kvalifikovaného elektrikáře, který nainstaluje příslušnou zásuvku. Nesprávné připojení zemnícího vodiče může mít za následek nebezpečí www.igm.cz -33-...
- Page 34 3HP Mobile Dust Cyclone Manual Nahlaste chybějící nebo poškozené díly svému prodejci nebo částí: Kužel cyklonu, hlavu cyklonu a sací válec. distributorovi. Před montáží a použitím stroje si důkladně přečtěte tuto příručku, abyste se seznámili s řádnými postupy montáže, údržby a bezpečnosti. www.igm.cz -34-...
- Page 35 Step Seven: Secure the base with (3) lower upright support panels to the Obr. 10 unit using (6) 5/16”*3/4” hex bolts and (6) 5/16”*OD18*2t flat washers. Krok 7: Základnu připojte k jednotce třemi podpěrnými sloupky pomocí šroubů (6) 8 mm*19 mm a podložek (6) 8 mm*OD18*2T. Obr. 14 www.igm.cz -35-...
- Page 36 (4) 8 mm. Profily pak upevněte pomocí šestihranných šroubů (4) pomocí šroubů (4) 8 mm*19 mm a podložek (4) 8 mm*OD18*2T. Totéž 8 mm*44 mm, podložek (8) 8 mm*OD18*2T a šestihrannými maticemi (4) proveďte na protější straně. 8 mm. Totéž proveďte na protější straně. www.igm.cz -36-...
- Page 37 Obr. 23 Krok 23: Srovnejte otvor pro šroub na tyči pro zvedací systém s otvorem 3HP Mobile Dust Cyclone Manual na držáku pro ručku zvedacího systému. Krok 20: Připevněte oba konce ručky zvedacího systému na matici tyčí zvedacího systému. www.igm.cz -37-...
- Page 38 Při montáži senzoru se ujistěte, že konec základně nádoby pomocí podložek (8) 9 mm*OD23*2T a šroubů 9 mm. (4) senzoru nepřesahuje okraj víka nádoby. Bude-li senzor přesahovat, Pro pevné utažení použijte dodaný plochý klíč. Smontované části odložte. nebude detekce fungovat správně. www.igm.cz -38-...
- Page 39 (4) 8 mm. View of side panels Pohled zevnitř from inside out. Obr. 36 www.igm.cz -39- Step Thirty Three: Take the Octagon base panel with wheels and secure on to the bottom of the drum using M4*12mm sheet metal thread bolts...
- Page 40 3HP Mobile Dust Cyclone Manual Krok 39: Vložte odpadní vak do nádoby a rozprostřete ho do rohů. Krok 42: Odstraňte ovládací panel uvolněním šesti šroubů. Přišroubujte k ovládacímu panelu držadla pomocí šroubů (4) M4*6 mm. www.igm.cz -40- 3HP Mobile Dust Cyclone Manual...
- Page 41 Vakuové sání v block off the negative pressure. tomto případě může být odstraněno, protože na stroji již neplní žádnou funkci. Pokud je podtlak blokován, neplní zamýšlenou funkci. Cover plates Foam tape Plug www.igm.cz -41- 3HP Mobile Dust Cyclone Manual...
- Page 42 2. Zatímco cyklonová část odsavače shromažďuje prach z koncovky nádoby filtru, použijte stlačený vzduch a vzduchovou pistoli a vyfukujte vnější povrch filtru. 3. Po vyčištění filtru pomocí vzduchové pistole na stlačený vzduch, postupujte podle pokynů v následující části a oddělejte koncovku filtru, www.igm.cz -42-...
- Page 43 7. Změňte velikost vedení a samotné upevnění a uchycení vedení. Odsavač fouká do vzduchu piliny. Možná příčina Možné řešení 1. Svěrky sběrných nádob na odsavači jsou uvolněné. 1. Znovu sevřete a zajistěte správné utěsnění. 2. Uvolněné nebo poškozené těsnění. 2. Vyměňte těsnění. www.igm.cz -43-...
- Page 44 ** EN ISO 12100: 2010, EN 60204-1: 2006 / AC: 2010 Technickú dokumentáciu spracoval: TUV Rheinland LGA Products GMBH Číslo certifikátu: BM50418591 & BM50418592 2019-11 Ivo Mlej, CEO IGM nástroje a stroje s.r.o., Ke Kopanině 560, 252 67 Tuchoměřice, Česká republika www.igm.sk -44-...
- Page 45 Vážený zákazník, ďakujeme za Váš nákup a vitajte v skupine vlastníkov strojov Laguna PFlux3. Rozumieme, že sa na súčasnom trhu nachádza nespočetné množstvo drevoobrábacích značiek a vážime si toho, že ste sa rozhodli zakúpiť práve stroj značky Laguna Tools od IGM.
- Page 46 • Odsávač nepoužívajte na iné než zamýšľané použitie. Pokiaľ je odsávač príslušenstva môže byť nebezpečné. použitý inak ako na zamýšľané použitie, IGM nástroje a stroje s. r. o. a Laguna Tools Inc. vypovedajú akúkoľvek záruku a nenesú akúkoľvek • Údržbu strojov vykonávajte opatrne. Dodržujte pokyny na premazanie a zodpovednosť...
- Page 47 * Slúži k prepojeniu diaľkového *Used to match up a new hand held Obr. 2 ovládania s diaľkovým spínačom controller with the remote switch 3HP Mobile Dust Cyclone Manual 3HP Mobile Dust Cyclone Manual www.igm.sk -47-...
- Page 48 M. Kužeľ cyklónu N. Stredná časť cyklónu O. Odsávacia redukcia P. Páka pre rýchle upnutie odpadovej nádoby Q. Zberná nádoba so 100mm hrdlom R. Spodné vzpery (3) S. Tesnenie T. Podperná doska (3) U. Pravé a ľavé profily zdvíhacieho systému www.igm.sk -48-...
- Page 49 Penovú pásku prilepte pozdĺž vnútornej strany dosky podľa obrázku nižšie. Penovú pásku pripevnite k vnútorným okrajom pod otvory pre skrutky. Pripojte vákuovú trubicu tak, aby koncová horná časť smerovala nahor k centrálnej separačnej časti a pripevnite pomocou štyroch skrutiek. Obr. 13 www.igm.sk -49-...
- Page 50 že je koniec profilu vnútri trojuholníkovej podpery. To isté urobte na 3HP Mobile Dust Cyclone Manual protiľahlej strane. Krok 13: Pripevnite koncový uzáver filtra k HEPA filtru pomocou spôn (4). Otvor v uzávere (100 mm) zakryte vekom (100 mm). www.igm.sk -50-...
- Page 51 Krok 19: Kryciu dosku nasaďte na zdvíhaciu tyčovú zostavu. Pripevnite same steps for the opposite side. pomocou skrutiek (6) 6 mm*19 mm a podložiek (6) 6 mm*OD19*2T. To Obr. 25 isté urobte na opačnej strane. Krok 22: Kryt zaistite šesťhrannou skrutkou (2) M8*30 mm. www.igm.sk -51-...
- Page 52 Najskôr skrutky nasaďte a až potom všetky dotiahnite. Veko sa bude • V smere: Znižuje množstvo detekovaného prachu (menej plná odpadová otáčať, pokiaľ neboli skrutky dostatočne dotiahnuté. Zle namontované nádoba) veko nebude sedieť na odpadovú nádobu. • Proti smeru: Zvyšuje množstvo detekovaného prachu (plnšia odpadová nádoba) www.igm.sk -52-...
- Page 53 Zostavte podľa fotky nižšie. Obr. 37 Krok 34: Pomocou plastových koncových uzáverov (40) zakryte všetky koncovky skrutiek na vnútornej strane odpadovej nádoby. Tento krok je nevyhnutný, aby sa zabránilo zničeniu odpadového vreca závitom skrutiek. www.igm.sk -53-...
- Page 54 Krok 40: Zdvihnite páku zdvíhacieho systému odpadovej nádoby. Vyššia strana tesnenia by mala smerovať k vrchnému okraju nádoby. Po Zarovnajte odpadovú nádobu a zatlačte ju dovnútra. Zdvihnite páku a dokončení budete potrebovať nožnice alebo nôž k orezaniu prebytočného utesnite odpadovú nádobu k stroju. gumového tesnenia. www.igm.sk -54-...
- Page 55 (4) 6 mm*OD19*2T a matice (4) 6 mm a pripevnite kryt na otvor na vrchnej strane odpadovej nádoby. Urobte to isté na spodnej strane, najskôr však použite penovú pásku pre zaizolovanie otvoru pred zaskrutkovaním krytu. Obr. 47 www.igm.sk -55-...
- Page 56 Pre používateľov, ktorí odsávač využívajú na maximum, odporúčame čistiť stlačeným vzduchom pravidelne, aby bola zachovaná maximálna účinnosť filtrácie a dlhá životnosť filtra. 1. Nechajte cyklón zapnutý; otvorte oba kryty filtra. Pripojte 100mm hadicu z cyklónu k 100mm hrdlu na spodku filtra. www.igm.sk -56-...
- Page 57 7. Nevhodná veľkosť vedenia, spojok alebo priehradiek. Odsávač fúka do vzduchu piliny. Možná príčina Možné riešenie 1. Svorky zberných nádob na odsávači sú uvoľnené. 1. Znovu zovrite a zaistite správne utesnenie. 2. Uvoľnené alebo poškodené tesnenie. 2. Vymeňte tesnenie. www.igm.sk -57-...
- Page 58 ** EN ISO 12100: 2010, EN 60204-1: 2006 / AC: 2010 A műszaki dokumentációt előkészítette: TUV Rheinland LGA Products GMBH A tanúsítvány száma: BM50418591 & BM50418592 2019-11 Ivo Mlej, CEO IGM nástroje a stroje s.r.o., Ke Kopanině 560, 252 67 Tuchoměřice, Česká republika www.igmtools.hu -58-...
- Page 59 (az eredeti fordítása) Tisztelt ügyfelünk, Köszönjük, hogy minket választott, és üdvözöljük a Laguna PFlux3 gépek tulajdonosainak csoportjában. Megértjük, hogy ma számtalan famegmunkáló gépet gyártó márka van a piacon, és nagyra értékeljük, hogy úgy döntött, hogy Laguna Tools gépet vásárol az IGM-től.
- Page 60 • Az elszívót csak a célnak megfelelően alkalmazza. Ha az elszívót nem a célnak megfelelően használja, az IGM nástroje a stroje s.r.o. És a Laguna • A gyártó által javasolt kiegészítőket használja, a nem megfelelő...
- Page 61 BERENDEZÉS HASZNÁLATÁVAL KAPCSOLATBAN Szükség esetében nézze át, és használja a többi személyzet betanításához. A gép használata. Ez az elszívó a famegmunkáló gépek által termelt fűrészpor és forgács elszívására szolgál. Ne használja az elszívó berendezést fém reszelék, agyag, kő, gipszkarton, azbeszt por, 3.4 A motor tulajdonságai ólomtartalmú...
- Page 62 On board circuit breaker Távirányító D. A hulladéktartály burkolata (elülső és hátsó rész) Hand held remote controller E. Felső támaszok (3) F. A ciklon fedele ON gomb ON button OFF button OFF gomb G. Alap keret H. HEPA szűrő *Távirányítás *Remote set button I.
- Page 63 attach the foam tape on the inner edges below the bolt holes. Attach the vacuum suction tube with the end top pointing upwards to the dust chute using the four bolts provided. Step Three: Turn the base around with it standing on the (4) 4” wheels and 3.
- Page 64 13. lépés Rögzítse a HEPA szűrő vég lezáróját a (4) kapcsokkal. A lezáró nyílását (100 mm) zárja le e (100 mm) fedéllel. 13. ábra 17. ábra 10. lépés A (4) 6mm*19mm csavarok és a (4) 6 mm* OD19*2T alátétek segítségével szerelje fel a szűrő burkolatát. 14.
- Page 65 Step Nineteen: Attach the cover plate over the foot peddle assembly. Secure using (6) 1/4”*3/4” hex bolts and (6) 1/4”*OD19*2t flat washers. Follow the same steps for the opposite side. 20. ábra 23. ábra 3HP Mobile Dust Cyclone Manual 17. lépés Ezután az emelő profilját rögzítse a támasz alsó részéhez a (4) 8 mm*13 mm csavarokkal és a (4) 8 mm*OD18*2T alátétekkel, valamint a (4) 8 mm hatlapú...
- Page 66 attach all the bolts on before tightening the bolts. The lid will turn when the bolts have not been tightened for alignment. Failure to do will result in the drum lid not being able to align with the drum. You will find a tag on the cone with the following warning.
- Page 67 35. ábra 32. ábra 32. lépés A jobb és a bal oldali részek 3 furattal rendelkeznek. Vegye Step Thirty Two: Both the left and right side lift panels have three bolt holes on 29. lépés Szerelje össze a hulladék tartályt. A 4 db. 7,6 mm kerekeket ki a megfelelő...
- Page 68 with the octagon foot pedal using (2) 3/8”*21mm hex bolts. Make sure the bolt head is on the inside of the octagon foot pedal. Adjust the tightness of this bolt accordingly. If this bolt is too tight, the Octagon foot peddle will not work smoothly.
- Page 69 Step Forty: Lift the foot peddle bar. Align the Octagon drum window to the center point of the drum lid and push the drum in. Lower the foot peddle bar to seal Step Forty: Lift the foot peddle bar. Align the Octagon drum window to the center the drum tight for normal machine operation.
- Page 70 Step Forty Six: Remove the vacuum suction pipe from the drum by loosening the 1/4”*1/2” carriage bolts, (4) 1/4”*OD19*2t flat washers and (4) 1/4” hex nuts mentioned in the previous step. There will be 2 sets from the top and 2 sets from the bottom of the vacuum suction pipe.
- Page 71 ereszkedjen le. 2. Tolja el az elszívótól és ellenőrizze, szükségesség esetében ürítse ki. IDŐSZAKOS ELLENŐRZÉS Minden berendezés vagy szerszám rendszeres ellenőrzése a műhely optimális működésének alapja. Ami magába foglalja az összes alkatrész, a szűrő tisztaságának és a szennyeződés eltávolítását az összes felületről és a mozgó...
- Page 72 ** EN ISO 12100: 2010, EN 60204-1: 2006 / AC: 2010 Dokumentacja techniczna opracowana została przez TUV Rheinland LGA Products GMBH Číslo certifikátu: BM50418591 & BM50418592 2019-11 Ivo Mlej, CEO IGM nástroje a stroje s.r.o., Ke Kopanině 560, 252 67 Tuchoměřice, Česká republika www.igmtools.pl -72-...
- Page 73 Szanowny Kliencie, Dziękujemy za zakup i witamy Cię wśród właścicieli i użytkowników maszyn Laguna PFlux3 od firmy IGM. Zdajemy sobie sprawę, że na rynku istnieje obecnie niezliczona ilość maszyn przeznaczonych do obróbki drewna i dlatego dziękujemy za zaufanie, które nam okazałeś...
- Page 74 Podczas pracy nie należy używać nadmiernej zaprojektowane. Jeśli urządzenie będzie używane w sposób niezgodny z siły. przeznaczeniem, firma IGM narzędzia i maszyny s.r.o. oraz Laguna Tools Inc. zrzekają się jakiejkolwiek gwarancji i nie ponoszą odpowiedzialności • Do pracy używaj narzędzi odpowiednio dostosowanych do prędkości za obrażenia, które mogą...
- Page 75 wypadek. odpadowy do odpowiednio uszczelnionego metalowego zbiornika. NIE WOLNO UŻYWAĆ URZĄDZENIA W NIEBEZPIECZNYM Przestrzeń operacyjna. Aby zmniejszyć ryzyko narażenia na drobny pył, ŚRODOWISKU. umieść na stałe zamontowane urządzenia odciągowe poza obszarem Nigdy nie używaj maszyny w wilgotnym lub mokrym otoczeniu oraz nie roboczym lub umieść...
- Page 76 5. Montaż maszyny UWAGA! PODŁĄCZANIE DO ŹRÓDŁA ZASILANIA MOŻE BYĆ WYKONYWANE WYŁĄCZNIE PRZEZ WYKWALIFIKOWANEGO 5.1 Rozpakowanie ELEKTRYKA. Mobilne urządzenie odciągowe dostarczane jest w opakowaniu. Przed Zalecany wyłącznik automatyczny: 16 A (16/3 / C), charakterystyka montażem urządzenia, należy zapoznać się z poniższymi instrukcjami wyzwalania C.
- Page 77 obsługi. SZACOWANY CZAS MONTAŻU 5-6 godzin Krok 1: Obróć urządzenie do góry nogami. Podeprzyj urządzenie tak, aby znajdowało się na tej samej wysokości co silnik. Urządzenia nie należy przechylać. Zdejmij podstawę przymocowaną do trzech rozpórek. Rys. 5 Rys. 8 Krok 2: Przymocuj kółeczka 760 mm (4) do podstawy za pomocą śrub Krok 5: Przymocuj walec ssący do centralnej separacyjnej części za (16) 8 mm * 19 mm i podkładek (16) 8 mm * OD18 * 2T.
- Page 78 Krok 11: Przymocuj pokrywę pojemnika do środkowej części separacji za pomocą śrub (12) 5 mm*13 mm z metalowym gwintem. Rys. 11 Rys. 15 Krok 8: Przymocuj trzy wsporniki za pomocą śrub (12) 8 mm * 19 mm i Krok 12: Otwórz pokrywę filtra i przymocuj filtr HEPA do środkowej podkładek (12) 8 mm * OD18 * 2T.
- Page 79 Step Fourteen: Secure the lower triangular support plate to the base using 5/16”*3/4” hex bolts and (4) 5/16”*OD18*2t flat washers. Follow the same steps for the opposite side. Rys. 18 Rys. 21 Step Eighteen: Secure the base of the foot pedal bar to the triangular support Krok 15: Przygotuj prawy i lewy profil systemu podnoszenia pojemnika Krok 18: Przymocuj profile do trójkątnej płyty nośnej, trzymając dolną...
- Page 80 Rys. 24 Krok 21: Zabezpiecz za pomocą osłony. Tą samą czynność wykonaj po przeciwnej stronie. Rys. 27 Krok 24: Zabezpiecz za pomocą śrub (2) 9 mm * 21 mm. Upewnij się, że łeb śruby znajduje się na wewnętrznej stronie systemu podnoszącego. Ostrożnie dokręć...
- Page 81 drum lid located behind the cyclone funnel. When securing the sensor make sure the end of the sensor is not longer then the drum lid rim. If it extends longer passed the rim, the detection will not function correctly. Dolna część Bottom end czujnika of sensor...
- Page 82 Krok 33: Za pomocą śrub M4 * 12 mm przykręć dolną pokrywę pojemnika na odpady wraz z kołami do dolnej części pojemnika. Rys. 40 Krok 37: Umieść gumową uszczelkę na górnej krawędzi pojemnika na odpady. Wyższa strona uszczelki powinna być skierowana w stronę górnej krawędzi pojemnika.
- Page 83 Rys. 46 Rys. 43 Krok 43: Przyklej taśmę piankową do centralnej separacyjnej części Step Forty: Lift the foot peddle bar. Align the Octagon drum window to the center Krok 40: Podnieś dźwignię systemu podnoszącego pojemnik na odpady. jeszcze przed przykręceniem przełącznika ciśnienia za pomocą śrub (4) point of the drum lid and push the drum in.
- Page 84 Remove the flex hose and clamps from the cyclone cone in Step Forty Eight: securing the vacuum suction pipe to assemble the cover plates. The vacuum step forty one. Locate the plug provided inside the hardware box and attach over suction pipe on the drum will be removed for this.
- Page 85 3. Po wyczyszczeniu filtra za pomocą pistoletu ze sprężonym powietrzem OPRÓŻNIANIE POJEMNIKA NA ODPADY postępuj zgodnie z instrukcjami, które opisane są w następnej części Regularnie sprawdzaj zawartość pojemnika na odpady i opróżnij go w instrukcji i usuń końcówkę filtra, aby opróżnić pozostały pył. razie potrzeby.
- Page 86 IGM nástroje a stroje s.r.o., Ke Kopanině 560, Tuchoměřice, 252 67, Czech Republic, E.U. +420 220 950 910, www.igm.cz © 2021 IGM nástroje a stroje s.r.o.
Need help?
Do you have a question about the LAGUNA PFlux3 and is the answer not in the manual?
Questions and answers