Advertisement
Scan for full manual
Step 1: Check what's in the box
VM-3DT 1:3 HDBT Distributor
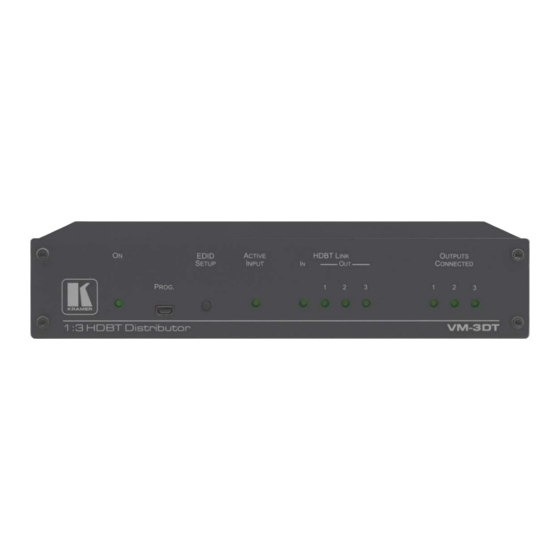
Step 2: Get to know your VM-3DT
#
Feature
1
ON LED
2
PROGRAM Mini USB Connector
3
EDID SETUP Button
4
ACTIVE INPUT LED
5
HDBT LINK LEDs
6
OUTPUTS CONNECTED LEDs
7
INPUT HDBT Connector
8
HDBT OUT Connectors
9
SETUP 8-way DIP-switches
10
SETUP 4-way DIP-switch
11
5V DC
VM-3DT Quick Start
VM-3DT Quick Start Guide
This guide helps you install and use your VM-3DT for the first time.
Go to
www.kramerav.com/downloads/VM-3DT
upgrades are available.
1 Power adapter and cord
Function
Lights green when the unit receives power.
Use to send RS-232 commands. Connect to a PC to perform firmware upgrades (via
K-Upload) and work with the EDID Designer. K-Upload and EDID Designer can be
downloaded from our Web site
To use the mini USB port, you need to download and the Kramer USB driver from our
Web site at:
Press to capture the input EDID, force RGB mode or select the default EDID.
Lights green when an HDMI signal is embedded on the HDBaseT input.
IN
Lights green when a link is established with the HDBaseT transmitter.
OUT
Lights green when a link is established with the HDBaseT receiver (1 to 3).
Flashes when a non-HDCP acceptor is connected to the output and the input is
HDCP-encrypted (the content is displayed for only a few seconds).
Lights green when an acceptor (sink) is detected on the HDBaseT receiver connected
to the output (from 1 to 3).
Connects to an HDBaseT source, for example VS-44DT.
Connect to an HDBaseT acceptor (from 1 to 3), for example TP-580R.
Use to set IR (DIP-switches 1-3) and RS-232 (DIP-switches 5-7) command behavior.
Always keep all four DIP-switches UP (off).
+5V DC connector for powering the unit.
to download the latest user manual and check if firmware
1 Quick start guide
at:www.kramerav.com/manual/EDID
www.kramerav.com/support/product_downloads.asp
P/N: 2 9 0 0 - 3 0 0 7 9 6 QS
4 Rubber feet
Designer.
and install it.
Rev: 2
Advertisement
Table of Contents

Related Manuals for Kramer VM-3DT


Summary of Contents for Kramer VM-3DT
- Page 1 K-Upload) and work with the EDID Designer. K-Upload and EDID Designer can be downloaded from our Web site at:www.kramerav.com/manual/EDID Designer. To use the mini USB port, you need to download and the Kramer USB driver from our Web site at: www.kramerav.com/support/product_downloads.asp and install it.
- Page 2 Step 4: Connect the inputs and outputs Always switch OFF the power on each device before connecting it to your VM-3DT. For best results, we recommend that you always use Kramer high-performance cables to connect AV equipment to the VM-3DT.
- Page 3 EDID Designer (via the mini USB port) that can be loaded from our Web site: Kramer EDID VM-3DT Designer To use the mini USB port, you need to download and the Kramer USB driver from our Web site at: www.kramerav.com/support/product_downloads.asp and install it. Acquiring the EDID via front panel Press the EDID SETUP once to display the current EDID source: OUT 1, OUT 2, OUT 3, or all OUT LEDs flash (default EDID).
- Page 4 At 4K@60Hz (4:2:0) 70m (230ft) At full HD (1080p@60Hz 36bpp) The specs only apply when using Kramer HDBaseT cables. This reach applies to each IN and OUT port separately; the total end-to-end reach is the sum of all ports’ reach. Video Max.
Need help?
Do you have a question about the VM-3DT and is the answer not in the manual?
Questions and answers