Advertisement
Installation & Assembly -
™
Base & Vision•Point
IMPORTANT!
Read entire instruction sheet before you start assembly and installation.
PART LIST
Model
LCV 100
Part #
QTY.
A
090-7008
1
095-8070
AA
1
CC
1
DD
1
FF
1
GG
1
B
095-4354
1
C
504-2013
4
D
504-2014
4
E
590-5003
4
F
520-2175
2
Note: You may not need all hardware provided
E
C
Note: Compare screws to full
scale drawings to make sure you
are using the correct screw.
Important: The product is made to support screens with a VESA
ing screws must turn at least three times in the screen inserts.
• The LCV 100 can be mounted to most wood and/or wood composite surfaces up to 1.5" thick. Before installation, the
installer MUST ensure that the mounting surface will safely hold the combined weight of the mount and the screen.
The surface must be at least 3/4" thick.
Thread set screw (AA) into the hole on the bottom of LCD assembly (A) using 3/16" allen wrench (GG) as shown.
Visit the Peerless Web Site at www.peerlessmounts.com
Vision•Point
Vertical Desktop Mount with Swivel Base
DESCRIPTION
LCD mount assembly
hardware pack
4" set screw
washer
nylock nut
1/4" allen wrench
3/16" allen wrench
adapter plate
M4 x .7 x 12 mm phillips screw
M4 x .7 x 20 mm phillips screw
.198 x .313 x .437 H retaining spacer
1/4-20 x .5 phillips screw
F
D
A
LCV 100
™
Vertical Desktop Mount with Stationary
B
®
compliant hole pattern. For safe mounting, mount-
CAUTION
Bottom View
AA
1 of 4
For customer service call 1-800-729-0307 or 708-865-8870.
Model: LCV 100
LCV 100
AA
CC
FF
ISSUED: 11-7-02 SHEET #: 090-9066-5 07-28-05
A
DD
GG
Advertisement
Table of Contents

Related Manuals for PEERLESS Vision-Point LCV 100


Summary of Contents for PEERLESS Vision-Point LCV 100
- Page 1 Thread set screw (AA) into the hole on the bottom of LCD assembly (A) using 3/16" allen wrench (GG) as shown. LCV 100 Bottom View 1 of 4 ISSUED: 11-7-02 SHEET #: 090-9066-5 07-28-05 Visit the Peerless Web Site at www.peerlessmounts.com For customer service call 1-800-729-0307 or 708-865-8870.
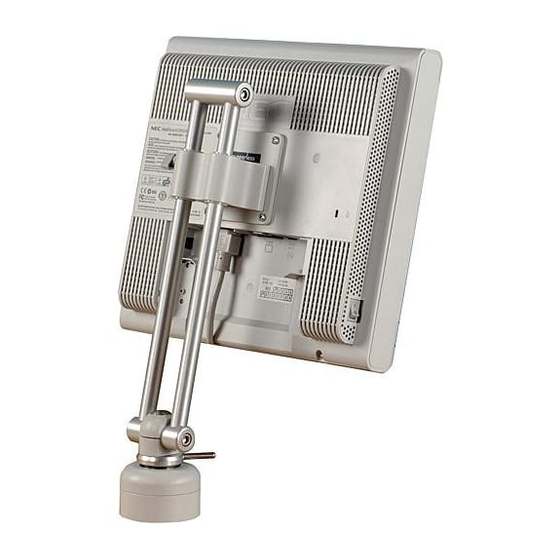
- Page 2 Attach adapter plate (B) to LCV 100 (A) using 2 1/4-20 x .5 phillips screws (F) as shown. 2 of 4 ISSUED:11-7-02 SHEET #: 090-9066-5 07-28-05 Visit the Peerless Web Site at www.peerlessmounts.com For customer service call 1-800-729-0307 or 708-865-8870.
- Page 3 100 MM hole pattern as shown. If necessary use four M4 x 20mm screws (D) and retaining spacers (E) provided with adapter plate. 3 of 4 ISSUED: 11-7-02 SHEET #: 090-9066-5 07-28-05 Visit the Peerless Web Site at www.peerlessmounts.com For customer service call 1-800-729-0307 or 708-865-8870.
- Page 4 FOR INSTALLING TO EXISTING PEERLESS ADAPTER PLATE Note: Refer to adapter bracket instruction sheet for attachment of adapter bracket to monitor. Attach interface plate (B) to existing adapter plate using four M5 x 6 mm screws provided with adapter plate as shown to the right.
Need help?
Do you have a question about the Vision-Point LCV 100 and is the answer not in the manual?
Questions and answers