
Related Manuals for Sony UP-D898DC


Summary of Contents for Sony UP-D898DC
- Page 1 4-593-541-12 (1) 2017-09 Digital Graphic Printer Instructions for Use Before operating the unit, please read this manual thoroughly and retain it for future reference. UP-D898DC © 2016 Sony Corporation...
- Page 2 Indications for Use/Intended Use Symbols on the product The Sony UP-D898DC printer is a compact, medical Safety sign grade black and white digital printer. It is designed to be Follow the warnings in the instructions for use integrated into digital radiology imaging systems such as...
- Page 3 All interface cables used to connect peripherals must be different branch circuits. shielded in order to comply with the limits for a digital For more information, consult qualified Sony service device pursuant to Subpart B of part 15 of FCC Rules. personnel.
- Page 4 Important EMC notices for use in medical environments • The UP-D898DC needs special precautions regarding EMC and needs to be installed and put into service according to the EMC information provided in the instructions for use. • Portable and mobile RF communications equipment, such as cellular phones, can affect the UP-D898DC.
- Page 5 Guidance and manufacturer’s declaration – electromagnetic immunity The UP-D898DC is intended for use in the electromagnetic environment specified below. The customer or the user of the UP-D898DC should assure that it is used in such an environment. IEC 60601 Compliance Immunity test Electromagnetic environment –...
- Page 6 Guidance and manufacturer’s declaration – electromagnetic immunity The UP-D898DC is intended for use in the electromagnetic environment specified below. The customer or the user of the UP-D898DC should assure that it is used in such an environment. IEC 60601 Compliance Immunity test Electromagnetic environment –...
- Page 7 Recommended separation distances between portable and mobile RF communications equipment and the UP-D898DC The UP-D898DC is intended for use in an electromagnetic environment in which radiated RF disturbances are controlled. The customer or the user of the UP-D898DC can help prevent electromagnetic interference...
-
Page 8: Table Of Contents
Table of Contents Getting Started Overview ..............9 Location and Function of Parts and Controls ..9 Front Panel ............9 Rear Panel ............10 Connections ............11 Connecting to the USB Connector ....11 Connecting the DC Power Supply Cable ..11 Installing the Printer Driver to the Computer ... -
Page 9: Getting Started
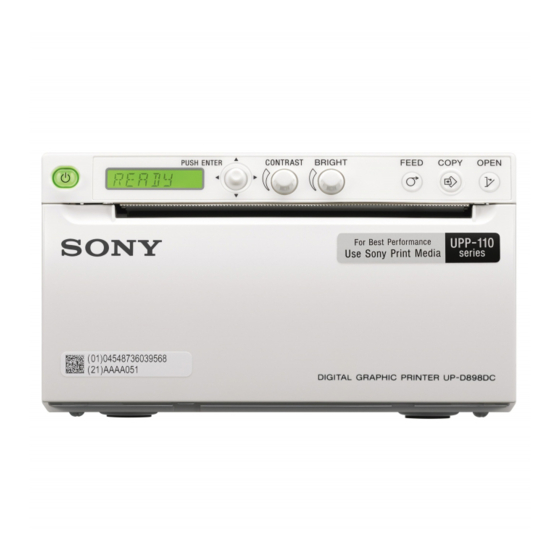
Getting Started Location and Function of Parts and Controls For more details, see the referenced page numbers Overview enclosed in parentheses ( ). This unit is a printer that prints images by heating a thermal head, according to the input image data, and Front Panel pressing the head against special thermal printing paper to print the image on the paper. -
Page 10: Rear Panel
COPY button (23) Warning on power supply devices Press to print another copy of the previous printout. You can make only one copy each time you press For the DC power supply, be sure to use a device this button regardless of the print quantity set using that complies with the IEC 60601-1 standard and is the menu. -
Page 11: Connections
Connecting to the USB Connector Connections First, with the DC power supply cable disconnected UP-D898DC from the external power supply, connect the printer and computer using a USB cable. Then, with the external power supply turned off, connect the DC power supply cable. Refer to the instructions for use of connected devices. -
Page 12: Paper
• When this unit is turned on, do not make the computer which is connected to this unit standby (suspended) or Use only Sony UPP-110S/110HD/110HG paper pause mode. It may cause a malfunction. designed for use with this unit. High print quality cannot •... -
Page 13: Loading Paper
Storing printouts Loading Paper • To prevent printouts from fading or changing color, store them in a cool, dry location where the temperature is not higher than 30 °C (86 °F). When loading paper, make sure to follow the notes of the •... - Page 14 Press the 1 On/standby switch to on. When paper is not loaded yet, the back light on the LCD lights in orange and the message “EMPTY” is displayed. Load the paper in the orientation shown in the diagram. Printing is not possible if the paper is reversed.
- Page 15 Close the door panel by pushing it. Notes • Make sure that the paper is loaded straight. If it is skewed, this could cause the paper to jam. • If you did not pull out enough paper in step 3, press the FEED button to feed some more paper out of the unit without pulling out the paper.
-
Page 16: Operation
Operation Adjustments and Settings Using the Menu You can carry out adjustments and settings to meet your requirements. Those settings and adjustments are retained even if the unit is turned off. You can set up the unit according to its intended purpose, connected equipments or your individual preferences. You can store up to three settings as a set of user settings. -
Page 17: Menu List
Menu List This section describes the menus displayed as you operate the menu lever. The setting surrounded by indicates the default setting. Item Function Settings HISTORY Displays up to five recently used menus according to the menu operation history. “NO ITEM”... - Page 18 Item Function Settings CLEAN.TH Starts head cleaning. CLEAN:OK Starts the head cleaning by pushing the menu lever. CONFIG. Displays menu for settings -AUT.LCK Select whether to lock BRIGHT control and CONTRAST control relating to operation. automatically. ALCK:ON: Always lock automatically. Unlock by pushing and holding the menu lever for three seconds at STANDBY.
- Page 19 a) The printing direction is as follows. When “BACW:OFF” is selected When “BACW:ON” is selected b) The printer paper orientation is as follows. Image on monitor screen When “SIDE:OFF” is selected When “SIDE:ON” is selected...
-
Page 20: Basic Menu Operations
Display “-BACWRD” by shifting the menu lever Basic Menu Operations up or down. This section describes the basic menu operations which Push the menu lever or shift it to the right. are common to each menu, taking settings for printing direction as an example. -
Page 21: Registering Menu Settings
To cancel the setting To load the desired settings Go back to step 3 or 5 by shifting the menu lever to the You can load the desired settings and make printouts left in step 7. with the loaded settings. To continue menu operations Confirm that “READY”... -
Page 22: Printing
Confirm “MENU:OK” is displayed, and then push Printing the menu lever. The unit starts printing the current menu settings. Before starting a print job, always check the following Shift the menu lever to the left. points: “READY” is displayed and the unit enters the •... -
Page 23: Cutting The Printed Paper
Paper currently selected Making Copies of the Last Printout You can check the paper type currently selected on the LCD. The paper type currently selected is displayed on Press the COPY button. The unit makes a copy of the the right edge of the LCD when you press the OPEN last printout. -
Page 24: Adjusting The Contrast And Brightness
Adjusting the Contrast and Brightness You can adjust the contrast and brightness of the unit using the CONTRAST control and BRIGHT control. To adjust the contrast You can adjust the contrast of printouts using the CONTRAST control. To make the contrast stronger: Turn the CONTRAST control clockwise. -
Page 25: Others
Caution Others • To prevent internal heat built-up, leave enough room around the printer (at least more than 10 cm (4 inches)). Do not cover the holes on the right and left sides of the printer and on the rear panel. Precautions •... -
Page 26: Using With Devices That Emit Radio Waves
Press the 1 On/standby switch to on. Using with Devices that Emit Radio Waves If this unit is to be used together with devices that emit strong radio waves, such as a radio knife, always verify that the unit is operating properly before use and ensure that there is no failure of the unit. -
Page 27: Cleaning The Platen Roller
Insert the cleaning sheet, with the black surface facing down, into the groove of the paper tray. Groove of the paper tray Cleaning sheet supplied Clean the platen roller using a soft cloth moistened with a 76.9 to 81.4 v/v% concentration of ethanol when it becomes dirty. -
Page 28: Specifications
Notes Specifications • After the surface of the platen roller wiped has been dried completely, turn the platen roller to Power Requirements clean another portion. 12 V to 24 V DC • Do not turn the platen roller with hands. Use the Input Current 8.2 A to 3.7 A FEED button to turn it. -
Page 29: Troubleshooting
(until it warms to room WHATSOEVER. temperature), then try printing again. • SONY WILL NOT BE LIABLE FOR CLAIMS OF ANY KIND MADE BY USERS OF THIS UNIT Printouts dirty. • Thermal head dirty? tUse the head cleaning sheet OR MADE BY THIRD PARTIES. -
Page 30: Error Messages
Symptom Causes/remedies Error Messages Printing is interrupted. Does the sunlight or incandescent light When printing, the that includes strong infrared light unit discharges several irradiate the paper exit? Messages appear on the LCD under the following tThe unit has an infrared light sensor centimeters of the conditions. -
Page 31: License
License “zlib”, “The FreeType Project LICENSE” and “The Catharon Open Source LICENSE” software are provided in this unit. We provide this software based on license agreements with their owners of copyright. Based on requests by the owners of copyright of these software applications, we have an obligation to inform you of the following. - Page 32 Sony Corporation 1-7-1 Konan Minato-ku Tokyo, 108-0075 Japan...
Need help?
Do you have a question about the UP-D898DC and is the answer not in the manual?
Questions and answers