Table of Contents
Advertisement
Quick Links
Operating instructions
Medical chair scales
Medical personal scales
KERN MCB, MPT
Type MCB 300K100NM
Type MPT 300K100NM
Version 1.1
2017-12
GB
KERN & Sohn GmbH
Ziegelei 1
D-72336 Balingen
email: info@kern-sohn.com
Phone: +49-[0]7433- 9933-0
Fax: +49-[0]7433-9933-149
Internet: www.kern-sohn.com
MCB_MPT-BAPS-e-1711
Advertisement
Table of Contents

Related Manuals for KERN MCB 300K100NM


Summary of Contents for KERN MCB 300K100NM
- Page 1 KERN & Sohn GmbH Ziegelei 1 Phone: +49-[0]7433- 9933-0 D-72336 Balingen Fax: +49-[0]7433-9933-149 email: info@kern-sohn.com Internet: www.kern-sohn.com Operating instructions Medical chair scales Medical personal scales KERN MCB, MPT Type MCB 300K100NM Type MPT 300K100NM Version 1.1 2017-12 MCB_MPT-BAPS-e-1711...
-
Page 2: Table Of Contents
KERN MCB, MPT Version 1.1 2017-12 Operating instructions chair scales, personal scales Table of Contents Technical Data ....................4 Declaration of conformity ................5 Basic Information (General) ................5 Proper use ..........................5 Improper Use ..........................6 Warranty ............................ 6 Monitoring of Test Resources .................... - Page 3 11.6.1 Interface parameters for RS232 (only MPT) ................ 30 Service, maintenance, disposal ..............31 12.1 Cleaning ..........................31 12.2 Cleaning / Disinfecting ......................31 12.3 Sterilisation ..........................31 12.4 Service, maintenance ......................31 12.5 Disposal ........................... 31 Error messages .................... 32 Instant help ....................
-
Page 4: Technical Data
1 Technical Data KERN MCB 300K100NM MPT 300K100NM Trademark MCB 300K100M MPT 300K100M Readability (d) 100 g Weighing range (max) 300 kg Recommended adjustment weight, 300 kg (Class) (M1) Weighing Units Stabilization time (typical) 2-3 sec. Warm-up time 10 min Supply voltage: 100 V –... -
Page 5: Declaration Of Conformity
2 Declaration of conformity To view the current EC/EU Declaration of Conformity go to: www.kern-sohn.com/ce 3 Basic Information (General) 3.1 Proper use The scales are used for determining body weights of people in sitting or standing position. The person to be weighed should be seated in the centre of the seating surface or step onto the weighing platform and sit or stand still. -
Page 6: Improper Use
Information is available on KERN’s home page (www.kern-sohn.com with regard to the monitoring of balance test substances and the test weights required for this. In KERN’s accredited DKD calibration laboratory test weights and balances may be... -
Page 7: Basic Safety Precautions
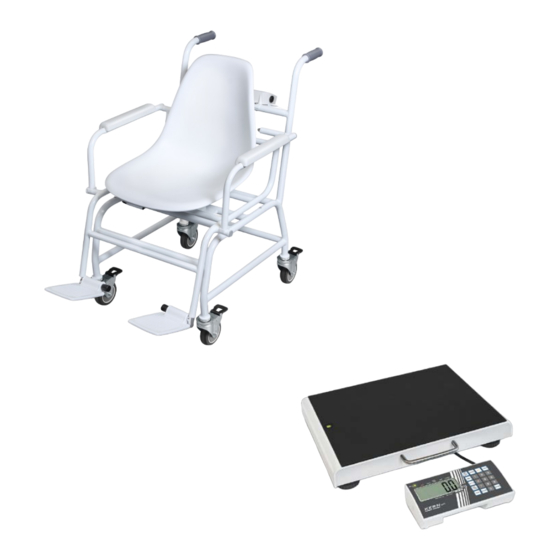
4 Basic Safety Precautions 4.1 Pay attention to the instructions in the Operation Manual Carefully read this operation manual before setup and commissioning, even if you are already familiar with KERN balances. 5 Appliance overview Chair scales MCB 1. Gripping handles 2. -
Page 8: Overview Of Displays
1. Weighing plate 2. Bubble level 3. Height adjustable rubber feet 4. Gripping handle 5. Display unit 6 Overview of displays Type MPT 300K100NM Type MCB 300K100NM Display Designation Description Stability display Scales are in a steady state Zeroing display... -
Page 9: Keyboard Overview
BMI function active Calculated BMI value HOLD function active Hold/Save function active PRE-Tare function active Preset tare value is enabled ´ Net weight display Net weight will be displayed Weight value display Current weight value will be displayed 7 Keyboard overview Button Designation Function... -
Page 10: Transportation & Storage
CLEAR This deletes manual number entry CLEAR button ENTER-key Import of numeric entry ENTER Numeric keys Numeric entry … 8 Transportation & Storage 8.1 Testing upon acceptance When receiving the appliance, please check packaging immediately, and the appliance itself when unpacking for possible visible damage. 8.2 Packaging / return transport ... -
Page 11: Unpacking, Setup And Commissioning
9 Unpacking, Setup and Commissioning 9.1 Place of installation / place of operation The balances are designed in a way that reliable weighing results are achieved in common conditions of use. You will work accurately and fast, if you select the right location for your balance. -
Page 12: Scope Of Delivery Chair Scales
9.3 Scope of delivery chair scales Balance Operating instructions Mains adapter 9.4 Installing the chair scales In delivery state the balance is adjusted in a manner that when placed on an even surface the air bubble of the water balance is in the prescribed circle. ... -
Page 13: Levelliing
9.4.1 Levelliing • The wheel height has to be adjusted for levelling. • Levelling is restricted to specialist staff possessing well acquainted with the workings of weighing scales. Place scales on an even surface. Arrest the brake Turn the wheel (1) clockwise until the air bubble of the water balance is in the prescribed circle Screw counternut (2) upwards till to the stop and it with a suitable tool (e.g. -
Page 14: Scope Of Delivery, Personal Scales
9.5 Scope of delivery, personal scales Balance Operating instructions Mains adapter Wall bracket 4 rubber feet 9.6 Installing the personal scales Place scales on an even surface Level balance with foot screws until the air bubble of the water balance is in the prescribed circle. -
Page 15: Attaching An Optional Stand (Only Mpt)
9.8 Attaching an optional stand (only MPT) Secure circular plate with screws on the aluminium section Secure wall fixing device with screws at the top on the aluminium section Remove the two lateral rubber plugs from the display unit. - Page 16 Ensure that the batteries are inserted in the correct direction Insert the battery holder with the inserted batteries in the display unit Close the battery cover If the batteries are run down, "LO" appears in the display. To turn off scales, press the button and immediately change the batteries.
-
Page 17: Operation Using A Rechargeable Battery (Optional)
9.10 Operation using a rechargeable battery (optional) In devices with an optional rechargeable battery operation: Connection CN 3 for Connection CN 4 for rechargeable battery batteries (AA x 6) 9.10.1 Battery operation On models where the back of the display unit is not directly accessible, remove the two black rotary knobs from both sides of the display unit in order to open the battery compartment and remove the display unit from the holder. - Page 18 Carefully take out the battery holder Insert 6 batteries (AA). Ensure that the batteries are inserted in the correct direction Insert battery holder with the inserted batteries into the display unit Ensure that the cables are not squeezed MCB_MPT-BAPS-e-1711...
- Page 19 Close the battery cover If the batteries are run down, "LO" appears in the display. To turn off, press the button and immediately change the batteries. If the balance is not used for a longer time, take out the batteries and store them separately.
-
Page 20: Rechargeable Battery Operation (Optional)
9.10.2 Rechargeable battery operation (optional) When an optional rechargeable battery is used, proceed as follows: On models where the back of the display unit is not directly accessible, remove the two black rotary knobs from both sides of the display unit in order to open the battery compartment and remove the display unit from the holder. - Page 21 Carefully insert the rechargeable battery block and insert plug into connection CN 3 Ensure that the cables are not squeezed Close the battery cover If the rechargeable battery is exhausted, „LO“ is displayed. The rechargeable battery is loaded via the provided plug-in power supply unit (loading time 14 h for a complete loading).
-
Page 22: Connecting The Power Supply
The stated voltage value must be the same as the local voltage. It is only allowed to use admitted, original power supply adaptors of KERN company. 9.12 Initial Commissioning In order to obtain exact results with the electronic balances, your balance must have reached the operating temperature (see warming up time chap. -
Page 23: Menu Overview
10 Menu overview z000 �� Start balance by pressing SETUP Press for 3 sec., “SETUP“ will be displayed. TARE HOLD Select parameter by using ) and ), as described. TARE Confirm the selected parameter by pressing Function Settings Description... -
Page 24: Operation
11 Operation After taking chair scales to patient, ensure scales are level before starting the weighing process. See diagram below 11.1 Weighing P-1.32 Start balance by pressing The balance carry out a segment test, then the program version is displayed. The scales are ready for operation as soon as the weight display for “0.0kg“... -
Page 25: Taring
11.2 Taring The tare weight of any preloads can be deducted by pressing a button so that the actual weight of the person is displayed in subsequent weighing. Place an object (such as a towel or support) on the seating surface or weighing platform. -
Page 26: Calculation Of The Body Mass Index
HOLD Press the button once more to repeat this function as often as required. There is no average value calculation in the event of too much movement. 11.4 Calculation of the Body Mass Index Start balance by pressing Wait for the rest position display ... -
Page 27: Classification Of Bmi Values
11.4.1 Classification of BMI values Weight classification for adults over 18 years of age using the BMI in accordance with WHO, 2000 EK IV and WHO 2004. Categorie BMI ( kg/m Risk of diseases associated with overweight Underweight < 18,5 Normal weight 18.5 –... -
Page 28: Pre-Tare Function With 5 Memories
PRE- 68.0 TARE To return to normal weighing mode, again press the button. 11.5.1 PRE-TARE function with 5 memories This gives the option of storing 5 different tare values that can be retrieved when required. Saving PPE-TARE values Weighing platform is unloaded and indicates “0.0 kg“. ... - Page 29 Retrieving PPE- TARE values from the memory Weighing platform is unloaded and indicates “0.0 kg“. PRE- TARE Press and hold the button until “ni“ appears and starts flashing on the display. Briefly press the numeric key ( 1..5 ) under which number the Pre-Tare value was saved.
-
Page 30: Print Function
11.6 Print function This action requires the RS232 interface cable available as an accessory which has to be connected via the round plug to the rear end of the terminal. (Loosen the two screws from the side, take off the display unit, insert the cable and screw the display unit back on.) Pressing the PRINT –... -
Page 31: Service, Maintenance, Disposal
Sterilisation of the appliance is not allowed. 12.4 Service, maintenance The appliance may only be opened by trained service technicians who are authorized by KERN. Disconnect the scales before opening. 12.5 Disposal Disposal of packaging and appliance must be carried out by operator according to valid national or regional law of the location where the appliance is used. -
Page 32: Error Messages
13 Error messages Display Description Battery low Please replace the batteries or connect scales to the power supply, using an adaptor. Underload ERRL Weight on weighing platform is too low. Please increase weight. If the error message remains inform manufacturer. Overload Weight on weighing platform is too heavy. -
Page 33: Adjustment
Draught/air movement The displayed weight is permanently changing Table/floor vibrations The seat surface/weighing plate is in contact with foreign bodies or is not correctly positioned. Electromagnetic fields / static charging (choose different location/switch off interfering device if possible) ... - Page 34 TARE , the appeared triangle must be located in the Press upper left part of the display. TARE If not, press again HOLD CAL U �� Press repeatedly until “CAL 0“ appears. CAL O �� 30770 TARE ...
-
Page 35: Adjustment Controls And Seals
14.2 Adjustment controls and seals Position of the official seals: 1. Rear 2. Battery compartment MCB_MPT-BAPS-e-1711... -
Page 36: Menu Overview In Service Mode (Adjustment Switch In Adjustment Position)
Position of the adjustment switch: Position of the adjustment State switch 1. to the left Not documented 2. concentric Adjustment position – adjustment possible 3. to the right Verification position - Adjustment locked 14.2.1 Menu overview in service mode (adjustment switch in adjustment position) The overview is used only for checking the set parameters by authorized verification offices. -
Page 37: Navigation In The Menu
14.3 Navigation in the menu With the balance switched on, keep the button depressed for approx. 3 sec until "SETUP" is displayed followed by "9rAd". TARE Press the button as often as necessary until the required function is displayed. -
Page 38: Menu Overview
HOLD TARE Selection available via button 14.4 Menu overview: Function Settings Description SEtuP Unit on-off Weight unit: kg Grad 3000 d – 6000 d – The values of the scale elementary division, 10000 d – 500 d – weighing range (max) and elementary division (d) 1000 d –... - Page 39 default Resetting to factory settings HOLD Leaving the menu after pressing button Description: Weighing unit: kg partition steps, weighing range (max.) and readout (d) Multi-range balance/ single-range balance selection Single-range balance Multi-range balance Filter: fast/ normal/ slow Auto Zero Tracking: 0.25d / 0.5d / 1d / 3d / OFF Stabilisation range: 0.25d / 0.5d / 1d / 3d / OFF Zero range: 2% / 100% Overload range: 9d / 2%...
Need help?
Do you have a question about the MCB 300K100NM and is the answer not in the manual?
Questions and answers