
Related Manuals for Flowserve Valtek GS


Summary of Contents for Flowserve Valtek GS
- Page 1 USER INSTRUCTIONS Valtek GS Installation General Service Control Valve Operation FCD VLENIM0300-00-A4 08/14 Maintenance TUV Certified IOM Experience in Motion...
-
Page 2: Table Of Contents
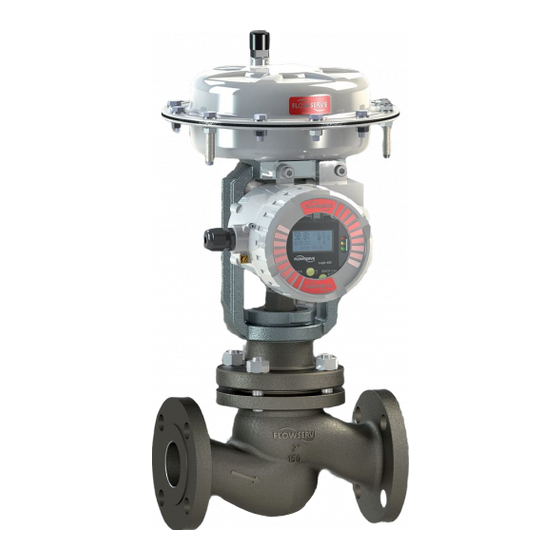
FCD VLENIM0300-00-A4 08/14 General Service Control Valve - Valtek GS The Valtek GS product line is low cost, compact and light-weight. Yet, it is rug- ged and can be used safely and confidently in a wide range of general service applications plant-wide. -
Page 3: Scope Of Manual
< 30° Ambient Temperature Arrangement Failure Position The Valtek GS handles a wide variety of general service ap- Besonderheiten Specialities plications, while offering high flow capacity. All sizes come standard with unbalanced trim; for high pressure drop appli- Figure 4: Serial Plate (EU-design, European Union) cations optional pressure balanced trim is available for NPS sizes 3 to 6 (DIN size 80 to 150). -
Page 4: Safety
NOTICE engineering standards. 6 months. Leakage may develop. Upon arrival on site, store the Valtek GS on a solid base in a 5 Safety cool, dry closed room. Until its installation, the valve must be protected from the weather, dirt and other potentially harmful influences. -
Page 5: Installation
(Actua- tor sizes 500 and 700 cm • Contact your shipper immediately to report any damage. • Call your Flowserve representative if you experience any problems. • Do not remove the protective covers from the body Figure 5: Triple-leg sling... - Page 6 Valtek GS General Service Valve FCD VLENIM0300-00-A4 08/14 Check Possible malfunction or safety related incident Confirm the actuator has enough overhead clearance ≈ R to disassemble the plug from the valve body. Removal Space ≈ R Actuator Code inch inch 10.2...
-
Page 7: Valve Quick-Check
Valtek GS General Service Valve FCD VLENIM0300-00-A4 08/14 1. Remove the protective flange covers and coating from 3. Install and connect the control valve to the pipeline. the control valve; clean the flange gasket surface. Locate gaskets in the center of the body flanges and secure nuts and bolts. -
Page 8: Valve Maintenance
Valtek GS General Service Valve FCD VLENIM0300-00-A4 08/14 Due to risk of crushing hazard, do 4. Continuously increase load until operation parameters WARNING are reached. not work between the yoke legs while the valve is in operation. 5. Minor relaxation of the flange bolting is possible after initial assembly. - Page 9 Valtek GS General Service Valve FCD VLENIM0300-00-A4 08/14 Valve Condition Inter- Service Good Adequate Inadequate Preventive overhaul of Dependent upon results of previous maintenance (see numbers 1 to 4 above) or a the valve minimum once every 60 months Operation test...
-
Page 10: Troubleshooting
Valtek GS General Service Valve FCD VLENIM0300-00-A4 08/14 After these requirements are confirmed proceed with valve 5. Make sure all nuts and bolts are securely fastened. maintenance. 6. If possible, stroke the valve and check for smooth, full-stroke operation. Unsteady stem movement could... - Page 11 Valtek GS General Service Valve FCD VLENIM0300-00-A4 08/14 Defect Possible Causes Remedy Jerky stem movement • Electric actuator is defective • Clean stem with suitable cleaning agent • Actuator not powerful enough • Compare actuator specifications on the serial plate with operation specifications of the facility. If...
-
Page 12: Disassembly And Reassembly
Make sure the pipeline is depressurized an in Remove the Valtek GS from the pipeline in a depressur- ambient state, also a suitable rigging (e.g. ized and ambient state. Failure to do so can cause serious Endless Sling) and securing devices (e.g. - Page 13 Valtek GS General Service Valve FCD VLENIM0300-00-A4 08/14 After these requirements are confirmed the control valve can be maintained and repaired. Description of the Procedure O-ring 1. Disconnect the air supply from the actuator and / or assembled accessories. Positioner 2.
- Page 14 Valtek GS General Service Valve FCD VLENIM0300-00-A4 08/14 6. Remove the bonnet gasket (58). 7. Insert the Seat Change Tool (See Section 16: Special Tools) into the body of the valve until the pin clicks into place. Use a suitable torque wrench to remove the seat ring.
- Page 15 Valtek GS General Service Valve FCD VLENIM0300-00-A4 08/14 body of the valve. 2. Turn the packing follower (80) counter clockwise to loosen. 20. Install and finger tighten the bonnet nuts (114) to the bonnet bolts (108). 3. Remove the Belleville springs (109).
- Page 16 Valtek GS General Service Valve FCD VLENIM0300-00-A4 08/14 Turn the hex nut (113) from the bellows seal assembly (6) counter clockwise to loosen, remove the seal car- rier (91) and profile ring (60) then move the bellows seal assembly down and out.
- Page 17 Valtek GS General Service Valve FCD VLENIM0300-00-A4 08/14 Reassembling Type A bellows: Carefully lower the bonnet (40) onto the plug. Install a new head gasket (59) and insert the bellows seal assembly (6) from the top of the bonnet (40). Finger tighten the stem (6) clockwise onto the plug (50).
- Page 18 Valtek GS General Service Valve FCD VLENIM0300-00-A4 08/14 Extended bonnet version with a pressure 29. Tighten the nuts (110) in four steps - 30%, 60%, 100%, and all around 100% - using a crosswise pattern (See balanced or MultiStream trim: Section 14: Torque Requirements).
- Page 19 Valtek GS General Service Valve FCD VLENIM0300-00-A4 08/14 Reassemble the actuator and positioner onto the valve: O-ring 1. Mount the pneumatic diaphragm or multi-turn actuator Positioner onto the bonnet and tighten the yoke lock nut (76) clockwise (See Section 14: Required Torques).
-
Page 20: Torque Requirements
Valtek GS General Service Valve FCD VLENIM0300-00-A4 08/14 14 Torque Requirements BONNET NUTs (58) Torque Requirements for per nominal diameter Valtek GS Presssure Class 1/2“ 3/4“ 1“ 1 1/2“ 2“ 3“ 4“ 6“ PN 16 / 40 12,5 Class 150... -
Page 21: Special Tools
Valtek GS General Service Valve FCD VLENIM0300-00-A4 08/14 16 Special Tools Special Tool Seat Change Tool Recommended tool for disassembling and reassembling. Part N° See spare parts catalog Torque wrench cannot afford such needed high torques. Use therefore an mechanical force multiplier - for example JUWEL Type 01 RS or Type 03L or equivalent. -
Page 22: Parts List
Valtek GS General Service Valve FCD VLENIM0300-00-A4 08/14 17 Parts List see page 17, see page 18 Item Part Available Materials Body 1.0619 A216 WCC 1.4408 A351 CF8M Bellows seal Unit 316 SS 3.15 Head 1.0460 A105 1.4404 316 L 1.0619... -
Page 23: Disposal
Table 17: Packing Details 18 Disposal The valve should be professionally disassembled and reas- Up to 95 % of the Valtek GS control valve is metal. The re- sembled. Metal parts should be scrapped, with the remaining maining materials are synthetic, rubber, polytetrafluoroethyl- materials disposed of according the national conditions. - Page 24 Flowserve Corporation has established industry leadership in the design and manufacture of its products. When properly selected, this Flowserve product is designed to perform its intended function safely during its useful life. However, the purchaser or user of Flowserve products should be aware that Flowserve products might be used in numerous applications under a wide variety of industrial service conditions.
Need help?
Do you have a question about the Valtek GS and is the answer not in the manual?
Questions and answers