Chapters
Table of Contents

Subscribe to Our Youtube Channel
Related Manuals for GreenWorks 2601402


Summary of Contents for GreenWorks 2601402
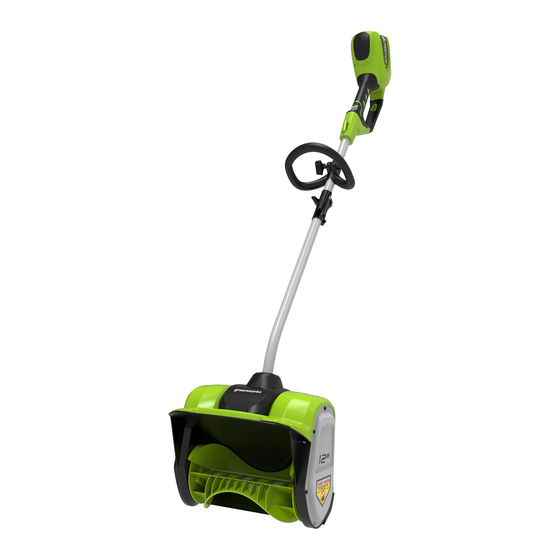
- Page 1 40V Cordless Snow Shovel 2601402 Owner’s Manual TOLL-FREE HELPLINE: 1-888-909-6757 www.GreenWorksTools.com Read all safety rules and instructions carefully before operating this tool.
-
Page 2: Table Of Contents
CONTENTS Contents ..........................2 Product Specifications ......................2 Safety Information ....................... 3 Symbols ..........................6 Know Your Snow Shovel ...................... 8 Assembly ..........................9 Operation ........................... 13 Maintenance ........................15 Environmentally safe battery disposal ................19 Troubleshooting ......................... 20 Warranty ..........................21 Exploded View/Parts List .................... -
Page 3: Safety Information
SAFETY INFORMATION FOLLOW THESE RULES WHILE OPERATING (THE POWER TOOL) W A R N I N G READ AND UNDERSTAND ALL INSTRUCTIONS. Failure to follow all instructions listed below may result in electric shock, fire, and/or serious personal injury. • Walk. Do not run. •... - Page 4 SAFETY INFORMATION accordance with the operator’s manual. • Keep Children Away – All visitors should be kept a safe distance from work area. • Dress Properly – Do not wear loose clothing or jewelry. They can be caught in moving parts. •...
- Page 5 USE ONLY GREENWORKS APPROVED REPLACEMENT BATTERIES, OTHER BATTERIES MAY CAUSE INJURY OR DAMAGE TO THE SNOW SHOVEL. USE ONLY WITH GREENWORKS 40V BATTERY (Model#: 29472) and GREENWORKS 40V CHARGER (Model#: 29482). W A R N I N G ( P R O P O S I T I O N 6 5 ) This product contains a chemical known to the state of California to cause cancer, birth defects or other reproductive harm.
-
Page 6: Symbols
SYMBOLS Some of the following symbols may be used on this product. Please study them and learn their meaning. Proper interpretation of these symbols will allow you to operate the product better and safer. SYMBOL DESIGNATION/EXPLANATION Voltage Current Frequency (cycles per second) Watt Hour - Energy Storage Capacity Amp Hour - Current Capacity Direct current... - Page 7 SYMBOLS The following signal words and meanings are intended to explain the levels of risk associated with this product. SYMBOLS SIGNAL MEANING Indicates an imminently hazardous situation, which, if not avoided, DANGER will result in death or serious injury. Indicates a potentially hazardous situation, which, if not avoided, WARNING could result in death or serious injury.
-
Page 8: Know Your Snow Shovel
KNOW YOUR SNOW SHOVEL Read this operator's manual and safety rules before operating your snow shovel. Compare the illustration in Figure 1 to your snow shovel in order to familiarize yourself with the location of various controls and adjustments. Save this manual for future reference. Battery compartment Auxiliary handle Lock-out button... -
Page 9: Assembly
ASSEMBLY INSTRUCTIONS PACKING LIST PART NAME FIGURE Snow shovel Auxiliary handle Owner's manual UNPACKING • Carefully remove the product and any accessories from the box. Make sure that all items listed in the packing list are included. • Inspect the product carefully to make sure no breakage or damage occurred during shipping. •... - Page 10 ASSEMBLY INSTRUCTIONS CONNECTING THE SHAFTS (See Figures 2-3) • Align the pin on the handle shaft and the hole on the lower shaft. (Fig. 2) • Once the two shafts are secured, turn the lock knob clockwise until it is fully tightened. (Fig. 3) Handle shaft Lower shaft Lock knob...
- Page 11 ASSEMBLY INSTRUCTIONS TO INSTALL BATTERY PACK (See Figure 4) • Slide the battery (1) down to lock it into position. The battery is fully inserted into the snow shovel when you hear an audible “click”. Fig. 4 Fig. 5 TO REMOVE BATTERY PACK (See Figure 5) •...
- Page 12 CONTENTS ASSEMBLY INSTRUCTIONS ATTACHING THE AUXILIARY HANDLE (See Figure 6) • Press the auxiliary handle (1) onto the upper shaft so that the handle is angled toward the rear handle that allows for comfortable operation. • Slide the auxiliary handle over the metal ring (2) and ensure the metal ring fits between the slot on the auxiliary handle.
- Page 13 CONTENTS OPERATING INSTRUCTIONS STARTING THE SNOW SHOVEL (See Figure 7) In order to avoid serious injury, the operator and unit must be in a stable position when starting the snow shovel. Follow this sequence exactly in order to start the snow shovel. •...
- Page 14 OPERATING INSTRUCTIONS USING THE SNOW SHOVEL (See Figure 8) • Start the snow shovel by following the Starting Instructions. The depth and weight of the snow will determine the forward speed. • Push the snow shovel forward so that it rides on the scraper. Scraper Fig.
-
Page 15: Maintenance
MAINTENANCE REPLACING THE SCRAPER (See Figures 9-10) W A R N I N G IN ORDER TO AVOID SERIOUS PERSONAL INJURY, TURN THE SNOW SHOVEL OFF AND REMOVE BATTERY BEFORE PERFORMING ANY MAINTENANCE. Use only the manufacturer's original replacement parts. •... - Page 16 MAINTENANCE STORAGE • Allow the motor to cool down before storing. • Store the snow shovel in a locked location in order to prevent unauthorized use or damage. • Store the snow shovel in a dry, well-ventilated area. • Store the snow shovel out of the reach of children. CLEANING •...
- Page 17 MAINTENANCE IMPELLOR REPLACEMENT screw Washer • Remove the right side • Pull the belt tensioner (idler • Remove the belt. cover by removing 6 arm) away from the drive screws. pulley. Be sure not to lose the washer and screw left. •...
- Page 18 MAINTENANCE IMPELLOR REPLACEMENT • Replace and tighten the • Replace and tighten the • Replace and tighten the remaining nut to secure the remaining screws to secure remaining screws to secure left side plate assembly. the left side cover. the pulley assembly. •...
-
Page 19: Environmentally Safe Battery Disposal
ENVIRONMENTALLY SAFE BATTERY DISPOSAL The following toxic and corrosive materials are in the batteries used in this tool battery pack: Lithium-Ion, a toxic material. W A R N I N G Toxic materials must be disposed of in a specified manner in order to prevent contamination of the environment. -
Page 20: Troubleshooting
TROUBLESHOOTING PROBLEM POSSIBLE CAUSE SOLUTION Charge the battery by following the The battery is not charged. procedures in the battery and charger manual. Press and hold the lock-out button, The lock-out button or trigger while holding the lock-out button, press switch were not used properly. -
Page 21: Warranty
(4) years against defects in materials, parts or workmanship. GREENWORKS™, at its own discretion will repair or replace any and all parts found to be defective, through normal use, free of charge to the customer. This warranty is valid only for... -
Page 22: Exploded View/Parts List
EXPLODED VIEW/PARTS LIST ITEM NO. PART NO. DESCRIPTION 311101469 Snow Shovel Main Body 361011469S Motor Assembly 311121468 Belt tensioner 329011468 Belt 311131468 Impeller shaft assembly 3220401 Screw 3390198 Tensioner spring 32205877 Screw 341041468 Scraper 341031468 Impeller 362011469AB PCB board 311021456 Auxiliary handle assembly... - Page 23 Greenworks Tools PO Box 1238 Mooresville, NC 28115 TOLL-FREE HELPLINE: 1-888-909-6757 Rev: 02 (07-24 -17) Printed in China on 100% recycle material...
- Page 24 Pala de nieve Inalámbrica de 40V 2601402 Manual Del Propietario LÍNEA GRATUITA LÍNEA DE AYUDA: 1-888-909-6757 www.GreenWorksTools.com Leer todas las normas de seguridad y las instrucciones cuidadosamente antes de utilizar esta herramienta.
- Page 25 CONTENIDOS Contenidos........................... 2 Especificaciones ........................2 Reglas de seguridad ......................3 Símbolos ..........................6 Diagrama y ubicación de piezas ..................8 Ensamblado ......................... 9 Funcionamiento ......................... 13 Mantenimiento ........................15 Eliminación de la batería que no daña el medio ambiente ..........19 Corrección de problemas ....................
-
Page 26: Reglas De Seguridad
REGLAS DE SEGURIDAD LEA TODAS LAS INSTRUCC IONES ANTES DEL PRIMER USO (DEL APARATO) A D V E R T E N C I A LEA Y COMPRENDA TODAS LAS INSTRUCCIONES ANTES DE USAR ESTE PRODUCTO. El ncumplimiento de las instrucciones siguientes puede ser causa de descargas eléctricas, incendios y lesiones personales graves. - Page 27 REGLAS DE SEGURIDAD • Pare el motor y retire la batería siempre que usted no opere con ella, antes de destapar el propulsor y antes de proceder a cualquier tipo de reparación, ajuste o comprobación. • No utilice la máquina en una superficie con grava, a menos que esté ajustada para este tipo de superficies según el manual del usuario.
- Page 28 PUEDEN OCASIONAR DAÑOS A LA PODADORA. ÚSESE CON BATERÍAS GREENWORKS 40 V (Modelo#: 29472) Y CARGADOR GREENWORKS 40 V (Modelo#: 29482). A D V E R T E N C I A ( P R O P U E S T A 6 5 ) Este producto contiene un producto químico conocido en el Estado de California por: producir...
-
Page 29: Símbolos
SÍMBOLOS Algunos de los siguientes símbolos pueden ser usados en este producto. Obsérvelos y aprenda su signifi cado. Una correcta interpretación de estos símbolos le permitirá utilizar el producto mejor y de una forma más segura. SÍMBOLO DENOMINACIÓN/EXPLICACIÓN Voltaje Corriente Frecuencia (ciclos por segundo) Vatio/hora –... - Page 30 SÍMBOLOS Las siguientes palabras de señalización y sus significados tienen el objeto de explicar los niveles de riesgo relacionados con este producto. SÍMBOLO SEÑAL SIGNIFICADO Indica una situación peligrosa inminente, la cual, si no se evita, PELIGRO causará la muerte o lesiones serias. Indica una situación peligrosa posible, la cual, si no se evita, ADVERTENCIA podría causar la muerte o lesiones serias.
-
Page 31: Diagrama Y Ubicación De Piezas
DIAGRAMA Y UBICACIÓN DE PIEZAS Lea el manual del operador y las normas de seguridad antes de manejar la pala de nieve. Compare la ilustración en Fig. 1 con la podadora para familiarizarse con la ubicación de los diferentes controles y ajustes. Guarde este manual para referencia futura. Compartimiento de batería Manija auxiliar... -
Page 32: Ensamblado
INSTRUCCIONES DE ENSAMBLADO LISTA DE PIEZAS NOMBRE DE LAS FIGURA CDAD. PIEZAS Pala de nieve Manija auxiliar Manual DESEMPAQUETADO • Extraiga cuidadosamente de la caja la herramienta y los accesorios. Asegúrese de que estén presentes todos los artículos enumerados en la lista de empaquetado. •... - Page 33 INSTRUCCIONES DE ENSAMBLADO CONECTAR LAS ASTAS (Consulte la figuras 2-3) • Alinee el perno del tubo de la empuñadura y el agujero del tubo inferior. (Fig. 2) • Gire la palanca de bloqueo hacia la derecha hasta que quede completamente apretada. (Fig. 3) Asta de asidero Asta más baja...
- Page 34 INSTRUCCIONES DE ENSAMBLADO IN STALACI ÓN DEL PAQUETE DE BATER ÍAS (Consulte la figura 4) • Deslice la batería (1) hacia abajo para trabarla en su posición correcta. La batería está completamente insertada en el quitanieve cuando se escucha un “clic”. Fig.
- Page 35 INSTRUCCIONES DE ENSAMBLADO FIJACIÓN DEL MANGO DELANTERO (Vea la figura 6) • Presione el mango (1) delantero en el eje de la cabeza motriz de manera que el mango está inclinado hacia el mango trasero. • Deslice el mango auxiliar en la anilla metálica (2) y asegúrese de que la anilla encaja entre la ranura del mango auxiliar.
- Page 36 INSTRUCCIONES DE USO CÓMO ARRANCAR LA PALA DE NIEVE (Consulte la figura 7) Para evitar lesiones graves, el operador y la unidad deben estar en una posición estable al arrancar la pala de nieve. Siga exactamente la siguiente secuencia para arrancar la pala de nieve. •...
- Page 37 INSTRUCCIONES DE USO CÓMO USAR LA PALA DE NIEVE (Consulte la figura 8) • Arranque la pala de nieve siguiendo las instrucciones de arranque. La velocidad hacia adelante se determina por la profundidad y peso de la nieve. • Empuje la pala de nieve hacia delante de manera que se apoye en el raspador. Raspador Fig.
-
Page 38: Mantenimiento
MANTENIMIENTO CÓMO REEMPLAZAR EL RASPADOR (Consulte la figuras 9-10) A D V E R T E N C I A PARA EVITAR LESIONES PERSONALES GRAVES, APAGUE LA PALA Y RETIRE LA BATERÍA ANTES DE HACER EL MANTENIMIENTO. Use solamente repuestos originales del fabricante. •... - Page 39 MANTENIMIENTO ALMACENAMIENTO • Deje que el motor se enfríe antes de almacenarlo. • Almacene la pala de nieve en un lugar bajo llave para evitar el uso no autorizado y los daños. • Almacene la pala de nieve en un área seca y bien ventilada. •...
- Page 40 MANTENIMIENTO CÓMO REEMPLAZAR EL IMPULSOR Tornillos Arandela • Retire la cubierta derecha • Tire del tensor de la correa • Retire la correa. desatornillando los 6 (brazo tensor) hacia fuera tornillos. del rodillo motriz. Asegúrese de no perder la arandela ni el tornillo izquierdo.
- Page 41 MANTENIMIENTO CÓMO REEMPLAZAR EL IMPULSOR • Coloque y apriete la tuerca • Coloque y apriete los • Coloque y apriete los restante para ensamblar la tornillos restantes para tornillos restantes para placa izquierda. ensamblar la cubierta ensamblar el rodillo. izquierda. •...
- Page 42 ELIMINACIÓN DE BATERÍAS SIN DAÑO PARA EL AMBIENTE Las baterías utilizadas en esta herramienta contienen los siguientes materiales tóxicos y corrosivos: Litio-ión, un material tóxico. A D V E R T E N C I A Se debe desechar los materiales tóxicos de la forma especificada para evitar contaminar el medio ambiente.
- Page 43 SOLUCIÓN DE PROBLEMAS PROBLEMA CAUSA POSIBLE SOLUCIÓN Cargue la batería siguiendo los La batería no tiene carga. procedimientos del manual de la batería y el cargador. El botón para bloqueo por Pulse y mantenga pulsado el botón desconexión o el interruptor de bloqueo.
-
Page 44: Garantía
GARANTÍA LIMITADA DE 4 AÑOS Por este medio y por un período de cuatro años GREENWORKS™ garantiza este producto contra defectos en materiales, piezas o mano de obra al comprador original que cuente con una prueba de compra. GREENWORKS™, a su sola discreción reparará o reemplazará, sin costo alguno para el cliente, cualquier pieza defectuosa, siempre y cuando se haya hecho uso normal de ella. -
Page 45: Vista Desarrollada/Lista De Piezas
VISTA DESARROLLADA/LISTA DE PIEZAS ARTÍCULO NO. PARTE NO. DESCRIPCIÓN CDAD. 311101469 Cuerpo principal 361011469S Conjunto del motor 311121468 Tensor de la correa 329011468 Correa 311131468 Eje propulsor 3220401 Tornillo 3390198 Resorte del tensor 32205877 Tornillo 341041468 Raspador 341031468 Impulsor 362011469AB Placa PCB 311021456 Conjunto de la manija auxiliar... - Page 46 Greenworks Tools PO Box 1238 Mooresville, NC 28115 LÍNEA DE AYUDA GRATUITA: 1-888-909-6757 Rev: 02 (07-24 -17) Impreso en China en papel reciclado de 100%...
Need help?
Do you have a question about the 2601402 and is the answer not in the manual?
Questions and answers