Advertisement
Quick Links
Scan for full manual
Step 1: Check what's in the box
VP-440X 4K Presentation Switcher Scaler
1 Power adapter and cord
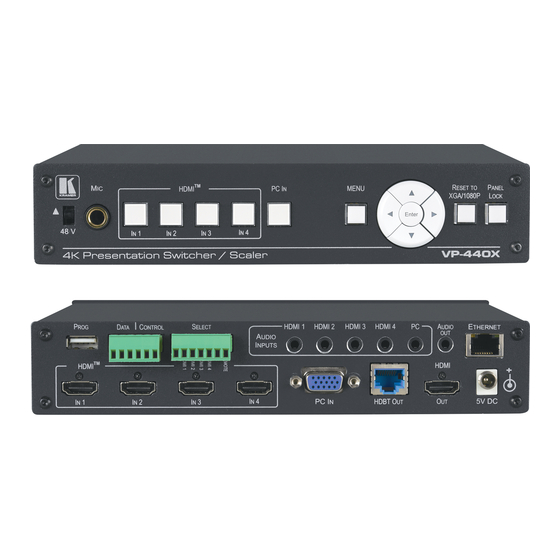
Step 2: Get to know your VP-440X
The terms HDMI, HDMI High-Definition Multimedia Interface, and the HDMI Logo are trademarks or registered trademarks of HDMI Licensing Administrator, Inc.
#
Feature
1
48 V () Slide Switch
2
MIC 6.3mm Jack
3
Input Selector
HDMI IN
Buttons
4
PC IN
5
MENU Button
6
Navigation
Buttons
ENTER
7
RESET TO XGA/1080p Button
8
PANEL LOCK Button
VP-440X Quick Start
VP-440X Quick Start Guide
This guide helps you install and use your VP-440X for the first time.
Go to
www.kramerav.com/downloads/VP-440X
upgrades are available.
1 Quick start guide
4 Rubber feet
Function
Slide up (48V) to select a condenser type microphone; slide down to select a dynamic
type microphone (we recommend that you slide down if a microphone is not connected to
the VP-440X).
Connect to the microphone source.
Press to select the HDMI input (from 1 to 4).
Press to select the computer graphics input.
Displays the OSD menu.
Press to decrease numerical values or select from several definitions.
When not in the OSD menu, press to reduce the output volume.
Press to move up the menu list values.
Press to increase numerical values or select from several definitions.
When not in the OSD menu, press to increase the output volume.
Press to move down the menu list.
Press to accept changes and change the SETUP parameters.
Press and hold for about 5 seconds to toggle the output resolution between XGA and
1080p, alternatively.
Press and hold for about 5 seconds to lock/unlock the front panel buttons.
to download the latest user manual and check if firmware
P/N: 2 9 0 0 - 3 0 1 2 3 3 QS
Rev: 3
Advertisement

Subscribe to Our Youtube Channel
Related Manuals for Kramer VP-440X


Summary of Contents for Kramer VP-440X
- Page 1 VP-440X Quick Start Guide This guide helps you install and use your VP-440X for the first time. Go to www.kramerav.com/downloads/VP-440X to download the latest user manual and check if firmware upgrades are available. Scan for full manual Step 1: Check what’s in the box...
- Page 2 5V DC +5V DC connector for powering the unit. Step 3: Install VP-440X Install VP-440X using one of the following methods: • Attach the rubber feet and place the unit on a flat surface. • Ensure that the environment (e.g., maximum ambient temperature &...
- Page 3 Step 4: Connect the inputs and outputs Always switch OFF the power on each device before connecting it to your VP-440X. For best results, we recommend that you always use Kramer high-performance cables to connect AV equipment to VP-440X. RJ-45 Pinout:...
- Page 4 Step 6: Operate and control the VP-440X Operate VP-440X via: • Input select and MENU front panel buttons (as well as reset and panel lock buttons). • Remotely, by RS-232 serial commands transmitted by a touch screen system, PC, or other serial controller.
Need help?
Do you have a question about the VP-440X and is the answer not in the manual?
Questions and answers