Table of Contents
Advertisement
Quick Links
Advertisement
Table of Contents

Related Manuals for PowerBox Systems iGyro SAT


Summary of Contents for PowerBox Systems iGyro SAT
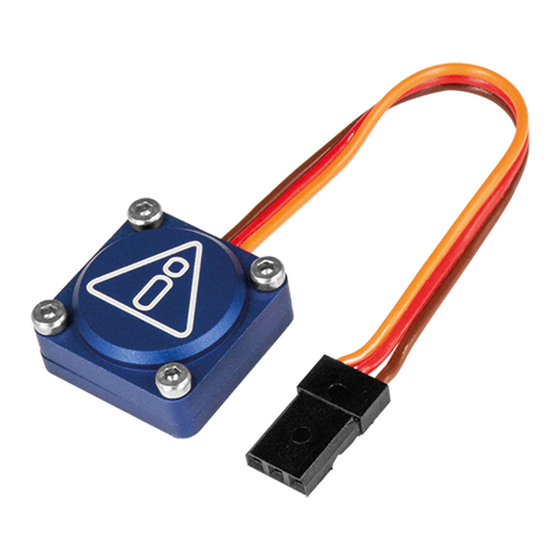
- Page 1 Instruction Manual...
- Page 2 2. INSTALLATION, CONNECTIONS The iGyro SAT can be installed in any position in the model - provided that it is parallel to or at right-angles (90°) to the model’s centreline (direction of flight). The result of installing it at an angle would be a mixed corrective effect.
- Page 3 2m long without problem. This means that the iGyro SAT can be instal- led in any location in the model, ideally well away from vibration or turbine noise. The iGyro SAT/receiver combination is capable of controlling two ailerons, two elevators and two rudders independently of each other.
- Page 4 - Assign the established gain value to a switch As you can see, no adjustments of any kind are required at the iGyro SAT or the receiver in order to carry out the basic model set-up, or to test-fly the model with the gyro disabled.
- Page 5 The menu is designed in such a way that frequently used screen displays are close to the front, while basic setup menus are further back. As a first step you have to set the Data output to FAST TRACK in the first page of the Telemetry menu.
-
Page 6: Channel Assignment
3.2. CHANNEL ASSIGNMENT Tap repeatedly on the right arrow until you come to the channel assignment / Input Mapping display. At this point you should select the outputs which are to be connected to the corre- sponding gyro outputs. This means: if you have set the two aileron servos to 1 and 5, then you should enter 1 for Aileron A, 5 for Aileron B. - Page 7 you should always allow a little time for the menu to refresh itself. If you wish to make substantial adjustments to a particular value, simply keep the button pressed, and the value begins to change faster and faster. Always maintain a certain minimum distance between the transmitter and the receiver.
- Page 8 Once you have completed the assignment procedure, switch to the Gyro Setup screen: The installed position of the iGyro SAT and the stick zero and end-points are esta- blished at this screen. The installed position of the iGyro SAT is detected by defined movements of the model.
- Page 9 neutral, and the transmitter displays the message Move right. If the elevators only return slowly to the neutral position, then you did not raise the tail high enough; in this case repeat the procedure. Now move the model’s tail briskly to the right. Exactly as before, the rudder moves in a random direction as you move the tail.
-
Page 10: Test-Flight
The iGyro in your PBR receiver is now ready for the model’s test-flight. Increase the gain using the gain control on the transmitter, and check that the directions of gyro effect are correct. If the installed position and the end-points have been established correctly, the directions of effect will also be correct! Note: if you subsequently alter the trims or end-points (travels), the teaching process should be repeated. - Page 11 3.6. GAIN ADJUSTMENT FOR INDIVIDUAL AXES All the fine-tuning for the iGyro SAT can be carried out using the CORE transmit- ter’s Telemetry menu. The most frequently required point is fine gain adjustment for individual axes. The transmitter’s Gain channel adjusts gyro gain for all axes simultaneously, whereas the Fine Tuning menu allows each axis to be adjusted separately.
-
Page 12: Additional Features
Select the axis to be adjusted at Axis Selection, then the desired range at Range Selection. The two ranges can be used to enter two different settings, which you can then select in flight using a switch. Range A is selected for gain values of 0% to +100%, while Range B applies to 0% to -100%. - Page 13 - Stick priority: The default setting for this is 100%, i.e. the gyro function is completely suppressed when the stick reaches either end-point. If you adjust Stick Priority to, say, 200%, then the gyro function is fully suppressed when the stick reaches the half-way point.
-
Page 14: Set Contents
4. SET CONTENTS - iGyro SAT - 2 x self-adhesive pad - Operating instructions 5. DIMENSIONS 6. SERVICE NOTE We make every effort to provide a good service to our customers, and have esta- blished a Support Forum which covers all queries relating to our products. Please use the Support Forum before you contact us by telephone. -
Page 15: Guarantee Conditions
For this reason we are unable to accept liability for loss, damage or costs which result from the use of the device, or are connected with its use in any way! We wish you every success using your new iGyro SAT and hope you are completely satisfied with it! Donauwoerth, May 2020 www.powerbox-systems.com... - Page 16 05/2020 PowerBox-Systems GmbH certified according to DIN EN ISO 9001 Ludwig-Auer-Straße 5 D-86609 Donauwoerth Germany +49-906-99 99 9-200 +49-906-99 99 9-209 www.powerbox-systems.com...
Need help?
Do you have a question about the iGyro SAT and is the answer not in the manual?
Questions and answers