
Related Manuals for SHOWTEC Quick DMX Rack 1024


Summary of Contents for SHOWTEC Quick DMX Rack 1024
- Page 1 MANUAL ENGLISH Quick DMX Rack 1024 Ordercode: 50058 Highlite International B.V. – Vestastraat 2 – 6468 EX – Kerkrade – the Netherlands...
-
Page 2: Table Of Contents
Quick DMX Rack 1024 Table of contents Warning ....................................2 Safety Instructions ................................. 2 Operating Determinations ............................3 Connection with the mains............................4 Return Procedure ................................4 Claims ....................................4 Description of the device ..............................5 Frontside..................................5 Backside ..................................5 Installation ................................... -
Page 3: Warning
Quick DMX Rack 1024 Warning Unpacking Instructions Immediately upon receiving this product, carefully unpack the carton and check the contents to ensure that all parts are present, and have been received in good condition. Notify the dealer immediately and retain packing material for inspection if any parts appear damaged from shipping or the carton itself shows signs of mishandling. -
Page 4: Operating Determinations
For replacement use fuses of same type and rating only. The user is responsible for correct positioning and operating of the Quick DMX Rack 1024. The manufacturer will not accept liability for damages caused by the misuse or incorrect installation of this device. -
Page 5: Connection With The Mains
Quick DMX Rack 1024 Connection with the mains Connect the device to the mains with the power-plug. Always check if the right color cable is connected to the right place. International EU Cable UK Cable US Cable BROWN YELLOW/COPPER PHASE... -
Page 6: Description Of The Device
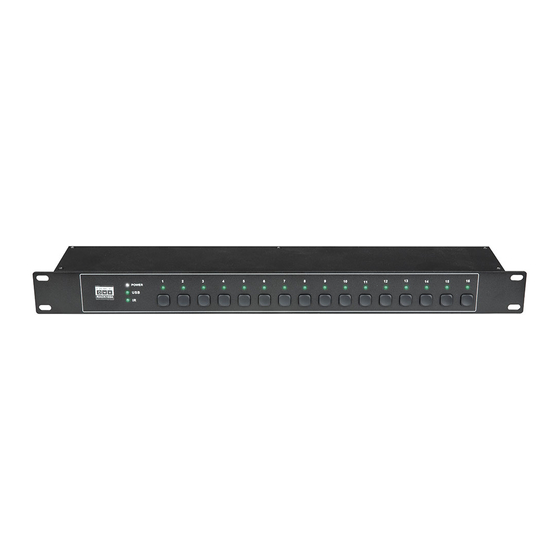
Description of the device Features The Showtec Quick DMX Rack 1024 is a stand-alone interface which can store up to 16 different DMX files. It makes the device suitable for fixed installations. In order to edit DMX files, connection with Quick DMX software is required. -
Page 7: Installation
Always disconnect from electric mains power supply before cleaning or servicing. Damages caused by non-observance are not subject to warranty. You are only able to connect the Quick DMX Rack 1024 via the included USB cable (USB-A to USB-B) to your own computer. - Page 8 Quick DMX Rack 1024 05) Click on “StandAlone” tab. The display will show: 06) Click on one of the numbers (1-16) in order to choose the desired memory button. 07) Right-click on the timeline and choose “Add light scene,” “Add Generator scene” or “Add Pixels scene.”...
- Page 9 11) Repeat steps 3-9 in order to assign DMX files to the remaining memory buttons. 12) Once you have assigned all the scenes/chases to the desired buttons, click on “Upload Data,” in order to export data to the Quick DMX Rack 1024 and wait until the process is finished. Ordercode: 50058...
-
Page 10: Patching Dmx Input
It is NOT RECOMMENDED to assign DMX files to random buttons. In such case, some DMX files WILL NOT function properly. Patching DMX Input Problems with uploading from your PC to your Quick DMX Rack 1024 Pay attention! Please, first check whether the rack Is connected on a USB Hub. - Page 11 Quick DMX Rack 1024 02) When the Quick DMX rack is listed under “other devices”, click Update driver of this device. 03) Click on: Browse my computer for drivers, Locate and Install a Driver manually: Ordercode: 50058...
- Page 12 Quick DMX Rack 1024 04) Click on: Let me pick from a list of available drivers on my computer Ordercode: 50058...
- Page 13 Quick DMX Rack 1024 05) Uncheck the box Show compatible hardware (if it is checked). 06) Select WinUSB-device from the manufacturer and model column. After that, you will get a long list of different devices. Select “USB device” here. 07) A popup-window will open and you have to select Yes:...
-
Page 14: Led Indicators
Quick DMX Rack 1024 08) Now the device is in the correct column, and the warning triangle is gone: LED indicators When the device is plugged in the LED indicators will show the status of the Quick DMX Rack. Power LED: Quick DMX Rack is receiving sufficient DC power. -
Page 15: Standalone Playback
Quick DMX Rack 1024 Standalone Playback The Quick DMX Rack can store a DMX program and is able to recall the uploaded program when it is no longer connected to a computer. After programming the show on your computer you have to upload it to the Quick DMX Rack: 01) Navigate to the StandAlone tab. -
Page 16: Ir Remote Control
Quick DMX Rack 1024 All three options may be selected at once, or none at all. Note: only the buttons or the phoenix contacts will trigger the programs IR Remote Control The included IR Remote can trigger any program assigned to one of the 16 buttons and can control the speed of the DMX programs. -
Page 17: Patching Dmx Input
If you have an external fader desk and would like to operate a device present on the DMX data link, assigned to a channel which cannot be reached by means of your fader desk, the Quick DMX Rack 1024 gives you the possibility to patch DMX input to the desired DMX outputs. - Page 18 Quick DMX Rack 1024 05) In “Outputs,” insert the number of the channel(s) which you want to be triggered by the selected fader. 06) Click on “Add” to create the patch (e.g. fader #1 should trigger the DMX channels #1, 2, 3, 4, 5, 6 and 7).
-
Page 19: Control Modes
02) Use a 3-pin XLR cable to connect the Quick DMX Rack 1024 and other devices. 03) Connect the Quick DMX Rack’s "in" socket to a light controller. Connect the Quick DMX Rack 1024 to a PC by means of a USB cable. -
Page 20: Data Cabling
03) If all of the above appears to be O.K., plug the unit in again. 04) If you are unable to determine the cause of the problem, do not open the Quick DMX Rack 1024, as this may damage the unit and the warranty will become void. -
Page 21: Product Specifications
Quick DMX Rack 1024 Product Specifications Model: Showtec Quick DMX Rack 1024 Input voltage: Input voltage: 9V DC, 300mA power adapter (not included), USB Memory: 16 slots DMX channels: 1024 Channels Control protocol: DMX-512 Internal clock / calendar 8 external trigger contacts (Phoenix connector) - Page 22 Quick DMX Rack 1024 Ordercode: 50058...
- Page 23 Quick DMX Rack 1024 Ordercode: 50058...
- Page 24 ©2020 Showtec...
Need help?
Do you have a question about the Quick DMX Rack 1024 and is the answer not in the manual?
Questions and answers