Advertisement
Table of Contents
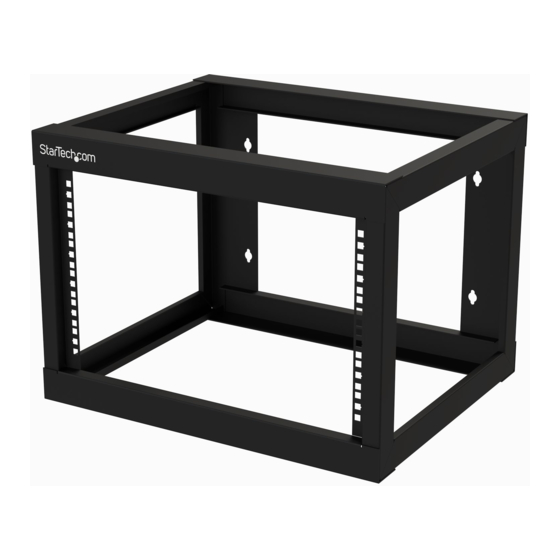
6U 18in Depth Wall-Mount Server Rack
Product Diagram (RK619WALLO)
1
Component
1
• Used to mount equipment in the Wall-Mount Rack.
Square Mounting Holes
• Used to secure the Wall-Mount Rack to a
2
Mounting Holes
• Wall-Mount Rack's maximum weight capacity =
Requirements
For the latest requirements, please visit
•
(Optional) Cage Nut Tool x 1
•
(Optional) Spirit/Bubble Level x 1
•
Phillips Head Screwdriver x 1
•
Mounting Hardware (sold separately)
Mounting the Wall-Mount Rack
Fasten the Wall-Mount Rack to a Mounting Surface using the appropriate Mounting
Hardware. Verify that the Wall-Mount Rack is level with a Spirit/Bubble Level before
fastening it to a Mounting Surface.
Warning! The Wall-Mount Rack is designed to be installed on a wood stud, solid
concrete, or cinder block wall. The wall structure should be capable of supporting at least
four times the weight of the mounted equipment. Contact a construction professional
to install the Wall-Mount Rack. Failure to do so may result in personal injury and/or
equipment damage.
To view manuals, FAQs, videos, drivers, downloads, technical drawings, and more, visit www.startech.com/support.
2
Function
Mounting Surface.
175 lbs (80 kg).
www.startech.com/RK619WALLO
Installing a Shelf or Equipment
1. Insert the M6 Cage Nuts into the Square Mounting Holes on the Mounting Rails.
Insert one side of the M6 Cage Nut (included) into the Square Mounting Hole and
push the other side into the Square Mounting Hole, until it locks into place.
Note: Use a Cage Nut Tool (sold separately) if you are having issues installing the M6
Cages Nuts into the Rack.
2. Align the Mounting Holes on the Equipment with the M6 Cages Nuts installed in
step 2.
3. Insert an M6 Screw through a M6 Plastic Washer (included) and through the
Mounting Holes on the Equipment and into the M6 Cage Nut.
4. Using a Phillips Head Screwdriver tighten the M6 Screws, being careful not to
over-tighten.
Product Dimensions
Front
Quick-Start Guide
Manual Revision: November 28, 2019 12:05 PM
Advertisement
Table of Contents

Related Manuals for StarTech.com RK619WALLO


Summary of Contents for StarTech.com RK619WALLO
- Page 1 Contact a construction professional to install the Wall-Mount Rack. Failure to do so may result in personal injury and/or equipment damage. To view manuals, FAQs, videos, drivers, downloads, technical drawings, and more, visit www.startech.com/support. Manual Revision: November 28, 2019 12:05 PM...
- Page 2 StarTech.com. Where they occur these references are for illustrative purposes only and do not represent an endorsement of a product or service by StarTech.com, or an endorsement of the product(s) to which this manual applies by the third-party company in question.
Need help?
Do you have a question about the RK619WALLO and is the answer not in the manual?
Questions and answers