Table of Contents
Advertisement
Quick Links
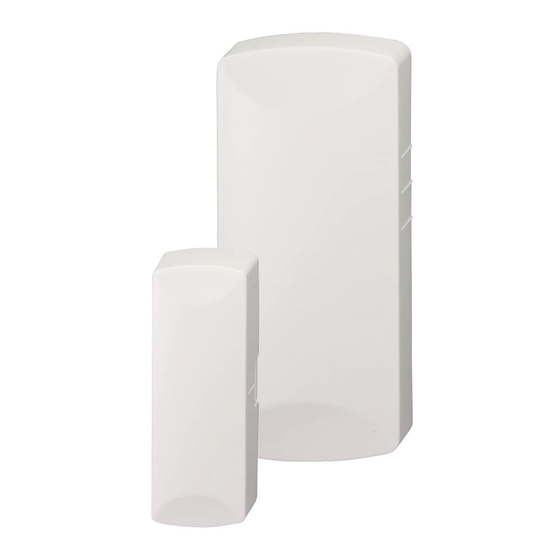
TX-E201 Door/Window Sensor
Installation Sheet
Overview
The TX-E201 door window sensor is designed for compatibility with Interlogix and Qolsys control panels that receive 319.5
MHz RF protocol.
Enrolling
To enroll the sensor, set your panel into program mode. Then go to the Learn Sensors menu. Refer to your specific alarm panel
manual for details on these menus. With the battery installed, activate the case tamper by sliding the cover up and down. You
will hear a click when the case latches are engaging and disengaging.
Continue until the panel responds to the sensor. Then select the appropriate sensor group and number.
Mounting
One side of the sensor is marked with 3 lines; this indicates the location of the reed switch. The magnet should be mounted facing
this side of the sensor, and it must be no further than 5/8" (15.875mm) from the sensor.
Included with this device is double sided tape for the contact and the magnet. Choose a suitable location for the sensor by following
the procedure in the section "Testing the Sensor" ensuring desired signal strength is achieved
surface is clean and dry. Apply the tape to the sensor and then to the desired location. Apply firm pressure for several seconds.
Note: When mounting with double sided tape, ensure temperatures are above 50°F and will remain above 50°F for at least 24
hours to ensure proper bond. After 24 hours, the bond will hold at lower temperatures.
Where possible, install sensors within 100 ft. (30 m) of the panel. While a transmitter may have an open-air range of 500 ft.
(150 m) or more, the environment at the installation site may have a significant effect on operational range. Changing a
sensor location may improve wireless communication.
Interchangeable covers
The contact comes from the factory assembled with a white cover but included are optional brown covers. To change the cover,
simply slide the front cover to disengage it from the sensor, and then remove. Replace with the brown cover ensuring the Top (as
marked on the inside of the cover) points away from the battery. You should hear a click when the cover engages and disengages
from the sensor. You do not need to replace the back plastic because once mounted the back is not visible. To replace the magnet
cover, you will need to gently pry the white cover off with a flat head screw driver and snap the brown cover in place.
Testing the Sensor (Test Weekly)
The sensor test verifies proper communication between the sensor and the panel/receiver. To test the sensor, refer to the specific
panel/receiver documentation and do the following:
1.
Put the panel/receiver into sensor test mode.
2.
Open the door/window the sensor is protecting. The sensor transmits a signal.
3.
Listen for siren beeps from the control panel to determine the appropriate response.
4.
Exit sensor test mode.
Installing / Replacing the Battery
When the battery is low a signal will be sent to the control panel. To install/replace the battery:
1.
Slide the top cover to disengage it from the sensor. Then remove to reveal the battery.
2.
Install/replace with a CR2032 battery ensuring the + side of the battery faces towards you.
3.
Re-attach the cover. Ensure the Top (as marked on the inside of the cover) points away from the battery. You should hear
a click when the cover engages properly.
Note: Removing the cover will trigger a zone tamper signal to the control panel.
Specifications
Frequency
Battery
Battery Life
Operating Temperature
Operating Humidity
Magnet Gap
Supervisory Signal Interval
Compatibility
319.5MHz
3V lithium CR2032
5-8 years
32°-120°F (0°-49°C)
5-95% RH noncondensing
5/8" (15.875mm) max
60 min (approximately)
Interlogix Learn Mode Panels and Receivers
.
For reliable bonding, ensure the
Advertisement
Table of Contents

Related Manuals for Ecolink TX-E201


Summary of Contents for Ecolink TX-E201
- Page 1 TX-E201 Door/Window Sensor Installation Sheet Overview The TX-E201 door window sensor is designed for compatibility with Interlogix and Qolsys control panels that receive 319.5 MHz RF protocol. Enrolling To enroll the sensor, set your panel into program mode. Then go to the Learn Sensors menu. Refer to your specific alarm panel manual for details on these menus.
- Page 2 The foregoing limited warranty is and shall be in lieu of any and all other warranties, whether expressed or implied and of all other obligations or liabilities on the part of Ecolink.
Need help?
Do you have a question about the TX-E201 and is the answer not in the manual?
Questions and answers