AudioCodes 445HD Quick Manual
Hide thumbs
Also See for 445HD:
- User manual (126 pages) ,
- Quick manual (11 pages) ,
- Administrator's manual (242 pages)
Table of Contents
Advertisement
Quick Links
AudioCodes 445HD IP Phone
1. Before Installing
Congratulations on purchasing your AudioCodes 445HD IP Phone!
Before installing your phone, make sure the following items are included in the shipped box:
445HD IP Phone
AC power adapter (optional)
Cat 5e Ethernet cable
Phone base stand
Handset
Handset cord
Wall-mounting screws
Note:
Sidecar and Busy Lamp Fields (BLF) with 12 Speed Dials are not supported on 445HD-R
models.
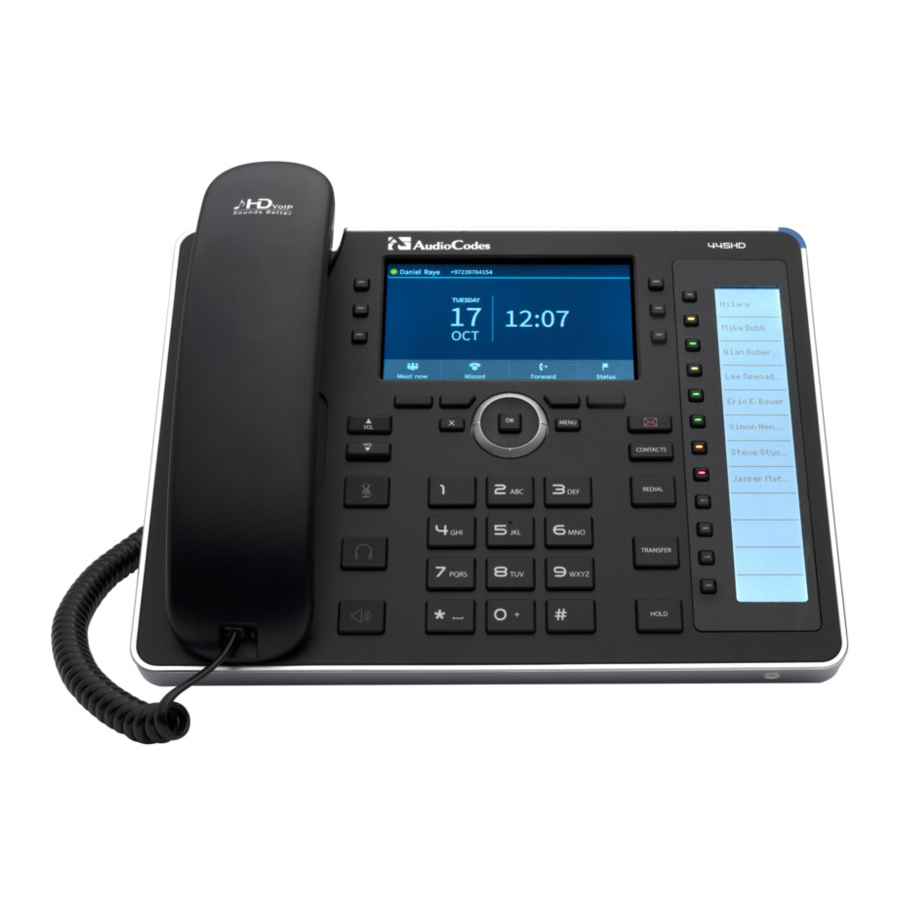
2. Physical Description
Programmable Keys
Softkeys
Navigation Control
Volume Keys
Mute Key
Headset Key
Speaker Key
Quick Guide
Alphanumerical
Keypad
P a g e
| 1
Screen
1-12 Function
Keys / Speed Dial
Buttons
Speed Dial Contacts
MENU Key
VOICEMAIL Key
CONTACTS Key
REDIAL Key
TRANSFER Key
HOLD Key
Microphone
Advertisement
Table of Contents

Related Manuals for AudioCodes 445HD


Summary of Contents for AudioCodes 445HD
- Page 1 Phone base stand Handset Handset cord Wall-mounting screws Note: Sidecar and Busy Lamp Fields (BLF) with 12 Speed Dials are not supported on 445HD-R models. 2. Physical Description Screen Programmable Keys 1-12 Function Keys / Speed Dial Softkeys...
-
Page 2: Cabling The Phone
3. Cabling the Phone Warning: Prior to connecting power, refer to the Compliancy and Regulatory Information document at www.audiocodes.com/library. To cable the phone: Connect the short, straight end of the phone cord to the handset, and the longer straight end of the cord, to the handset jack on the phone. -
Page 3: Attaching Stand To Phone
4. Attaching Stand to Phone For instructions on assembling the stand, scan the QR code or refer to https://www.youtube.com/watch?v=oGe9STB9lFE Desktop mounting: Slide stand's outer rails (A) onto phone's outer notches (A). Wall mounting: Slide stand's middle rails (B) onto phone's inner notches (B). ... - Page 4 To sign in with the Skype for Business client: Refer to the 445HD IP Phone User's Manual. To sign in with your PIN: In the Offline idle screen, touch Sign In, and then touch the PIN Code option.
- Page 5 To sign in with Web Sign-in (Cloud) (applies only to Microsoft Cloud PBX users): In the Offline idle screen, touch Sign In, and then select the Web Sign-in (Cloud) option. Using your web browser, navigate to the URL (Microsoft's Cloud PBX login page) shown in the Web Sign-in (Cloud) screen (above).
- Page 6 To sign in with Web Login: In the Offline idle screen, touch Sign In, and then touch the Web Login option. Using your web browser, navigate to the URL shown in the Web Login screen (above). Enter the ‘Sign-in address’ (SIP address), ‘User name’ and 'Password', and then click Sign in. To sign in with the Device Manager: ...
-
Page 7: Changing Your Presence Status
6. Changing your Presence Status Note: This section is applicable only to Skype for Business/Teams Compatible. Presence To change your presence: Touch the Status softkey (idle screen mode), scroll down to the required presence, and then touch the Select softkey. To set Skype for Business server to automatically update presence: ... - Page 8 8. Connecting to a Router via Wi-Fi Note: This section is applicable only to models with Wi-Fi functionality. The phone can connect to an Access Point via Wi-Fi. The Wi-Fi interface can be used to make VoIP calls over Wi-Fi, when the phone is installed in an environment free of LAN/cables. If an Ethernet cable does not connect the phone to a LAN port, the phone displays a "LAN Link Failure"...
- Page 9 After enabling Wi-Fi, "Searching for networks…" is displayed. The phone then displays the available Wi-Fi Access Points. Touch the Refresh softkey to display more networks. Select the desired Wi-Fi Access Point (network): Enter the Wi-Fi password if needed, and then touch the Connect softkey: When connected to the Access Point, "Connected"...
-
Page 10: Configuring Bluetooth
10. Configuring Bluetooth Note: This section is applicable only to models with Bluetooth functionality. The Bluetooth interface is used to connect the phone to a wireless headset or speaker. To pair and connect a remote Bluetooth device: Press the phone’s MENU hard key, and then select the Settings option. In the Settings screen, select the Bluetooth Settings option, and then in the Bluetooth Settings screen, select the Bluetooth Scan option. - Page 11 Select one of the Bluetooth devices listed, let it enter ‘pair mode’, and then click the Pair softkey. Once paired successfully, touch the Connect softkey to connect the remote device; "Connected" is displayed alongside the device: Note: The system does not start scanning automatically if there are paired devices in the list;...
- Page 12 Information contained in this document is believed to be accurate and reliable at the time of printing. However, due to ongoing product improvements and revisions, AudioCodes cannot guarantee accuracy of printed material after the Date Published nor can it accept responsibility for errors or omissions.
Need help?
Do you have a question about the 445HD and is the answer not in the manual?
Questions and answers