
Related Manuals for Retsch RS 200


Summary of Contents for Retsch RS 200
- Page 1 Manual Vibratory Disc Mill RS 200 Translation © Retsch GmbH, 42781 Haan, Retsch-Allee 1-5, Germany | 11.02.2020 Version 0008...
- Page 2 Copyright © Copyright by Retsch GmbH Retsch-Allee 1-5 42781 Haan Germany...
-
Page 3: Table Of Contents
Table of Contents Notes on the manual ..........................6 Explanations of the Safety Instructions ..................... 7 General Safety Instructions ....................... 8 Repairs ............................... 9 Confirmation ............................10 Packaging, Transport and Installation ....................12 Packaging ............................12 Transport............................12 Temperature fluctuations and condensed water ................12 Conditions for the Installation Site .................... - Page 4 5.15.1 Grinding duration ........................37 5.15.2 Speed ............................37 5.15.3 Start in ............................37 5.15.4 Save parameters ........................37 5.16 Programme Mode ..........................37 5.16.1 Grinding duration ........................37 5.16.2 Speed ............................37 5.16.3 Change program ........................37 5.16.4 Delete program ........................38 5.17 Basic settings ...........................
- Page 5 Notes on the manual...
-
Page 6: Notes On The Manual
This operating manual does not contain any repair instructions. If faults arise or repairs are necessary, please contact your supplier or get in touch with Retsch GmbH directly. Application technology information relating to samples to be processed is not included but can be read on the Internet on the respective device’s page at www.retsch.com. -
Page 7: Explanations Of The Safety Instructions
Notes on the manual 1.1 Explanations of the Safety Instructions In this Operating Manual we give you the following safety warnings Serious injury may result from failing to heed these safety warnings. We give you the following warnings and corresponding content. WARNING Type of danger / personal injury Source of danger... -
Page 8: General Safety Instructions
All persons concerned with the machine in any form This machine is a modern, high performance product from Retsch GmbH and complies with the state of the art. Operational safety is given if the machine is handled for the intended purpose and attention is given to this technical documentation. -
Page 9: Repairs
Notes on the manual 1.3 Repairs This operating manual does not contain any repair instructions. For your own safety, repairs may only be carried out by Retsch GmbH or an authorized representative or by Retsch service engineers. In that case please inform:... -
Page 10: Confirmation
Confirmation Bes tätigung Confirmation This operating manual contains essential instructions for operating and maintaining the device which must be strictly observed. It is essential that they be read by the operator and by the qualified staff responsible for the device before the device is commissioned. This operating manual must be available and accessible at the place of use at all times. - Page 11 Confirmation...
-
Page 12: Packaging, Transport And Installation
NOTICE H0014 Complaints – The forwarding agent and Retsch GmbH must be notified immediately in the event of transport damage. It is otherwise possible that subsequent complaints will not be recognised. • Notify your forwarding agent and Retsch GmbH within 24h 3.3 Temperature fluctuations and condensed water... -
Page 13: Installation Of The Device
Packaging, Transport and Installation NOTICE Ambient temperature – Electronic and mechanical components may be damaged and the performance data alter to an unknown extent. • Do not exceed or fall below the permitted temperature range of the machine (5°C to 40°C / ambient temperature). 3.5 Installation of the Device Installation height: maximum 2000 m above sea level 3.6 Type Plate Description... -
Page 14: Creating Interface Connection
Packaging, Transport and Installation When connecting the power cable to the mains supply, use an external fusethat complies with the regulations applicable to the place of installation . • Please check the type plate for details on the necessary voltage and frequency for the device. -
Page 15: Transport
Packaging, Transport and Installation 3.9 Transport WARNING Serious personal injury Falling loads – The appliance is very heavy and can therefore cause serious personal injuries if it falls down. • Lifting above head height is not permissible! N1.0018 NOTICE Transportation lock Transport without transportation lock, or operation with transportation lock −... - Page 16 Packaging, Transport and Installation Four bolts secure the transport lock underneath the device. • Use a 13mm spanner to unscrew the four bolts. Fig. 4: Mounting the transport screws The device should only be lifted and transported using the 4 transport screws (TS) provided. Net weight approx.
-
Page 17: Installation Of The Device
Packaging, Transport and Installation NOTICE Transport – Mechanical or electronic components may be damaged. • The machine may not be knocked, shaken or thrown during transport. 3.10 Installation of the Device Fig. 6: Locking the transport rollers • Place the device on a firm surface. Please refer to the “Technical Data”... -
Page 18: Technical Data
Technical Data Fig. 8: Releasing the transport lock • Unscrew the two cylinder screws (ZS). • Pull the cylinder screws (ZS) together with the sleeve (PM) out sideways. NOTICE Keep the cylinder screws for any future transport. Fig. 9: Removing the transport lock Technical Data 4.1 Use of the Device for the Intended Purpose CAUTION... - Page 19 Technical Data CAUTION Danger of personal injury Dangerous nature of the sample – Depending on the dangerous nature of your sample, take the necessary measures to rule out any danger to persons. • Observe the safety guidelines and datasheets of your sample material.
-
Page 20: Grinding Jar Nominal Volume
In addition to the instrument settings, the filling level of the grinding jar is also of crucial importance for a successful grinding process in the Vibratory Disc Mill of Retsch GmbH. The table indicates approximate values for the recommended amount of sample as a function of the grinding set used. -
Page 21: Emissions
Technical Data In the case of tungsten carbide grinding sets, it is not possible to set a speed greater than 1200min 4.6 Emissions CAUTION Possibility of acoustic signals not being heard Loud grinding noises - Acoustic alarms and voice communication might not be heard. •... -
Page 22: Operating The Device
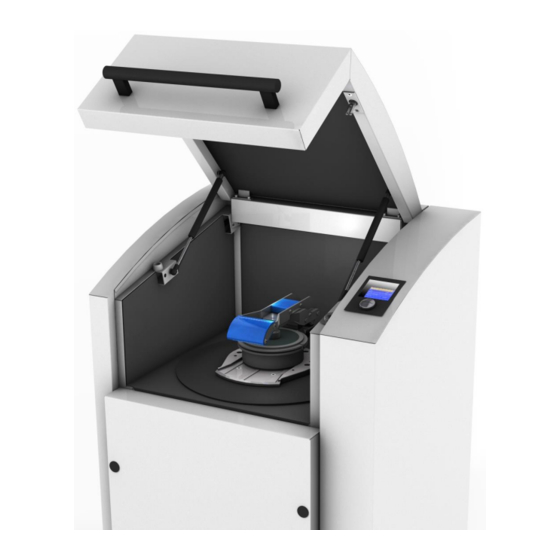
Operating the Device Operating the Device 5.1 Views of the device Fig. 10: View of the device from the front Fig. 11: Close-up of the grinding chamber... - Page 23 Operating the Device Fig. 12: View of the back of the device...
-
Page 24: Overview Table Of The Parts Of The Device
Operating the Device 5.2 Overview table of the parts of the device Description Function Element Locking bolt Locks the grinding set Hood Closes the grinding chamber Damper for hood Secures the hood when it is open Clamping unit for grinding chamber Clamps grinding jar on the support Grinding chamber support Support for grinding jar and centring aid... -
Page 25: Opening The Device
Operating the Device START button Starts grinding STOP button Stops grinding 5.5 Opening the device The following steps are necessary in order to be able to use and clamp the grinding jar. • Connect the device to the mains. • Switch on the main switch at the back of the device. -
Page 26: Inserting The Grinding Jar
• Operate the device only with a grinding set mounted. 5.8.1 Grinding jar The RS200 can be used with a Retsch grinding set with a volume of 50 / 100 / 250ml and with special steel / agate / tungsten carbide materials. -
Page 27: Tungsten Carbide (Tc) Grinding Sets
Operating the Device 5.8.1.1 Tungsten carbide (TC) grinding sets Only use tungsten carbide grinding sets in the RS200 at speeds of ≤ 1200min RS200 Max. speed with TC ≤ 1200min Do not use any grinding jars with 4 identical drilled holes (13mm in diameter) on the bottom. TC (old) Agate (old) TC (new) - Page 28 Operating the Device Fig. 17: Positioning the ring and disc • Fill grinding material into the space (RZ) between the grinding jar wall (MW) and the inner ring (RE). – For best grinding results, the area (RS) between the inner ring (RE) and the disc (SC) must remain empty.
- Page 29 Operating the Device Fig. 19: Inserting the grinding jar • Ensure that the grinding set engages in the locking bolt (AB). Fig. 20: Locking bolt • Where necessary, turn the grinding set slightly to engage it in the locking bolt (AB). Fig.
-
Page 30: Grinding Jar Carrier
Operating the Device • Clamp the grinding set using the clamping lever (SH). • You can then close the hood and start the device. CAUTION Scalding/burns Hot grinding jar – Depending on the grinding process, the material being ground and accordingly the grinding jar can become very hot. - Page 31 Operating the Device Fig. 22: Insert 1 for 50ml grinding jar (steel, TC) Fig. 23: Insert 2 for 50ml grinding jar (agate) Fig. 24: Insert 3 for 50ml grinding jar (zirconium oxide)
- Page 32 Operating the Device Fig. 25: Insert 4 for 100ml grinding jar (TC) Fig. 26: Without insert for 250ml and all other grinding jars Fig. 27: Inserting the insert...
-
Page 33: Display Unit - Operation Of The Device
Operating the Device 5.10 Display unit – operation of the device 5.11 Symbols in the Display Unit MANUAL Grinding duration 01:10 mm:ss Speed Start time 0000 Save parameters Fig. 28: View of the menu on the display unit Description Function Element Menu navigation Switching between manual operating mode, program... -
Page 34: Navigating Between Operating Modes
Operating the Device Rotating function II) • Rotate the operating button to change numerical values and decisions in the menu items. Press I) • Press the operating button to open selected menu items. Press II) • Press the operating button to confirm settings. Press III) •... - Page 35 Operating the Device • Switch the device on while simultaneously pressing the buttons START - STOP – Open hood. • After selecting the correct language, switch the device off and then immediately back on. • Confirm your selection by pressing the operating button. The device is now set permanently to your language and you are in the main menu.
-
Page 36: Menu Structure
Operating the Device 5.13 Menu structure Complete overview of all menu items: MANUAL OPERATING MODE Grinding duration Speed BASIC SETTINGS Start in Automatic opening Start in: Language Screen message: Press STOP to cancel Brightness Back Date Save parameters Time Program Acoustic signal Save Service... -
Page 37: Manual Mode
Operating the Device – Language – Brightness – Date – Time – Acoustic warning signal – Service 5.15 Manual Mode 5.15.1 Grinding duration 00:01 to 99:59 (minutes : seconds) 5.15.2 Speed 700 to 1500 rpm 5.15.3 Start in 00:00:01 to 99:59:59 (hours : minutes : seconds) You can adjust a countdown to the starting of the device here. -
Page 38: Delete Program
Operating the Device – The Save parameters menu opens and the dark line cursor is placed on Program. NOTICE You can change the active program or any other program. • Press the operating button (F) to activate the program selection. •... -
Page 39: Brightness
SOFTWARE VERSION The version of the operating software can be called up and updated as required. If necessary, get in touch with your Retsch distributor. Should you have reached this menu by mistake and cannot return to the previous menu, switch... -
Page 40: Error Messages And Information Notes
Error Messages and Information Notes Error Messages and Information Notes 6.1 Error Messages Error messages inform the user about detected device or programme errors. In the event of an error message, a fault has occurred, in which the operation of the device or the programme is automatically interrupted. -
Page 41: Cleaning, Wear And Maintenance
Cleaning, Wear and Maintenance Cleaning, Wear and Maintenance WARNING Risk of a fatal electric shock An electric shock can cause injuries in the form of burns and cardiac arrhythmia, respiratory arrest or cardiac arrest. • Do not clean the blender under running water. Use only a cloth dampened with water. -
Page 42: Maintenance
Cleaning, Wear and Maintenance Fig. 31: Changing the fuses NOTICE Always replace both fuses (TB). – Type of fuse: 2 x 200mA T 250V • Unscrew the fuse holders (TC1) and (TC2). • Remove the fuse from the fuse holders and insert the new fuses. •... - Page 43 Cleaning, Wear and Maintenance Fig. 32: Disconnecting the plug Fig. 33: Removing the cover • Press the open hood button and open the hood. • Remove the bottom caps (ADK). • Unscrew the two cylinder head bolts (ZKS). • Pull the bottom suspension (UA) upwards to unhinge it. NOTICE –...
-
Page 44: Wearing Parts
Cleaning, Wear and Maintenance Fig. 34: Positions of the rubber springs • After servicing the rubber springs, insert the bottom cover. • Secure the bottom cover using the two cylinder head bolts. 7.4 Wearing parts Fig. 35: Rubber springs • Replace the 3 rubber springs (GF) after approx. -
Page 45: Return For Service And Maintenance
Return for Service and Maintenance Return for Service and Maintenance Fig. 2: Returned goods dispatch note RETSCH devices and accessories can only be accepted for repair, maintenance or calibration if the returned goods despatch note has been correctly completed in full. •... -
Page 46: Disposal
Disposal Disposal Please observe the respective statutory requirements with respect to disposal. Information on disposal of electrical and electronic machines in the European Community. Within the European Community the disposal of electrically operated devices is regulated by national provisions that are based on the EU Directive 2002/96/EC on Waste Electrical and Electronic Equipment (WEEE). -
Page 47: Index
10 Index > Emergency unlocking......... 25 Emissions ............21 >Mains connection ..........14 Error E11 ..............40 E13 ..............40 1500W..............20 E20 ..............40 16A ..............20 E25 ..............40 E26 ..............40 Acoustic warning signal ........39 E50 ..............40 Adjustment options using the display menu .. - Page 48 Lid closing Save parameters ..........37 automatic ............21 Selection bar ............33 Serial number ............. 13 Lid closing mechanism ........25 serious injury ............7 Locking the transport rollers ....... 17 Service ............... 39 LpAeq..............21 Service Address ........... 9 LWA ..............
- Page 50 Copyright © Copyright by Retsch GmbH Retsch-Allee 1-5 42781 Haan Germany...
Need help?
Do you have a question about the RS 200 and is the answer not in the manual?
Questions and answers