Table of Contents
Advertisement
Quick Links
INSTRUCTION MANUAL
Keep this manual in a safe place for future reference
BALANCED PRESSURE THERMOSTATIC
STEAM TRAPS LV6 SERIES
EINBAU- UND BETRIEBSANLEITUNG
Gebrauchsanleitung leicht zugänglich aufbewahren
THERMISCHE KAPSEL-KONDENSATABLEITER
LV6 SERIE
MANUEL D UTILISATION
Conserver ce manuel dans un endroit facile d'accès
PURGEURS THERMOSTATIQUES À PRESSION
EQUILIBRÉE GAMME LV6
Clean Steam Trap
LV6-CE • LV6-SF • LV6-P • LV6-EP
Copyright (C) 2016 by TLV Co., Ltd. All rights reserved.
Advertisement
Table of Contents

Subscribe to Our Youtube Channel
Related Manuals for TLV LV6 Series


Summary of Contents for TLV LV6 Series
- Page 1 LV6 SERIE MANUEL D UTILISATION Conserver ce manuel dans un endroit facile d'accès PURGEURS THERMOSTATIQUES À PRESSION EQUILIBRÉE GAMME LV6 Clean Steam Trap LV6-CE • LV6-SF • LV6-P • LV6-EP Copyright (C) 2016 by TLV Co., Ltd. All rights reserved.
- Page 2 1 MPa = 10.197 kg/cm , 1 bar = 0.1 MPa For products with special specifications or with options not included in this manual, contact TLV for instructions. The contents of this manual are subject to change without notice.
-
Page 3: Safety Considerations
• The three types of cautionary items above are very important for safety; be sure to observe all of them, as they relate to installation, use, maintenance, and repair. Furthermore, TLV accepts no responsibility for any accidents or damage occurring as a result of failure to observe these precautions. - Page 4 • Diese drei Warnzeichen sind wichtig für Ihre Sicherheit. Sie müssen unbedingt beachtet werden, um den sicheren Gebrauch des Produktes zu gewährleisten und Einbau, Wartung und Reparatur ohne Unfälle oder Schäden durchführen zu können. TLV haftet nicht für Unfälle oder Schäden, die durch Nichtbeachtung dieser Sicherheitshinweise entstehen.
-
Page 5: Règles De Sécurité
• Ces 3 indicateurs sont importants pour votre sécurité; observez les précautions de sécurité énumérées dans ce manuel pour l’installation, l’utilisation, l'entretien et la réparation du produit. TLV n’accepte aucune responsabilité en cas d’accident ou de dommage survenant à la suite d'un non-respect de ces précautions. - Page 6 LV6-CE / LV6-SF LV6-P / LV6-EP Direction of inlet flow from the top Durchflussrichtung von oben Direction du flux d'en haut LV6-CE LV6-SF / LV6-P* / LV6-EP* *Electro-polished *Elektro-poliert *Polissage électrolytique...
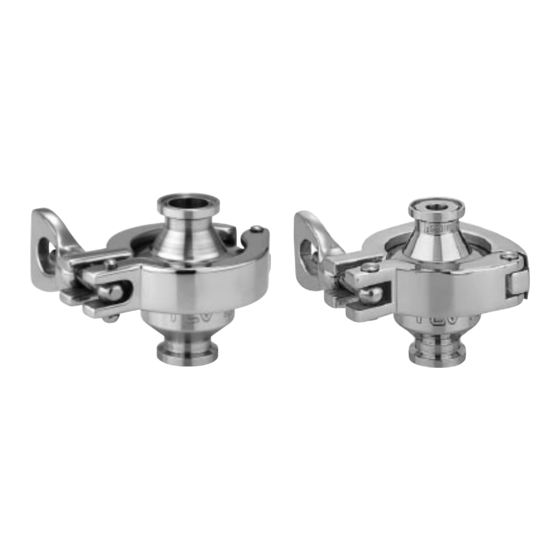
- Page 7 3. Exploded View Einzelteile Pièces détachées Upper Body Gehäuseoberteil Corps supérieur Body Clamp Gehäuse-Clamp Collier de serrage X-element Wing Nut X-Element Flügelmutter Elément X Ecrou à oreille Body Gasket Gehäusedichtung Joint du corps Lower Body Gehäuseunterteil Corps inférieur Figure shows 3-piece body clamp Abbildung zeigt 3-teilige Gehäuseklammer Collier de serrage en trois parties illustré...
- Page 8 4. Specifications Technische Daten Données techniques Refer to the product body for detailed specifications. Die technischen Daten stehen auf dem Gehäuse. Les données techniques sont inscrites sur le corps. A Nominal Diameter B Model Größe/DN Dimension/DN Modèle C Material D Maximum Allowable Pressure* Werkstoff Maximal zulässiger Druck* Matériau...
-
Page 9: Proper Installation
5. Proper Installation CAUTION • Installation, inspection, maintenance, repairs, disassembly, adjustment and valve opening/closing should be carried out only by trained maintenance personnel. • Take measures to prevent people from coming into direct contact with product outlets. • Install for use under conditions in which no freeze-up will occur. •... -
Page 10: Troubleshooting
Disassembly / Reassembly (to reassemble, follow procedures in reverse) Part & No. During Disassembly During Reassembly Tighten wing nut to the proper torque; open Body Clamp 4 Loosen the wing nut then inlet valve and allow live steam to enter and remove the body clamp heat the trap, then close the inlet valve;... -
Page 11: Inspektion Und Wartung
5. Einbauhinweise • Einbau und Ausbau, Inspektion, Wartungs- und Reparaturarbeiten, VORSICHT Öffnen/Schließen von Armaturen, Einstellung von Komponenten dürfen nur von geschultem Wartungspersonal vorgenommen werden. • In sicherer Entfernung von Auslassöffnungen aufhalten und andere Personen warnen, sich fern zu halten. • Kondensatableiter in frostsicherer Umgebung einbauen. •... -
Page 12: Fehlersuche
Ausbau und Einbau der Teile (Einbau erfolgt in umgekehrter Reihenfolge) Bauteil & Nr. Ausbau Einbau Flügelmutter mit vorgeschriebenem Anzugs- Gehäuse- Flügelmutter lösen und moment anziehen, Einlassventil öffnen, klammer 4 Gehäuseklammer abnehmen Sattdampf zum Anheizen des Kondensatab- leiter einströmen lassen, dann Einlassventil schließen;... - Page 13 5. Installation correcte ATTENTION • Tout installation, inspection, entretien, réparation, démontage, ajustement et ouverture/fermeture de vanne doit être fait uniquement par une personne formée à l’entretien. • Prendre des mesures appropriées afin d’éviter que des personnes n’entrent en contact direct avec les ouvertures du produit.
-
Page 14: Détection Des Problèmes
Démontage et rassemblage (suivre l’ordre inverse pour le rassemblage) Pièce & No. Pendant le démontage Pendant le rassemblage Resserrer l'écrou avec le moment de torsion Collier de serrage 4 Desserrer l'écrou à oreilles approprié; ouvrir la soupape d'entrée pour puis retirer le collier de serrage que de la vapeur vive puisse pénétrer dans le purgeur et le chauffer;... -
Page 15: Product Warranty
10. Product Warranty 1) Warranty Period: one year after product delivery. 2) TLV CO., LTD. warrants this product to the original purchaser to be free from defective materials and workmanship. Under this warranty, the product will be repaired or replaced at our option, without charge for parts or labor. - Page 16 For Service or Technical Assistance: Contact your representative or your regional office. Für Reparatur und Wartung: Wenden Sie sich bitte an Ihre Vertretung oder an eine der Niederlassungen. Pour tout service ou assistance technique: Contactez votre agent ou votre bureau régional USA and Canada: Te l: [1]-704-597-9070 USA und Kanada:...
Need help?
Do you have a question about the LV6 Series and is the answer not in the manual?
Questions and answers