National Instruments AT-GPIB/TNT Getting Started
For windows 98/95
Hide thumbs
Also See for AT-GPIB/TNT:
- Getting started (60 pages) ,
- Getting started (42 pages) ,
- Getting started (59 pages)
Table of Contents
Advertisement
Quick Links
Advertisement
Table of Contents
Troubleshooting

Related Manuals for National Instruments AT-GPIB/TNT


Summary of Contents for National Instruments AT-GPIB/TNT
- Page 1 (217) 352-9330 | Click HERE Find the National Instruments AT-GPIB/TNT at our website:...
- Page 2 Getting Started with Your AT-GPIB/TNT and the GPIB Software for Windows 98/95 AT-GPIB/TNT for Windows 98/95 July 1998 Edition Part Number 322092A-01 © Copyright 1998 National Instruments Corporation. All rights reserved.
- Page 3 Netherlands 0348 433466, Norway 32 84 84 00, Singapore 2265886, Spain 91 640 0085, Sweden 08 730 49 70, Switzerland 056 200 51 51, Taiwan 02 377 1200, United Kingdom 01635 523545 National Instruments Corporate Headquarters 6504 Bridge Point Parkway Austin, Texas 78730-5039 USA Tel: 512 794 0100...
- Page 4 Important Information Warranty The AT-GPIB/TNT is warranted against defects in materials and workmanship for a period of two years from the date of shipment, as evidenced by receipts or other documentation. National Instruments will, at its option, repair or replace equipment that proves to be defective during the warranty period.
- Page 5 This device complies with the FCC rules only if used with shielded interface cables of suitable quality and construction. National Instruments used such cables to test this device and provides them for sale to the user. The use of inferior or nonshielded interface cables could void the user’s authority to operate the equipment under the...
-
Page 6: Table Of Contents
Configure the AT-GPIB/TNT ................2-6 Configure the AT-GPIB/TNT Input/Output Range ......2-7 Configure the AT-GPIB/TNT Interrupt Request ........2-10 Configure the AT-GPIB/TNT Direct Memory Access.......2-11 Setting the AT-GPIB/TNT Shield Ground Configuration ....2-13 Install the AT-GPIB/TNT ..............2-14 Configure the GPIB Software..................2-16 Resolve Conflicts....................2-16 Assign an Interface Name .................2-17 View or Modify Logical Device Templates (Optional) ........2-18... - Page 7 0xE1050029 (–519765975)................B-2 EDVR Error Condition with ibcntl set to 0xE1030043 (–519897021) .... B-2 Troubleshooting Device Manager Problems ..............B-2 No National Instruments GPIB Interfaces Item ..........B-2 Missing GPIB Interface ..................B-3 GPIB Interface Not Working Properly ............. B-3 Removing System-Reserved Resources ................
- Page 8 AT-GPIB/TNT Interrupt Jumper Setting for IRQ5 ....... 2-11 Figure 2-9. AT-GPIB/TNT DMA Jumper Setting for DMA Channel 7 ....2-12 Figure 2-10. AT-GPIB/TNT DMA Jumper Setting for No DMA Channel ....2-13 Figure 2-11. AT-GPIB/TNT Ground Configuration Jumper Settings ....... 2-14 Figure 2-12. Installing the AT-GPIB/TNT..............2-15 Figure 2-13.
- Page 9 Contents Tables Table 2-1. AT-GPIB/TNT Hardware Default Settings........... 2-6 Table 2-2. Possible Base I/O Address Switch Settings for AT-GPIB/TNT ..2-8 Table 2-3. AT-GPIB/TNT DMA Channel Settings..........2-12 Table C-1. AT-GPIB/TNT Hardware Characteristics..........C-1 Table C-2. GPIB Software Transfer Rates for the AT-GPIB/TNT......C-2...
-
Page 10: About This Manual
About This Manual This manual contains instructions to help you install and configure the National Instruments AT-GPIB/TNT and the GPIB software. How to Use the Manual Set Installation and Getting Started Configuration Manual Novice Experienced Users Users NI-488.2M Function GPIB User... -
Page 11: Organization Of This Manual
This manual is organized as follows: • Chapter 1, Introduction, explains how to use this manual, lists what you need to get started, provides an overview of the AT-GPIB/TNT and the GPIB software, and describes optional equipment you can order. -
Page 12: Conventions Used In This Manual
This font is also used for the proper names of disk drives, paths, directories, programs, subprograms, subroutines, device names, functions, operations, variables, filenames and extensions, and for statements and comments taken from programs. © National Instruments Corporation AT-GPIB/TNT for Windows 98/95... -
Page 13: Related Documentation
Microsoft Windows Online Help, Microsoft Corporation Customer Communication National Instruments wants to receive your comments on our products and manuals. We are interested in the applications you develop with our products, and we want to help if you have problems with them. -
Page 14: Introduction
Chapter Introduction This chapter explains how to use this manual, lists what you need to get started, provides an overview of the AT-GPIB/TNT and the GPIB software, and describes optional equipment you can order. How to Use This Manual Gather What You Need... -
Page 15: What You Need To Get Started
X5, which you can order from National Instruments Note: If you do not have a CD drive and would like to order the GPIB software on floppy disks, contact National Instruments and order part number 777780-01. Optional Equipment Call National Instruments for more information about the following optional equipment: •... -
Page 16: Gpib Software Overview
GPIB Software Overview The GPIB software includes a native, 32-bit multitasking driver that is fully Plug and Play aware. Because the AT-GPIB/TNT is not a Plug and Play interface, Windows is unable to detect its addition to or removal from your system dynamically. You must manually inform Windows about the insertion or removal of the AT-GPIB/TNT from your system. -
Page 17: Time-Saving Development Tools
GPIB systems. The GPIB Analyzer software can be used with the AT-GPIB/TNT+ and PCMCIA-GPIB+ GPIB hardware, which provide GPIB Analyzer support along with the functionality of a high-performance GPIB Controller. -
Page 18: Installation And Configuration
Chapter Installation and Configuration This chapter describes how to install and configure the AT-GPIB/TNT hardware and the GPIB software. Install the GPIB Software Before installing the hardware, complete the following steps to install the GPIB software: 1. Insert the CD GPIB Software for Windows NT/98/95. The CD autoplay feature automatically launches the setup wizard. -
Page 19: Identify Resources For The At-Gpib/Tnt
Add New Hardware icon. 3. Click on the Next button in the first Add New Hardware Wizard dialog box. 4. Because the AT-GPIB/TNT is not a Plug and Play interface, Windows is unable to detect its presence automatically. Windows 95:... -
Page 20: Figure 2-1. Add New Hardware Wizard Hardware Selection
If Windows is able to assign resources successfully, the next Add New Hardware Wizard dialog box describes the resources assigned to the AT-GPIB/TNT, as shown in the example dialog box in Figure 2-2. Skip to Step 7 to proceed. © National Instruments Corporation... -
Page 21: Figure 2-2. At-Gpib/Tnt Resources Assigned Successfully
If Windows is unable to assign resources successfully, the next Add New Hardware Wizard dialog box explains the problem, as shown in the example dialog box in Figure 2-3. Figure 2-3. AT-GPIB/TNT Resources Not Assigned Successfully AT-GPIB/TNT for Windows 98/95 © National Instruments Corporation... -
Page 22: Figure 2-4. At-Gpib/Tnt Resources Settings
Conflict Troubleshooter help. When you reach the step of looking for nonconflicting resources for the AT-GPIB/TNT, you need to change the Setting based on selection on the Resources page of the AT-GPIB/TNT Properties dialog box to a configuration other than Basic configuration 0 or Basic configuration 1, as shown in Figure 2-4. -
Page 23: Configure The At-Gpib/Tnt
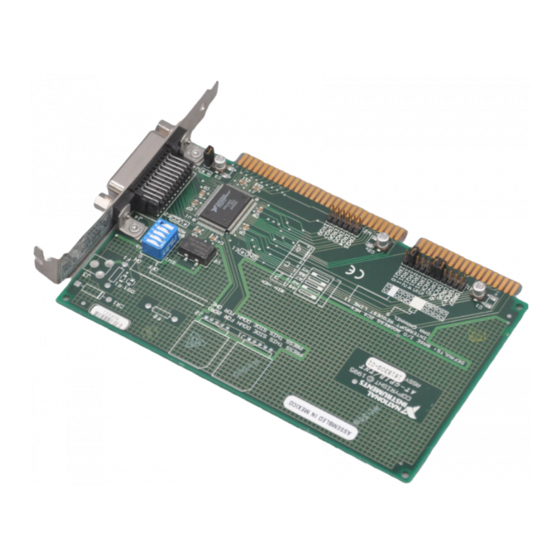
Configure the AT-GPIB/TNT Caution: Electrostatic discharge can damage several components on the AT-GPIB/TNT. To avoid such damage in handling the board, touch the antistatic plastic package to a metal part of your computer chassis before removing the board from the package. -
Page 24: Configure The At-Gpib/Tnt Input/Output Range
The base I/O address of an Input/Output Range is the first position in the Input/Output Range used by the plug-in interface board. By default, the AT-GPIB/TNT is configured to use base I/O address 2C0 hex. With this setting, the board uses an Input/Output Range of 2C0 hex to 2DF hex. -
Page 25: Table 2-2. Possible Base I/O Address Switch Settings For At-Gpib/Tnt
Follow these steps to reconfigure the base I/O address of the AT-GPIB/TNT: 1. Locate the base I/O address switch at SW1 on your AT-GPIB/TNT board. Refer to the parts locator diagram, Figure 2-5. 2. Change the switch settings to configure the GPIB board to match the base I/O address of the Input/Output Range assigned by Windows. - Page 26 Chapter 2 Installation and Configuration Table 2-2. Possible Base I/O Address Switch Settings for AT-GPIB/TNT (Continued) Switch Setting Base I/O I/O Address Address (hex) Space Used (hex) 280 to 29F 2A0 to 2BF 2C0 to 2DF 2E0 to 2FF 300 to 31F...
-
Page 27: Configure The At-Gpib/Tnt Interrupt Request
CPU for asynchronous events. Your GPIB hardware and software use interrupts to get service from the CPU when necessary. By default, the AT-GPIB/TNT is configured to use interrupt request line 11. Note: If there are no interrupt lines available for your GPIB hardware, the jumpers that set the interrupt request line have no effect. -
Page 28: Configure The At-Gpib/Tnt Direct Memory Access
Follow these steps to reconfigure the interrupt request line: 1. Find the jumpers that set the interrupt request line. The jumpers are located on the lower edge of your AT-GPIB/TNT. Refer to the parts locator diagram, Figure 2-5. 2. Change the jumper settings to configure the AT-GPIB/TNT to the new interrupt request line. -
Page 29: Table 2-3. At-Gpib/Tnt Dma Channel Settings
— — Figure 2-9 shows the jumper position for selecting DMA channel 7. = Used to Select the IRQ Level Figure 2-9. AT-GPIB/TNT DMA Jumper Setting for DMA Channel 7 AT-GPIB/TNT for Windows 98/95 2-12 © National Instruments Corporation... -
Page 30: Setting The At-Gpib/Tnt Shield Ground Configuration
Figure 2-10. AT-GPIB/TNT DMA Jumper Setting for No DMA Channel Setting the AT-GPIB/TNT Shield Ground Configuration The AT-GPIB/TNT is set at the factory with the jumper in place to connect the logic ground of the AT-GPIB/TNT to its shield ground. This configuration minimizes EMI emissions. -
Page 31: Install The At-Gpib/Tnt
4. Remove the corresponding slot cover on the back panel of the computer. 5. Insert the AT-GPIB/TNT into the slot with the GPIB connector sticking out of the opening on the back panel, as shown in Figure 2-12. It might be a tight fit, but do not force the board into place. -
Page 32: Figure 2-12. Installing The At-Gpib/Tnt
Chapter 2 Installation and Configuration Figure 2-12. Installing the AT-GPIB/TNT 6. Screw the mounting bracket of the AT-GPIB/TNT to the back panel rail of the computer. 7. Replace the top cover (or the access port to the expansion slot). 8. Power on your computer and start Windows. -
Page 33: Configure The Gpib Software
(!) appears through the eagle icon, the AT-GPIB/TNT is not working properly. Figure 2-13 shows an example of a AT-GPIB/TNT that is working properly, and Figure 2-14 shows an example of a AT-GPIB/TNT that is not working properly. -
Page 34: Assign An Interface Name
Setting based on drop-down list and the Change Setting button to select conflict-free resources for the AT-GPIB/TNT. If you cannot find conflict-free resources for the AT-GPIB/TNT, or if no conflicts are listed, refer to the Troubleshooting Device Manager... -
Page 35: View Or Modify Logical Device Templates (Optional)
Chapter 2 Installation and Configuration Figure 2-15 shows the GPIB Settings page for an AT-GPIB/TNT. Figure 2-15. GPIB Settings Page for the AT-GPIB/TNT View or Modify Logical Device Templates (Optional) If you want to examine or modify the logical device templates for the GPIB software, select the National Instruments GPIB Interfaces icon from the Device Manager page, and click on the Properties button. -
Page 36: Figure 2-16. Device Templates Page For The Logical Device Templates
Chapter 2 Installation and Configuration Figure 2-16. Device Templates Page for the Logical Device Templates © National Instruments Corporation 2-19 AT-GPIB/TNT for Windows 98/95... -
Page 37: Figure 3-1. Diagnostic Utility After Testing
Use that information and the information in Appendix C, Specifications, to troubleshoot the problem. Troubleshooting information is also available in the online help for the Diagnostic utility, which you can access by clicking on the Help button. © National Instruments Corporation AT-GPIB/TNT for Windows 98/95... -
Page 38: Begin To Use The Gpib Software
For more information, refer to Chapter 7, Getting Started with a LabVIEW Instrument Driver, in the LabVIEW User Manual. If you want to write your own instrument driver, National Instruments provides application notes that help you get started. -
Page 39: Introduction To The Win32 Interactive Control Utility
For more information about instrument drivers, refer to the project window chapter in the LabWindows/CVI User Manual. For more information about National Instruments products, please refer to our web site at http://www.natinst.com/products/ Introduction to the Win32 Interactive Control Utility You can use the interactive control utility to enter NI-488 functions and NI-488.2 routines interactively and see the values returned by the... -
Page 40: Introduction To The Ni Spy Utility
2. In the System Properties dialog box that appears, select the Device Manager tab. 3. Click on the View devices by type button at the top of the page. 4. Click on the National Instruments GPIB Interfaces icon. © National Instruments Corporation AT-GPIB/TNT for Windows 98/95... -
Page 41: General Programming Considerations
Manual for Win32. For detailed information about each NI-488 function and NI-488.2 routine, refer to the NI-488.2M Function Reference Manual for Win32 or the online help file, which you can access by selecting Start»Programs»National Instruments GPIB»GPIB32 Help. AT-GPIB/TNT for Windows 98/95 © National Instruments Corporation... -
Page 42: Uninstalling The Hardware And Software
Appendix Uninstalling the Hardware and Software This appendix describes how to uninstall your AT-GPIB/TNT and the GPIB software. Uninstalling the Hardware Before you physically remove the GPIB hardware from your system, you must remove the hardware information from the Windows Device Manager. -
Page 43: Uninstalling The Software
Complete the following steps to uninstall the GPIB software: 1. Select Start»Settings»Control Panel and double-click on the Add/Remove Programs icon. The dialog box shown in Figure A-2 lists the software available for removal. AT-GPIB/TNT for Windows 98/95 © National Instruments Corporation... -
Page 44: Figure A-2. Add/Remove Programs Properties Dialog Box
You will need to remove any remaining components yourself. If you want to reinstall the GPIB hardware and software, refer to Chapter 2, Installation and Configuration. © National Instruments Corporation AT-GPIB/TNT for Windows 98/95... -
Page 45: Troubleshooting And Common Questions
If a call is made with a device name that is not listed in the logical device templates that are part of the GPIB Configuration utility, an EDVR error condition occurs with set to 0xE0140035. ibcntl © National Instruments Corporation AT-GPIB/TNT for Windows 98/95... -
Page 46: Edvr Error Condition With Ibcntl Set To 0Xe0320029 (-533594071) Or
• If there is no National Instruments GPIB Interfaces item and you are certain you have a GPIB interface installed, refer to the No National Instruments GPIB Interfaces Item section of this appendix. -
Page 47: Missing Gpib Interface
Configuration. Missing GPIB Interface If the National Instruments GPIB Interfaces item exists, but the GPIB interface you are looking for is not listed there, the GPIB interface is not properly installed. For GPIB hardware, this means that the Add New Hardware Wizard has not been run to add the new hardware to your Windows system. -
Page 48: Removing System-Reserved Resources
If you did not use the Device Manager to acquire system-reserved resources, you do not need to use the Device Manager to remove such resources. To remove any resources that you reserved for your AT-GPIB/TNT, complete the following steps: 1. Select Start»Settings»Control Panel. -
Page 49: Troubleshooting Diagnostic Utility Failures
Device Manager page. 4. Double-click on the National Instruments GPIB Interfaces icon. If there is no National Instruments GPIB Interfaces icon, either no GPIB interfaces are installed in your system or the GPIB software is installed incorrectly. If you see a National Instruments GPIB... -
Page 50: Gpib Cables Need To Be Disconnected
Microsoft Windows Online Help for instructions on how to use the Device Manager to reserve DMA resources for legacy boards. After the conflict has been resolved, run the Diagnostic utility again. AT-GPIB/TNT for Windows 98/95 © National Instruments Corporation... -
Page 51: Single-Cycle Dma Required
DMA. GPIB interfaces that use the system DMA controller (such as the AT-GPIB/TNT) normally use demand-mode DMA. If you get this error, you should use the Device Manager to configure the GPIB software to use single-cycle DMA for all DMA transfers, and then run the Diagnostic utility again. -
Page 52: Common Questions
System Properties dialog box. Click on the View devices by type button at the top of the page. If any GPIB hardware is correctly installed, a National Instruments GPIB Interfaces icon appears in the list of device types. Double-click on this icon to see a list of installed GPIB hardware. - Page 53 How do I modify the hardware resources that Windows assigned to my AT-GPIB/TNT? To modify the hardware resources assigned to the AT-GPIB/TNT, double-click on the System icon under Start»Settings»Control Panel. In the System Properties dialog box that appears, select the Device Manager tab, click on the View devices by type button, and ©...
- Page 54 You need to remove any remaining components yourself. What information should I have before I call National Instruments? When you call National Instruments, you should have the results of the Diagnostic utility test. Also, make sure you have filled out the form in Customer Communication.
-
Page 55: Appendix C Specifications
Appendix Specifications This appendix describes the physical characteristics of the AT-GPIB/TNT, the transfer rates of the GPIB software, and the recommended operating conditions. Hardware Characteristics Table C-1. AT-GPIB/TNT Hardware Characteristics Characteristic Specification Dimensions 10.67 cm by 16.51 cm (4.2 in. by 6.5 in.) -
Page 56: Software Transfer Rates
Appendix C Specifications Software Transfer Rates Table C-2. GPIB Software Transfer Rates for the AT-GPIB/TNT Transfer Method Maximum GPIB Transfer Rate 3-Wire (IEEE 488) 1.5 Mbytes/s* High Speed (HS488) 2.2 Mbytes/s* * Actual speed may vary considerably from speed shown because of system and instrumentation capabilities. -
Page 57: Appendix D Customer Communication
Electronic Services Bulletin Board Support National Instruments has BBS and FTP sites dedicated for 24-hour support with a collection of files and documents to answer most common customer questions. From these sites, you can also download the latest instrument drivers, updates, and example programs. For recorded instructions on how to use the bulletin board and FTP services and for BBS automated information, call 512 795 6990. - Page 58 Telephone and Fax Support National Instruments has branch offices all over the world. Use the list below to find the technical support number for your country. If there is no National Instruments office in your country, contact the source from which you purchased your software to obtain support.
- Page 59 National Instruments for technical support helps our applications engineers answer your questions more efficiently. If you are using any National Instruments hardware or software products related to this problem, include the configuration forms from their user manuals. Include additional pages if necessary.
- Page 60 Complete a new copy of this form each time you revise your software or hardware configuration, and use this form as a reference for your current configuration. Completing this form accurately before contacting National Instruments for technical support helps our applications engineers answer your questions more efficiently.
- Page 61 Documentation Comment Form National Instruments encourages you to comment on the documentation supplied with our products. This information helps us provide quality products to meet your needs. Title: Getting Started with Your AT-GPIB/TNT and the GPIB Software for Windows 98/95...
-
Page 62: Glossary
I/O address lowest I/O address used by the GPIB hardware Celsius central processing unit dynamic link library direct memory access electromagnetic interference Federal Communications Commission GPIB General Purpose Interface Bus hexadecimal © National Instruments Corporation AT-GPIB/TNT for Windows 98/95... - Page 63 ISA interrupt request, DMA channel, and base I/O address seconds volts direct current VME eXtensions for Instrumentation AT-GPIB/TNT for Windows 98/95 © National Instruments Corporation...
Need help?
Do you have a question about the AT-GPIB/TNT and is the answer not in the manual?
Questions and answers