Dorma AGILE 150 DORMOTION Series Installation Instruction
Installation to wall
Hide thumbs
Also See for AGILE 150 DORMOTION Series:
- Installation instruction (13 pages) ,
- Installation instruction, care instructions, service and maintenance (12 pages) ,
- Installtion instructions (4 pages)
Table of Contents
Advertisement
Montageanleitung
DORMA
AGILE 150 DORMOTION
Wandmontage
Installation instruction
DORMA
AGILE 150 DORMOTION
Installation to wall
Inhaltsverzeichnis:
Index of contents:
S. 2-3 . . . . . . . . . . .
S. 3
. . . . . . . . . . .
S. 4
. . . . . . . . . . .
S. 4
. . . . . . . . . . .
S. 5
. . . . . . . . . . .
S. 5
. . . . . . . . . . .
S. 6
. . . . . . . . . . .
S. 7
. . . . . . . . . . .
S. 8
. . . . . . . . . . .
S. 9
. . . . . . . . . . .
S. 10 . . . . . . . . . . .
S. 10 . . . . . . . . . . .
S. 11 . . . . . . . . . . .
S. 12/13 . . . . . . . . .
7. Montage der Schiebetür und Befestigung der Laufschiene
S. 14 . . . . . . . . . . .
S. 14 . . . . . . . . . . .
S.15/16 . . . . . . . . . 10. Positionierung der Laufwegbegrenzer / positioning of panel stops
S. 17 . . . . . . . . . . . 11. Positionierung der DORMOTION Start / positioning of DORMOTION start
S. 18 . . . . . . . . . . . 12. Glaskantenschutz / glass edge protection
S. 19 . . . . . . . . . . . 13. Montage der Sichtschutzbürste (optional) / installation of brush profile (optional)
S. 20 . . . . . . . . . . . 14. Montage der Stirnabdeckungen / installation of end caps
DORMA-Glas
Stand/Issue 02.10 / 004599
800.52.639.6.32
Advertisement
Table of Contents

Related Manuals for Dorma AGILE 150 DORMOTION Series


Summary of Contents for Dorma AGILE 150 DORMOTION Series
-
Page 1: Table Of Contents
Montageanleitung DORMA AGILE 150 DORMOTION Wandmontage Installation instruction DORMA AGILE 150 DORMOTION Installation to wall Inhaltsverzeichnis: Index of contents: S. 2-3 ... Wichtige Informationen / Important information S. 3 ... - Page 2 = Lichte Höhe / clear height = Gesamthöhe / total height = Glashöhe / glass height = Glasdicke / glass thickness Bauteil/Baugruppe Components geschlossen / closed Montagefolge 1. ; 1.1 ; ... = Mounting sequence geöffnet / opened Seite/Page 2/20 DORMA-Glas...
-
Page 3: Wichtige Informationen / Important Information
5 Jahren gegeben. For higher frequency we recommend a maintenance Bei höherer Frequentierung empfehlen wir einen contract between fitter and user for a yearly inspection. jährlichen Wartungsvertrag zwischen Montagebetrieb und Endbenutzer. Benötigte Werkzeuge: Requisite tools: 2,5mm Seite/Page 3/20 DORMA-Glas... -
Page 4: Glasbearbeitung Dormotion L: Glass Preparation Dormotion L
10 ..Stirnabdeckungen / end caps 11 ..Glaskantenschutz / glass edge protection 12 ..Sichtschutzbürste (optional) / brush profile (optional) Seite/Page 4/20 DORMA-Glas... -
Page 5: Glasbearbeitung Dormotion Xl: Glass Preparation Dormotion Xl
10 ..Stirnabdeckungen / end caps 11 ..Glaskantenschutz / glass edge protection 12 ..Sichtschutzbürste (optional) / brush profile (optional) Seite/Page 5/20 DORMA-Glas... -
Page 6: Position Der Laufschiene Vor Der Maueröffnung
Y = Griffbreite / handle width Der Glasüberstand (M) darf durch unterschiedliche Bedingungen wie z.B. Glasbohrung oder Griffdicke von dem empfohlenen Maß abweichen. The glass overlap (M) can differ to the recommended measurements depending on position of drillings or handle thickness. Seite/Page 6/20 DORMA-Glas... -
Page 7: Montage Des Winkelprofils / Installation Of The Angle Profile
Mitgelieferte Schrauben und Dübel sind nicht für jeden Untergrund geeignet. Geeignete auf den Untergrund abgestimmte Befestigungsmittel verwenden! Delivered screws and plugs are not usable for all types of foundations! Please use suitable fixing materials according to foundation! ø 8mm Seite/Page 7/20 DORMA-Glas... -
Page 8: Montage Der Bodenführung / Installation Of The Floor Guide
2. Montage der Bodenführung: 2. Installation of the floor guide: Geeignete auf den Untergrund abgestimmte Befestigungsmittel verwenden! Please use suitable fixing material according to foundation! 2 mm lösen / loosen ø 8mm Seite/Page 8/20 DORMA-Glas... -
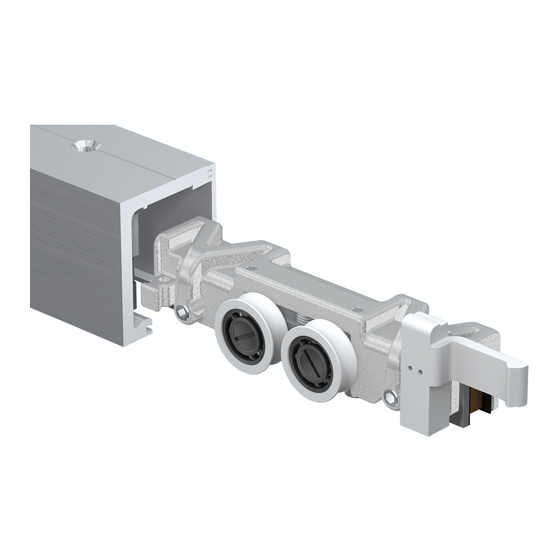
Page 9: Montage Der Klemmwagen / Installation Of The Clamping Carrier
Glasreiniger verwenden, die frei von Silikonen und Ölen sind (z.B. Aceton). 3.1 Before installation all glass clamping areas have to be cleaned first. Only use glass cleaning products, free from silicones and oil (e.g. acetone). 4 mm 12 Nm Alternativ: 0 mm Seite/Page 9/20 DORMA-Glas... -
Page 10: Vorbereitung Aushebeschutz / Preparation Of Anti-Jump Device
5. Endmontage der Bodenführung: 5. Final installation of floor guide: 5.1 Tür vorsichtig öffnen. 5.1 Open the door carefully. Glas 3 mm anziehen / tighten 5.4 Einstellen der benötigten Glasdicke 2 mm 5.4 Adjustment of required glass thickness Seite/Page 10/20 DORMA-Glas... -
Page 11: Montage Der Dämpfereinheit / Installation Of The Spring Damper Unit
Glas legen. Place the clamping plate with gasket onto glass. Detail Y 3 mm Gewindestift eindrehen bis Kontakt mit der Klemm- platte besteht, dann Umdrehung anziehen. Screw-in set screws until contact with clamping plate, then tighten turn. Seite/Page 11/20 DORMA-Glas... -
Page 12: Fitting Of Sliding Door And Fixing Of The Track Profile
7.1 Zugfedern von beiden Dämpfereinheiten spannen. 7.1 Apply tension at the springs of both damper units. Schritt 7.1 bitte unbedingt beachten! Insure that step 7.1 is followed! DETAIL X DETAIL X Feder entspannt Feder gespannt relieve tension apply tension Seite/Page 12/20 DORMA-Glas... - Page 13 Winkelprofil lehnen! 7.4 Position glass onto blocks. Align the door and lean the door against the angle profile! 4 mm fest anziehen / tighten 7.8 Klötze entfernen Klötze / blocks 7.8 remove the blocks Seite/Page 13/20 DORMA-Glas...
-
Page 14: Höheneinstellung / Height Adjustment
3 mm anziehen / teighten 9.2 Hochdrehen bis Kontakt mit der Laufschiene besteht 9.3 Ca. 1/2 - 1 Umdrehung zurück drehen 9.2 Turn upwards until contact is achieved with track 9.3 Circa 1/2 - 1 turn backwards Seite/Page 14/20 DORMA-Glas... - Page 15 / closed Doppeltür / double door Laufwagen Laufwagen Laufwegbegrenzer Laufwegbegrenzer Roller carrier Roller carrier panel stop panel stop Die Position der Laufwegbegrenzer kann alternativ durch Versuch festgelegt werden! The position of panel stop can be fixed by trying! Seite/Page 15/20 DORMA-Glas...
- Page 16 10. Positionierung der Laufwegbegrenzer: 10. Positioning of the panel stops: Seite/Page 16/20 DORMA-Glas...
- Page 17 In the case of a collision, either glass with wall The starter can break or handle with wall, DORMOTION Start and panel stop should readjusted. if overtightened! After adjustment, repeat function control. Seite/Page 17/20 DORMA-Glas...
- Page 18 Glaskantenschutz glass edge protection glass edge protection Zwischen den Flügeln den Glaskantenschutz aufkleben. Wand Schiebetür Schiebetür wall sliding door sliding door Glue on glass edge protection between the panels. Glaskantenschutz Glaskantenschutz glass edge protection glass edge protection Seite/Page 18/20 DORMA-Glas...
- Page 19 13. Installation of brush profile (optional): 13.1 Wellig biegen! 13.1 Deform it wavy! Vor der Profil-Montage: Seitlich einschieben. Nach der Profil-Montage: Von vorne einfedeln. Before profile installation: insert sidewise. After profile installation: insert from ahead. 13.2 13.2 13.2 13.3 Seite/Page 19/20 DORMA-Glas...
- Page 20 14. Installation of end caps: 14.1 Stirnabdeckungen an beiden Enden der Laufschiene anbringen. 14.1 Fixing of end caps on both sides of track profile. 14.1 Folienstreifen abziehen 14.1 pull-off backing tape 14.1 Folienstreifen abziehen 14.1 pull-off backing tape Seite/Page 20/20 DORMA-Glas...
Need help?
Do you have a question about the AGILE 150 DORMOTION Series and is the answer not in the manual?
Questions and answers