Page 1
Operation, Repair, and Parts
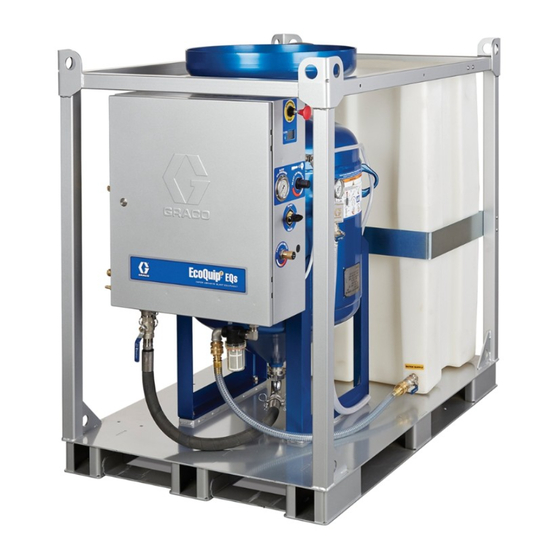
 EcoQuip 2™ 2™ Vapor Vapor Abrasive Abrasive Blast Blast EcoQuip EcoQuip 2™ Vapor Abrasive Blast 3A3489A System System System Vapor abrasive abrasive blast blast system system for for coating coating removal removal and and surface surface preparation. preparation.
Tubing Schematic..........62 Shutting Down ..........20 Draining the Pot ........... 21 Dimensions ............63 Winterizing the Equipment ......22 Technical Specifications........66 Cleaning the Water Tank ......23 Using the Water Dose Meter......23 Graco Standard Warranty........72 3A3489A...
Model Description Description Description Approvals/Emissions Approvals/Emissions Approvals/Emissions 262950 Mobile EcoQuip2 EQm Vapor Blast System 262954 II 2G c ia IIA T3 X 273200 EcoQuip2 EQc Vapor Blast System 273209 II 2G c ia IIA T3 X Custom / OEM 273204...
Warnings Warnings Warnings Warnings The following warnings are for the setup, use, grounding, maintenance, and repair of this equipment. The exclamation point symbol alerts you to a general warning and the hazard symbols refer to procedure-specific risks. When these symbols appear in the body of this manual or on warning labels, refer back to these Warnings.
Page 5
Warnings WARNING WARNING WARNING EQUIPMENT EQUIPMENT EQUIPMENT MISUSE MISUSE MISUSE HAZARD HAZARD HAZARD Misuse can cause death or serious injury. • Do not operate the unit when fatigued or under the influence of drugs or alcohol. • Do not exceed the maximum working pressure or temperature rating of the lowest rated Technical Specifications Specifications in all equipment manuals.
Page 6
Warnings WARNING WARNING WARNING FIRE FIRE FIRE AND AND EXPLOSION EXPLOSION HAZARD EXPLOSION HAZARD HAZARD work area area can ignite or explode. To help prevent fire Flammable fumes, such as solvent, in work work area and explosion: • Use equipment only in well ventilated area. •...
System Component Identification Key: Key: Key: Key: Key: Key: Frame Blast Air Pressure Gauge Blast Control Switch Selector Valve Blast Nozzle Rinse Ball Valve Blast Hose Air Supply Connection Blast Connection Pop-up Handle Pneumatic Control Connection Water Tank Electric Control Connection (non-ATEX systems only) Water Tank Lid Supply Pressure Gauge...
Systems: (237686). Air and and fluid fluid hoses: hoses: Use only genuine Graco ATEX fluid hoses: rated, conductive blast hoses with a maximum of 150 ft (45 m) combined blast hose length to ensure grounding continuity. Check the electrical resistance of the blast hoses.
Operation Operation Operation Operation Lifting the the System System Blast Hose Hose Selection Selection Lifting Lifting System Blast Blast Hose Selection • Lift the system with a lift apparatus rated Make sure to use the correct type of blast control. An appropriately for the weight of the system electric or pneumatic blast control switch can be used (see...
Operation Connecting the the Blast Blast Hose Hose and and Air Connecting Connecting Blast Hose 5. Connect the blast hose, hose restraints, control Hose hoses, and coupler pins. Hose Hose 1. ATEX ATEX models ATEX models only: models only: only: Connect the grounding cable to the external ground stud on the enclosure, then connect the clamp to a true earth ground.
Operation Setting Up Up the the Equipment Equipment Setting Setting Equipment 3. Turn the selector valve to OFF. 1. Fill the water tank with fresh water only, then open the inlet ball valve (N). 4. Disengage the emergency stop (Q). 2.
Page 14
Operation 6. Open the pot dump valve (J). 10. When the water level is above the pop-up gasket, rotate the handle to release the pop-up pin. 7. Add 10 gallons (30 liters) of fresh water 11. Turn the selector valve to BLAST. to the pot.
Operation EQs2 Elite Elite Blast Blast Pressure Pressure Setting Setting EQs2 EQs2 Elite Blast Pressure Setting 14. To set the MediaTrak (ZD), slowly adjust the abrasive metering valve (T) while the abrasive is blasting from the nozzle to reach the desired 1.
Operation Setting the the Abrasive Abrasive Metering Metering Valve Valve Optimizing the the Abrasive Abrasive Metering Metering Setting Setting Abrasive Metering Valve Optimizing Optimizing Abrasive Metering Valve Valve Valve The optimal set point of the abrasive metering valve and corresponding MediaTrak CPM value varies To optimize performance, use the High Production or significantly depending on application and user Media Efficient lines on the charts.
Page 17
Operation General General General Application Application Application Guides: Guides: Guides: 3A3489A...
Operation Nozzle Selection Selection Guide Guide Nozzle Nozzle Selection Guide Blast Pressure Pressure vs. vs. Air Air Flow Flow Guide Guide below to determine which nozzle to use to achieve the desired blast Use the Blast Blast Pressure Flow Guide pressure based on compressor output.
Operation Using the the Wash Wash Feature Feature Using Using Wash Feature 1. Close the abrasive ball valve (M). The wash feature uses water (without abrasive) to rinse areas that have been blasted with abrasive. It is also a convenient feature for flushing abrasive from the blast hose.
Operation Refilling the the Pot Pot with with Abrasive Abrasive Refilling Refilling with Abrasive 4. Engage the pop-up pin by compressing the spring and turning the handle 90° to hold the pop-up in the open position. 1. Close the abrasive ball valve (M). 5.
Operation Draining the the Pot Draining Draining 5. Engage the pop-up pin to hold the pop-up open and allow air to enter. 1. Disconnect the abrasive ball valve cam-lock by removing the coupler pins and pulling the rings out and up to pull the two cams away from the groove.
Operation Winterizing the the Equipment Equipment Winterizing Winterizing Equipment 5. Turn the selector valve to WASH and open the rinse ball valve. While holding the rinse hose over the pot, run the pump until windshield wash comes out of the rinse hose. NOTICE NOTICE NOTICE...
Operation Cleaning the the Water Water Tank Tank Cleaning Cleaning Water Tank 5. Remove the tank lid and clean out with pressure washer. 1. Perform Pressure Relief Procedure, page 2. Disconnect the water inlet hose. Using Using the Using the Water Water Water Dose Dose...
Troubleshooting Troubleshooting Troubleshooting Troubleshooting Problem Problem Problem Cause Solution Cause Cause Solution Solution Unable to fill or The emergency stop (Q) is Disengage the emergency stop (Q). pressurize the pot engaged. with water. The air supply is inadequate. Make sure the air compressor is capable of supplying the minimum air flow requirement for your system (see Technical Specifications, page 66).
Page 25
Troubleshooting Problem Cause Solution Problem Problem Cause Cause Solution Solution The blast hose recoils The abrasive ball valve was Shutting Down, page 20, step 2. heavily when the blast left open during shut down. control switch (B) is The abrasive ball valve is With the pot pressurized and the abrasive ball valve closed, engaged.
Page 26
Troubleshooting Problem Cause Solution Problem Problem Cause Cause Solution Solution No blast air flow when The adjustable blast regulator Adjust the blast regulator to the desired pressure while the the blast control switch is not adjusted to the correct blast control is engaged. (B) is engaged.
Page 27
Troubleshooting Problem Cause Solution Problem Problem Cause Cause Solution Solution While in BLAST mode, The abrasive ball valve is Setting Up the Equipment, page with the blast control closed. switch (B) engaged, The abrasive metering valve Setting Up the Equipment, page air is flowing from the is not properly set.
Page 28
Troubleshooting Problem Cause Solution Problem Problem Cause Cause Solution Solution The blast control switch The air supply is inadequate. Make sure the air compressor is capable of supplying (B) is not engaged, but the minimum air flow requirement for your system (see blasting occurs.
Page 29
Troubleshooting Problem Cause Solution Problem Problem Cause Cause Solution Solution The blast spray The air supply is inadequate. Make sure the air compressor is capable of supplying pattern is sputtering the minimum air flow requirement for your system (see or irregular. Technical Specifications, page 66).
HAZARD To reduce the risk of fire and explosion, the battery must be replaced in a non-hazardous location. Use only an approved replacement battery (see table). Use of an unapproved battery will void Graco’s warranty. Replace Replace Replace Battery Battery Battery 1.
HAZARD HAZARD To reduce the risk of fire and explosion, the fuse must be replaced in a non-hazardous location. Use only an approved replacement fuse (see table). Use of an unapproved fuse will void Graco’s warranty. Replace Replace Fuse Replace...
Repair Replacing the the Pinch Pinch Hose Hose Replacing Replacing Pinch Hose Removing Removing Removing the the Pinch Pinch Pinch Hose Hose Hose Installing Installing the Installing the Pinch Pinch Pinch Hose Hose Hose 1. Place both hose clamps (C1, C2) on the pinch hose (PH).
Parts Parts Parts Parts EQm Parts Parts Parts Apply thread sealant to all non-swivel pipe Apply anti-seize to enclosure mounting threads. studs. Apply anti-seize to threads. Torque to 25–30 ft-lb (34–40.6 N•m) Torque to 60 +/-5 ft-lb (81.3 +/- 6.7 N•m) Apply anaerobic sealant to threads.
Page 34
Parts EQm Parts Parts Parts List List List Ref. Part Description Qty. Ref. Part Description Qty. Ref. Ref. Part Part Description Description Qty. Qty. Ref. Ref. Part Part Description Description Qty. Qty. 17L049 PRESSURE POT, blast media, 17J332 VALVE, ball, 1 npt, brass, nickel 3.5 cu ft.
Parts EQs Parts Parts Parts 1. Apply thread sealant to all non-swivel pipe Torque to 60 +/-5 ft-lb (81.3 +/- 6.7 N•m). threads. Torque to 15 +/-2 ft-lb (20.3 +/- 2.7 N•m) Apply anti-seize to threads. 3A3489A...
Page 36
Parts EQs Parts Parts Parts List List List Ref. Part Description Qty. Ref. Part Description Qty. Ref. Ref. Part Part Description Description Qty. Qty. Ref. Ref. Part Part Description Description Qty. Qty. BASE, standard, frame, tank EQ1934 COUPLER, sandblast, 1-1/2 npt(f) BASE, elite, frame, tank 190774 BLANK, label, kit...
Page 37
Parts EQs (continued) (continued) (continued) Apply thread sealant to all non-swivel pipe Torque to 60 +/-5 ft-lb (81.3 +/- 6.7 N•m) threads. with the pot pressurized. Apply anti-seize to threads. Torque to 15 +/-2 ft-lb (20.3 +/- 2.7 N•m) 3A3489A...
Page 38
Parts EQs Parts Parts List Parts List List (continued) (continued) (continued) Ref. Ref. Ref. Part Part Part Description Description Description Qty. Qty. Qty. Ref. Ref. Ref. Part Part Part Description Description Description Qty. Qty. Qty. FRAME, EcoQuip 2 17K045 FITTING, elbow, 3/4 npt, 17K048 TANK, EcoQuip 2, 17J343...
Parts EQs2 Parts Parts EQs2 EQs2 Parts Apply thread sealant to all non-swivel pipe threads. 3A3489A...
Page 40
Parts EQs2 EQs2 EQs2 Parts Parts List Parts List List Ref. Part Description Qty. Ref. Part Description Qty. Ref. Ref. Part Part Description Description Qty. Qty. Ref. Ref. Part Part Description Description Qty. Qty. 17L078 FRAME, EcoQuip 2, dual BRACKET, manifold, dual frame, EQ2 17K026 COVER, media, fill...
Page 41
Parts EQs2 EQs2 EQs2 (continued) (continued) (continued) Apply thread sealant to all non-swivel pipe threads. 3A3489A...
Page 42
Parts EQs2 EQs2 EQs2 Parts Parts Parts List List (continued) List (continued) (continued) Ref. Part Description Qty. Ref. Part Description Qty. Ref. Ref. Part Part Description Description Qty. Qty. Ref. Ref. Part Part Description Description Qty. Qty. 17L050 128819 PRESSURE POT, blast media, BOLT, flange hd, serrated, 1/2, 6.5 cu ft ENCLOSURE, EcoQuip, elite,...
Parts EQC Parts Parts Parts 1. Apply thread sealant to all non-swivel pipe Torque to 15 +/-2 ft-lb (20.3 +/- 2.7 N•m) threads. Apply anti-seize to enclosure mounting Apply anti-seize to threads. studs. Torque to 60 +/-5 ft-lb (81.3 +/- 6.7 N•m) Torque to 25–30 ft-lb (34–40.6 N•m) with pot pressurized.
Page 44
Parts EQC Parts Parts List Parts List List Ref. Part Description Qty. Ref. Part Description Qty. Ref. Ref. Part Part Description Description Qty. Qty. Ref. Ref. Part Part Description Description Qty. Qty. 17K046 PRESSURE POT, blast, media, 206994 FLUID, TSL 8 oz. bottle 6.5 cu ft EQ1829 FITTING, ground boss, spud,...
Parts EQ200T Parts Parts EQ200T EQ200T Parts Apply thread sealant to all non-swivel pipe threads. 3A3489A...
Page 46
Parts EQ200T EQ200T EQ200T Parts Parts Parts List List List Ref. Part Description Qty. Ref. Part Description Qty. Ref. Ref. Part Part Description Description Qty. Qty. Ref. Ref. Part Part Description Description Qty. Qty. TRAILER, GL7, 129010 FITTING, elbow, 45, electric brakes mxf, cs 24Z156...
Parts EQ400T3 Parts Parts EQ400T3 EQ400T3 Parts Apply thread sealant to all non-swivel pipe threads. 3A3489A...
Page 48
Parts EQ400T3 EQ400T3 EQ400T3 Parts Parts Parts List List List Ref. Part Description Qty. Ref. Part Description Qty. Ref. Ref. Part Part Description Description Qty. Qty. Ref. Ref. Part Part Description Description Qty. Qty. TRAILER, GL10, electric 24Z156 KIT, replacement, tool brakes COMPRESSOR, 375 24Z156...
Parts EQ400T4i Parts Parts EQ400T4i EQ400T4i Parts Apply thread sealant to all non-swivel pipe threads. 3A3489A...
Page 50
Parts EQ400T4i EQ400T4i EQ400T4i Parts Parts List Parts List List Ref. Part Description Qty. Ref. Part Description Qty. Ref. Ref. Part Part Description Description Qty. Qty. Ref. Ref. Part Part Description Description Qty. Qty. TRAILER, GL10, electric 129009 FITTING, elbow, 90, mxf, brakes COMPRESSOR, 425 24Z156...
Parts Enclosure Box Box Parts Parts Enclosure Enclosure Parts Enclosure Enclosure Enclosure Parts Parts Parts Torque fitting with pump outlet fitting to 35–40 ft-lb (47.4–54.2 N•m) Apply thread sealant to needle valve knob screw when reassembling. Align knob with ‘D’ facing up when in closed position. Apply thread sealant to selector valve handle set screw when reassembling.
Page 52
Parts Ref. Part Description Qty. Ref. Part Description Qty. Ref. Ref. Part Part Description Description Qty. Qty. Ref. Ref. Part Part Description Description Qty. Qty. BRACKET, pump 17K055 VALVE, selector, 3-way, 3/8 npt, br 25A531 PUMP, water, sst, 3:1 118160 WASHER, lock, external 128483 GROMMET, pump, EQ2...
Page 53
Parts Enclosure Enclosure Enclosure Parts Parts Parts (continued) (continued) (continued) Apply thread sealant to emergency stop valve stem when reassembling the red knob. 3A3489A...
Page 54
Parts Ref. Ref. Ref. Part Part Part Description Description Description Qty. Qty. Qty. Ref. Ref. Ref. Part Part Part Description Description Description Qty. Qty. Qty. BRACKET, EcoQuip, EQ1122 FITTING, elbow, stem, 3/8 DataTrak 17K057 ENCLOSURE, DataTrak, EQ5108 VALVE, 3-way. e-stop, 3/8 EcoQuip in.
Page 55
Parts Enclosure Enclosure Enclosure Parts Parts Parts (All (All (All models models models except except EQm) except EQm) EQm) 3A3489A...
Page 56
Parts Ref. Part Description Qty. Ref. Part Description Qty. Ref. Ref. Part Part Description Description Qty. Qty. Ref. Ref. Part Part Description Description Qty. Qty. 128720 VALVE, pinch MANIFOLD, slurry, barb/cam-lock SEAL, wiper 128638 FITTING, ptc, straight, SEAL, o-ring 121022 FITTING, elbow, male, 128637 FITTING, ptc, straight,...
Page 57
Parts Enclosure Enclosure Enclosure Parts Parts Parts (EQm (EQm only) (EQm only) only) 3A3489A...
Page 58
Parts Ref. Part Description Qty. Ref. Part Description Qty. Ref. Ref. Part Part Description Description Qty. Qty. Ref. Ref. Part Part Description Description Qty. Qty. 128720 VALVE, pinch 128638 FITTING, ptc, straight, SEAL, wiper 128637 FITTING, ptc, straight, SEAL, o-ring 121022 FITTING, elbow, male, 17L317...
Vapor Abrasive Blast Systems and Accessories Vapor Abrasive Abrasive Blast Blast Systems Systems and and Accessories Accessories Vapor Vapor Abrasive Blast Systems Accessories Blast Hoses Hoses with with Control Control Hose/Cables Hose/Cables Blast Blast Hoses with Control Hose/Cables Part ID ID ID Length ATEX Part...
Vapor Abrasive Blast Systems and Accessories Other Accessories Accessories Other Other Accessories Part Part Part Description Description Description 17L119 Kit, nozzle gasket (pack of 5) EQ5166 Kit, nozzle extension, 24 in (.6 m) 26A029 Kit, nozzle extension, 24 in (.6 m), with handles 17J958 Kit, nozzle pressure verification tool 17G833...
Technical Specifications Technical Specifications Specifications Technical Technical Specifications Metric U.S. U.S. U.S. Metric Metric Maximum Fluid Working Pressure 175 psi 12.1 bar, 1.21 MPa Operating Temperature 35˚ - 110˚ F 1.6˚ - 43.3˚ C Recommended Compressor Size 185–600 CFM 5.3-17 m^3/min Blast Hose Size 1.25 in.
Page 67
Technical Specifications EQs and and EQs EQs Elite Elite Elite U.S. U.S. U.S. Metric Metric Metric Maximum Fluid Working Pressure 175 psi 12.1 bar, 1.21 MPa Operating Temperature 35˚ - 110˚ F 1.6˚ - 43.3˚ C 10.6-25.5 m^3/min Recommended Compressor Size 375-900 CFM Blast Hose Size 1.25 in.
Page 68
Technical Specifications EQs2 Elite Elite EQs2 EQs2 Elite U.S. U.S. U.S. Metric Metric Metric Maximum Fluid Working Pressure 175 psi 12.1 bar, 1.21 MPa Operating Temperature 35˚ - 110˚ F 1.6˚ - 43.3˚ C 10.6-45.3 m^3/min Recommended Compressor Size 375-1600 CFM Blast Hose Size 1.25 in.
Page 69
Technical Specifications EQc and and EQc EQc Elite Elite Elite U.S. U.S. U.S. Metric Metric Metric Maximum Fluid Working Pressure 175 psi 12.1 bar, 1.21 MPa Operating Temperature 35˚ - 110˚ F 1.6˚ - 43.3˚ C 10.6-25.5 m^3/min Recommended Compressor Size 375-900 CFM Blast Hose Size 1.25 in.
Page 70
Technical Specifications EQ200T Elite Elite EQ200T EQ200T Elite U.S. U.S. U.S. Metric Metric Metric Maximum Working Pressure 125 psi 8.61 bar, 0.86 MPa Operating Temperature 35˚ - 110˚ F 1.6˚ - 43.3˚ C 1.25 in. ID 31.75 mm ID Blast Hose Size Abrasive Capacity* 880 lb.
Page 71
Technical Specifications EQ400T Elite Elite EQ400T EQ400T Elite U.S. U.S. U.S. Metric Metric Metric Operating Temperature 35˚ - 110˚ F 1.6˚ - 43.3˚ C Blast Hose Size 1.25 in. ID 31.75 mm ID Abrasive Capacity* 880 lb. 400 kg Pressure Pot Volume 6.5 cubic feet 184 liters Water Tank Volume...
With the exception of any special, extended, or limited warranty published by Graco, Graco will, for a period of twelve months from the date of sale, repair or replace any part of the equipment determined by Graco to be defective. This warranty applies only when the equipment is installed, operated and maintained in accordance with Graco’s written recommendations.