Table of Contents
Advertisement
Quick Links
Advertisement
Table of Contents
Troubleshooting

Related Manuals for DeLonghi ECAM22.32 Series


Summary of Contents for DeLonghi ECAM22.32 Series
- Page 1 De’Longhi Appliances via Seitz, 47 31100 Treviso Italia www.delonghi.com...
- Page 2 ECAM22.32X BEAN TO CUP ESPRESSO AND CAPPUCCINO MACHINE Instruction for use...
- Page 3 pag. 6...
- Page 5 HOT MILK...
-
Page 7: Table Of Contents
CONTENTS CLEANING ..............13 Cleaning the machine ............13 INTRODUCTION ............7 Cleaning the coffee grounds container .......13 Symbols used in these instructions ........7 Cleaning the drip tray and condensate tray ......13 Letters in brackets ..............7 Cleaning the inside of the coffee machine ......14 Troubleshooting and repairs ..........7 Cleaning the water tank .............14 Cleaning the coffee spouts ..........14... -
Page 8: Introduction
INTRODUCTION • Make sure the socket used is freely accessible at all times, enabling the appliance to be unplugged when necessary. Thank you for choosing this automatic espresso and cappuccino • Unplug directly from the plug only. machine. Never pull the power cable as you could damage it. We hope you enjoy using your new appliance. -
Page 9: Designated Use
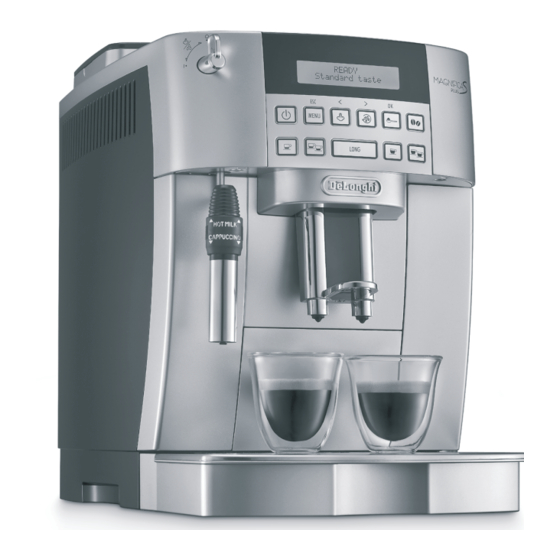
Designated use A19 Cappuccino maker A20 Cappuccino/hot milk ring This appliance is designed and made to prepare coffee and heat A21 Steam/hot water knob drinks. This is a household appliance only. Description of the control panel It is not intended to be used in: (page 2 - B ) A number of buttons on the panel have a dual function. -
Page 10: Setting Up The Appliance
TURNING THE APPLIANCE ON appliance on the worktop, leave a space of at least 3 cm between the surfaces of the appliance and the side and Please note : rear walls and at least 15 cm above the coffee machine. Before turning the appliance on, make sure the main switch at •... -
Page 11: Adjust Time
Adjust time 1. Press the MENU button to access the menu; To adjust the time on the display, proceed as follows: 2. Press the button until “Set temperature” is 1. Press the MENU button to access the menu; displayed; 2. Press the button until “Adjust time”... -
Page 12: Default Values (Reset)
Default values (reset) To change the quantity of coffee the appliance delivers This resets all menu settings and programmed quantities back automatically into the cup, proceed as described below: to the default values (with the exception of the language which press the button corresponding to the quantity to be remains as set). -
Page 13: Making Coffee Using Pre-Ground Coffee
- 1 cup, if you want to make 1 coffee (fig. 10); 3. Make sure the funnel is not blocked, and then add one level - 2 cups, if you want 2 coffees (fig. 11). measure of pre-ground coffee (fig. 13). 3. -
Page 14: Making Hot Milk (Not Frothed)
CLEANING Add the milk froth to the cup of coffee prepared previously. The cappuccino is ready. Sweeten to taste and, if desired, Cleaning the machine sprinkle the froth with a little cocoa powder. The following parts of the machine must be cleaned regularly: coffee grounds container (A14), Making hot milk (not frothed) drip tray (A18) and condensate tray (A15),... -
Page 15: Cleaning The Inside Of The Coffee Machine
1. Remove the drip tray and the grounds container (fig. 21); NO WASHING UP LIQUID - NO DISHWASHER 2. Empty the drip tray and grounds container and wash them; Do not use washing up liquid to clean the infuser as it may 3. -
Page 16: Setting Water Hardness
SETTING WATER HARDNESS It is essential that you observe the manufacturer’s safety warnings indicated on the descaler packet and the warnings The DESCALE message is displayed after a period of operation relating to the procedure to follow in the event of contact with established according to the water hardness. -
Page 17: Replacing The Filter
filter” is displayed. Please note : 10. Press the button; The filter lasts about two months if the appliance is used 11. The message “Confirm?” is displayed. normally. If the coffee machine is left unused with the filter 12. Press the button to confirm selection. -
Page 18: Messages Displayed
MESSAGES DISPLAYED MESSAGE DISPLAYED POSSIBLE CAUSE SOLUTION FILL TANK Insufficient water in the tank. Fill the tank with water and/or insert it cor- rectly, pushing it as far as it will go until it clicks into place (fig. 4). EMPTY GROUNDS CONTAINER The grounds container (A13) is full. Empty the grounds container and drip tray, clean and replace (fig. -
Page 19: Troubleshooting
GENERAL ALARM The inside of the appliance is very dirty. Clean the inside of the appliance thoroughly, as described in the section “Cleaning” (page 13). If the message is still displayed after cle- aning, contact De’Longhi Customer Services. REPLACE FILTER The water softener filter has been used up. -
Page 20: Electrical Connection (Uk Only)
The milk is not frothed Cappuccino maker is dirty. Clean as described in the section “Cleaning the cappuccino maker after use” (page 13). The ring on the cappuccino maker is NOT in the Place the ring in the CAPPUCCINO position. cappunccino position.
Need help?
Do you have a question about the ECAM22.32 Series and is the answer not in the manual?
Questions and answers