Avaya 3500 Series Installation Instructions Manual
Ethernet routing switch
Hide thumbs
Also See for 3500 Series:
- Getting started (162 pages) ,
- Troubleshooting manual (114 pages) ,
- Configuration manual (96 pages)

Related Manuals for Avaya 3500 Series


Summary of Contents for Avaya 3500 Series
- Page 1 Installing Avaya Ethernet Routing Switch 3500 Series Release 5.3.2 NN47203-304 Issue 01.02 September 2016...
- Page 2 Products)” OR SUCH SUCCESSOR SITE AS DESIGNATED BY written consent of Avaya can be a criminal, as well as a civil offense AVAYA, ARE APPLICABLE TO ANYONE WHO DOWNLOADS, under the applicable law.
- Page 3 See the Avaya Support website: https://support.avaya.com product or Hosted Service notices and articles, or to report a problem with your Avaya product or Hosted Service. For a list of support telephone numbers and contact addresses, go to the Avaya Support website: https://support.avaya.com...
-
Page 4: Table Of Contents
Chapter 2: New in this document.................... 6 Chapter 3: Hardware compatibility for ERS 3500 Series............ 7 ......................... 7 Switch models Chapter 4: Preinstallation checklist.................. 10 Chapter 5: Installing the Avaya Ethernet Routing Switch 3500 Series...... 12 ....................... 12 Installation checklist ....................... 13 Installation fundamentals ...................... 13... -
Page 5: Chapter 1: Introduction
Chapter 1: Introduction Purpose This document provides conceptual information and installation procedures for the switch hardware. September 2016 Installing Avaya Ethernet Routing Switch 3500 Series Comments on this document? infodev@avaya.com... -
Page 6: Chapter 2: New In This Document
Chapter 2: New in this document Installing Avaya Ethernet Routing Switch 3500 Series, NN47203–304 is a new document. September 2016 Installing Avaya Ethernet Routing Switch 3500 Series Comments on this document? infodev@avaya.com... -
Page 7: Chapter 3: Hardware Compatibility For Ers 3500 Series
Chapter 3: Hardware compatibility for ERS 3500 Series This chapter lists the ERS 3500 Series hardware. Switch models The following table describes the ERS 3500 series models. All switch models support autopolarity. Model Part Number Description ERS 3510GT AL3500?04– 10 port Ethernet Switch configured as: •... - Page 8 Mode ERS 3549GTS AL3500?06-E6 49 port Ethernet Switch configured as: • 48 ports of 10/100/1000BASE-T with 2 shared SFP ports (combo with ports 47-48) Table continues… September 2016 Installing Avaya Ethernet Routing Switch 3500 Series Comments on this document? infodev@avaya.com...
- Page 9 • C — UK / Ireland power cord • D — Japan power cord • E — North American power cord • F — Australia / New Zealand / China power cord September 2016 Installing Avaya Ethernet Routing Switch 3500 Series Comments on this document? infodev@avaya.com...
-
Page 10: Chapter 4: Preinstallation Checklist
Chapter 4: Preinstallation checklist Before you install the Avaya Ethernet Routing Switch 3500 Series, make sure that you complete the tasks in the preinstallation checklist. Task Description Review the technical specification for For the physical, electrical, and the switch. Make sure that the area... - Page 11 3500 series, prepare the equipment rack and ensure that there is enough rack space of 1.75 inches (4.45 centimeters). Installing ERS 3500 in an equipment rack on page 23. September 2016 Installing Avaya Ethernet Routing Switch 3500 Series Comments on this document? infodev@avaya.com...
-
Page 12: Chapter 5: Installing The Avaya Ethernet Routing Switch 3500 Series
Chapter 5: Installing the Avaya Ethernet Routing Switch 3500 Series This chapter provides the information and procedures to install the Avaya Ethernet Routing Switch 3500 Series. Installation checklist Use this checklist to install the Avaya Ethernet Routing Switch. Table 1: Installation checklist... -
Page 13: Installation Fundamentals
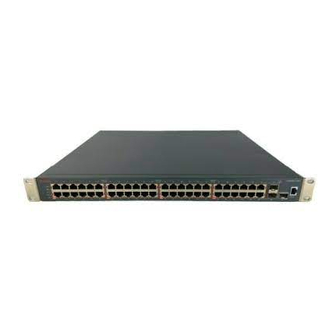
This section provides information about the switches and their front panel view. Front panel view The following figures illustrate the front panel ports for the switch series. September 2016 Installing Avaya Ethernet Routing Switch 3500 Series Comments on this document? infodev@avaya.com... - Page 14 Installing the Avaya Ethernet Routing Switch 3500 Series Figure 1: ERS 3500 series front panel port illustrations September 2016 Installing Avaya Ethernet Routing Switch 3500 Series Comments on this document? infodev@avaya.com...
-
Page 15: Electrostatic Discharge
ESD voltages on the body; ESD voltages on clothing can still cause damage. • Avoid touching any connector pins. • Do not remove the wrist or ankle strap until the installation is complete. September 2016 Installing Avaya Ethernet Routing Switch 3500 Series Comments on this document? infodev@avaya.com... -
Page 16: Technical Specifications
Technical specifications The following table provides the technical specifications for the individual switches in the Avaya Ethernet Routing Switch 3500 Series. Ensure that the area where you install the switch and where it operates meets these requirements. Warning: To avoid bodily injury from hazardous electrical shock and current, never remove the top of the device. - Page 17 ERS 3510GT 18 Watts max ERS 3510GT-PWR+ 210 Watts ERS 3524GT 28.5 Watts max ERS 3524GT-PWR+ 500 Watts max ERS 3549GTS 65 Watts max Table continues… September 2016 Installing Avaya Ethernet Routing Switch 3500 Series Comments on this document? infodev@avaya.com...
- Page 18 Installing the Avaya Ethernet Routing Switch 3500 Series Electrical component Switch details Specification ERS 3549GTS-PWR+ 484 Watts max Thermal rating ERS 3526T 65 BTU/hr max ERS 3526T-PWR+ 360 BTU/hr max ERS 3510GT 61 BTU/hr max ERS 3510GT-PWR+ 156 BTU/hr max...
-
Page 19: Equipment Requirement
Ensure to order Direct Attach cables and SFP or SFP+ Transceivers if required. Optional rack-mounting equipment If you plan to rack-mount the switch, ensure the following equipment is available: September 2016 Installing Avaya Ethernet Routing Switch 3500 Series Comments on this document? infodev@avaya.com... - Page 20 Installing the Avaya Ethernet Routing Switch 3500 Series Table 7: Optional equipment Switch Optional equipment Equipment Avaya Ethernet Spare Rack Mount Kit— Routing Switch used as a replacement 3500 Series rack mount kit. Order Code AL3511001- ERS 3510GT or Spare Rack Mount Kit—...
- Page 21 — Quantity: 1 • #10–32 rack mounting screws (not shown) — Quantity: 4 • #12–24 rack mounting screws (not shown) — Quantity: 4 Table continues… September 2016 Installing Avaya Ethernet Routing Switch 3500 Series Comments on this document? infodev@avaya.com...
-
Page 22: Cable Requirements
ERS 3510GT / ERS 3510GT-PWR+ can be installed on a table or shelf, or wall mounted. It can also be installed in an equipment rack like the other switches in the ERS 3500 Series. See the following procedures to install the switch: •... -
Page 23: Installing An Ers 3500 Series Switch In An Equipment Rack
Installing an ERS 3500 series switch in an equipment rack About this task Install an ERS 3500 series switch in an equipment rack using the supplied brackets. The brackets secure the chassis and prevent it from sliding around during vibration or when inserting or extracting transceivers. -
Page 24: Installing An Ers 3510Gt Or Ers 3510Gt-Pwr
Installing the Avaya Ethernet Routing Switch 3500 Series 4. Verify that the switch is securely fastened to the rack. Installing an ERS 3510GT or ERS 3510GT-PWR+ The following procedures describe how to install the switch models ERS 3510GT or ERS 3510GT PWR+ on a table or shelf, or in an equipment rack: •... - Page 25 • Allow at least 2 inches (5.1 cm) on each side of the switch for proper ventilation and at least 5 inches (12.7 cm) at the back of the switch for power cord clearance. Procedure 1. Attach the rubber feet at the marked locations. September 2016 Installing Avaya Ethernet Routing Switch 3500 Series Comments on this document? infodev@avaya.com...
- Page 26 Installing the Avaya Ethernet Routing Switch 3500 Series 2. Set the switch on a table or shelf. September 2016 Installing Avaya Ethernet Routing Switch 3500 Series Comments on this document? infodev@avaya.com...
- Page 27 3. With the front of the ERS 3510GT or ERS 3510GT-PWR+ unit facing you, attach the long bracket from the optional kit (see Figure that follows) to the left side of the switch using the flathead screws provided. September 2016 Installing Avaya Ethernet Routing Switch 3500 Series Comments on this document? infodev@avaya.com...
- Page 28 Installing the Avaya Ethernet Routing Switch 3500 Series 4. Slide the switch into the rack as shown in the figure that follows. Insert and tighten the rack mount screws. September 2016 Installing Avaya Ethernet Routing Switch 3500 Series Comments on this document? infodev@avaya.com...
- Page 29 Switch installation Note: The ERS 3500 Series mounting hardware is specific for each switch model. Do not mix screws or brackets between different ERS 3500 Series switches. 5. Verify that the switch is securely fastened to the rack. Installing two ERS 3510GT or ERS 3510GT-PWR+ switches in an equipment...
- Page 30 Installing the Avaya Ethernet Routing Switch 3500 Series About this task Install two ERS 3510GT or ERS 3510GT-PWR+ units together to form one standard width rack-wide system using a 19 inch side-by-side Rack Mount Kit (ordered separately). Before you begin Check for the following rack and bracket requirements: •...
- Page 31 3. Attach the standard rack mount bracket ears to the outer end of each switch as shown below. 4. After the switches are joined together, fold the hinged bracket inward. September 2016 Installing Avaya Ethernet Routing Switch 3500 Series Comments on this document? infodev@avaya.com...
- Page 32 Installing the Avaya Ethernet Routing Switch 3500 Series 5. Perform one of the following: • To connect two ERS 3510GT or two 3510GT-PWR+ switches together use the rear bracket as shown below, with four M4 pan head screws to secure the switches at the rear.
-
Page 33: Installation And Removal Of Transceivers
Installation and removal of transceivers The following sections describe how to install and remove transceivers in the Avaya Ethernet Routing Switch 3500 Series switch. In this context, the term transceiver refers to Small Form Factor (SFP) and SFP+. For more information about transceiver use and designation, see Installing Transceivers and Optical Components on Avaya Ethernet Routing Switch 3500 Series , NN47203-302. - Page 34 Installing the Avaya Ethernet Routing Switch 3500 Series SFP transceivers are keyed to prevent incorrect insertion. If the SFP transceiver resists pressure, do not force it; turn it over, and reinsert it. Apply a light pressure to the device until it clicks and locks into position.
-
Page 35: Removing An Sfp
If you discard the SFP transceiver, dispose of it according to all national laws and regulations. Stacking switches All the switches in the ERS 3500 Series other than ERS 3510GT, include up/down stack ports located in the rear of the unit in the form of SFP ethernet ports. September 2016 Installing Avaya Ethernet Routing Switch 3500 Series Comments on this document? infodev@avaya.com... -
Page 36: Stacking Capabilities
Installing the Avaya Ethernet Routing Switch 3500 Series In the ERS 3500 Series, the stack ports can be used in one of two different modes and are not reserved as stacking ports. The two modes are Standalone Mode and Stacking Mode. - Page 37 Stacking switches Figure 3: ERS 3526T and ERS 3526T-PWR+ rear ports Figure 4: ERS 3524GT and ERS 3524GT-PWR+ rear ports September 2016 Installing Avaya Ethernet Routing Switch 3500 Series Comments on this document? infodev@avaya.com...
-
Page 38: Connecting Switches In A Stack
Figure 5: ERS 3549GTS and ERS 3549GTS-PWR+ rear ports Figure 6: ERS 3550T and ERS 3550T-PWR+ rear ports For more information, see Quick Start Configuration for Avaya Ethernet Routing Switch 3500 Series, NN47203-301. Stacking cables must be ordered separately. The correct Avaya SFP direct attach cable is required in order to enable and use stacking mode. - Page 39 Stacking switches Note: Avaya recommends that you use a Cascade Down configuration. Before you begin • Order the appropriate Avaya Ethernet Routing Switch 3500 Series cascade cables to ensure fail-safe stacking. For more information, see Cable requirements on page 22.
- Page 40 Installing the Avaya Ethernet Routing Switch 3500 Series Figure 7: Cascade Down September 2016 Installing Avaya Ethernet Routing Switch 3500 Series Comments on this document? infodev@avaya.com...
- Page 41 Next steps For making a standalone switch a stack for the first time and adding a switch to an already existing stack, see Quick Start Configuration for Avaya Ethernet Routing Switch 3500 Series, NN47203-301. September 2016 Installing Avaya Ethernet Routing Switch 3500 Series...
-
Page 42: Connecting The Ac Power Cord To The Switch
Installing the Avaya Ethernet Routing Switch 3500 Series Connecting the AC power cord to the switch About this task Connect a switch to a power source. Before you begin • Ensure to check AC power specifications for the switch. • Ensure to check the AC power cord for international use. You must use a power cord that is approved for the receptacle type in your country. -
Page 43: Ac Power Specifications
AC power specifications The following table describes the AC power specifications for the Ethernet Routing Switch 3500 Series. September 2016 Installing Avaya Ethernet Routing Switch 3500 Series Comments on this document? infodev@avaya.com... -
Page 44: Console Port Pin Assignments
You can use an RJ-45 to DB-9 cable to connect the switch console port to your management terminal. Avaya recommends you use the Avaya RJ-45. Alternatively a DB-9 to RJ-45 adapter or other suitable console cables can be used - the maximum length of a console cable is 25 feet (8.3 meters). -
Page 45: Led State Definitions
1 LED state definitions The figures and tables in the following sections describe the LEDs on the Avaya Ethernet Routing Switch 3500 Series. The tables describe LED operation for a switch that finishes the power-on self- test. Warning: Fiber optic equipment can emit laser or infrared light that can injure your eyes. - Page 46 Installing the Avaya Ethernet Routing Switch 3500 Series Figure 9: ERS 3510GT/3510GT-PWR+ Series Front Panel LEDs Figure 10: ERS 3524 Front Panel LEDs Figure 11: ERS 3526 Front Panel LEDs Figure 12: ERS 3549GTS/GTS-PWR+ Front Panel LEDs September 2016 Installing Avaya Ethernet Routing Switch 3500 Series...
-
Page 47: Status Leds
The unit is operating in a standalone mode, or not the stack base unit. Amber (Solid) The unit is operating as the Temporary Base Unit. Table continues… September 2016 Installing Avaya Ethernet Routing Switch 3500 Series Comments on this document? infodev@avaya.com... - Page 48 Installing the Avaya Ethernet Routing Switch 3500 Series State Definition Green (Solid) The unit is operating as the Base Unit for the designated stack. Green (Blinking) There is a stack configuration error. Either multiple base units or no base unit is configured in the stack.
-
Page 49: Chapter 6: Related Resources
Documentation See Documentation Reference for Avaya Ethernet Routing Switch 3500 Series, NN47203-101 for a list of the documentation for this product. For more information about new features of the switch and important information about the latest release, see Release Notes for Avaya Ethernet Routing Switch 3500 Series, NN47203-400. -
Page 50: Searching A Documentation Collection
Avaya Mentor videos provide technical content on how to install, configure, and troubleshoot Avaya products. About this task Videos are available on the Avaya Support website, listed under the video document type, and on the Avaya-run channel on YouTube. Procedure •... -
Page 51: Subscribing To E-Notifications
Application & Technical Notes for Virtual Services Platform 7000. Procedure 1. In an Internet browser, go to https://support.avaya.com. 2. Type your username and password, and then click Login. 3. Under My Information, select SSO login Profile. - Page 52 8. Scroll through the list, and then select the product name. 9. Select a release version. 10. Select the check box next to the required documentation types. September 2016 Installing Avaya Ethernet Routing Switch 3500 Series Comments on this document? infodev@avaya.com...
- Page 53 Subscribing to e-notifications 11. Click Submit. September 2016 Installing Avaya Ethernet Routing Switch 3500 Series Comments on this document? infodev@avaya.com...
- Page 54 Index installation ..............33 lock and extraction mechanisms ........removal .................35 support .................49 videos .................. September 2016 Installing Avaya Ethernet Routing Switch 3500 Series Comments on this document? infodev@avaya.com...
Need help?
Do you have a question about the 3500 Series and is the answer not in the manual?
Questions and answers