Advertisement
Quick Links
DO NOT RETURN TO STORE.
For immediate help with assembly or product information
customerservice@backyardproductsllc.com
Our staff is ready to provide assistance.
April through October M - F 8:00 AM to 7:00 PM EST
November through March M - F 8:00 AM to 5:00 PM EST
ANTES DE DEVOLVERLO, ¡LLÁMENOS!
Si desea más información sobre el montaje, llámenos sin coste
adicional alguno al siguiente teléfono:
customerservice@backyardproductsllc.com
Nuestro personal le proporcionará toda la ayuda que necesite.
Abril por octubre M - F 8:00 ESTA a 7:00 P.M. EST
el sábado 8:30 ESTA a 4:30 P.M. EST
noviembre por marzo M - F 8:00 ESTA a 5:00 P.M. EST
STOP!
STOP!
¡PARADA!
¡PARADA!
Call Us First!
call our toll-free number:
1-888-827-9056
or email:
Saturday 8:30 AM to 4:30 PM EST
+1-888-827-9056
o correo electrónico:
16695
Advertisement

Related Manuals for Backyard Discovery San Marino 10


Summary of Contents for Backyard Discovery San Marino 10
- Page 1 16695 STOP! STOP! ¡PARADA! ¡PARADA! Call Us First! DO NOT RETURN TO STORE. For immediate help with assembly or product information call our toll-free number: 1-888-827-9056 or email: customerservice@backyardproductsllc.com Our staff is ready to provide assistance. April through October M - F 8:00 AM to 7:00 PM EST Saturday 8:30 AM to 4:30 PM EST November through March M - F 8:00 AM to 5:00 PM EST ANTES DE DEVOLVERLO, ¡LLÁMENOS!
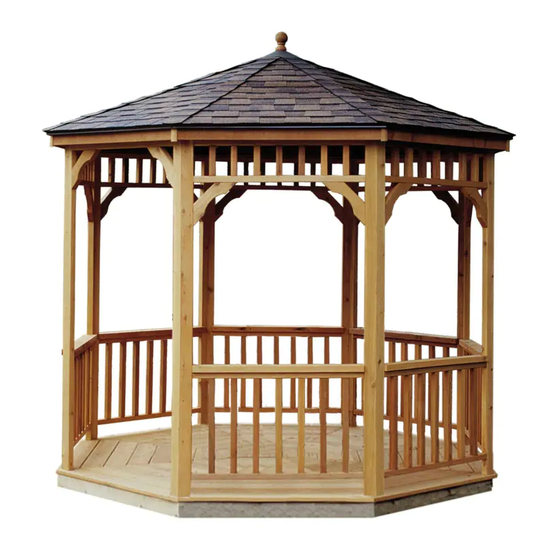
- Page 3 10’ Diameter. San Marino 12’ actual floor size has to be a minimum of 11’-8-3/4” flat to flat or 13’ Diameter is recommended. #16695 San Marino 10’- 8 sided Gazebo shown with optional Floor Kit (Not Included) San Marino 12’- 10 sided Gazebo (not shown)
- Page 4 10’ and 12’ Round Gazebo 8-Sided 10-Sided ■ Parts List San Marino 10’ ❑ 7 pcs. Pre-assembled Wall Panels 44-3/4” x 82-1/2” ❑ 1 pc. Pre-assembled Door Panel 44-3/4” x 82-1/2” with Spacer ❑ 1 pc. Roof Finial ❑ 1 pc.
- Page 5 F L O O R S Y S T E M ( F l o o r s y s t e m s n o t s u p p l i e d w i t h k i t ) Y O U M U S T B U I L D Y O U R G A Z E B O O N A F L O O R S Y S T E M .
-
Page 6: Hard Surface Installation
W O O D F L O O R S I T E P R E P A R A T I O N For optional pre-cut floor kit, follow assembly instructions included with floor kit. It is important to have a solid, flat and level foundation for your Gazebo. Carefully consider the recommendations listed below prior to creating your foundation. - Page 7 C O N C R E T E S L A B S I T E P R E P A R A T I O N It is important to have a solid, flat and level foundation for your Gazebo. Carefully consider the recommendations listed below prior to creating your foundation.
- Page 8 PARTS LIST 10’ GAZEBO A S S E M B L I N G ❑ 7 pcs. Pre-assembled Wall Panels W A L L P A N E L S ❑ 1 pc. Pre-assembled Door Panels PARTS LIST 12’ GAZEBO ❑...
- Page 9 PARTS LIST 10’ GAZEBO I N S T A L L I N G ❑ 8 pcs. Plywood Gusset Bracket G U S S E T B R A C K E T S PARTS LIST 12’ GAZEBO ❑ 10 pcs. Plywood Gusset Bracket VIEW FROM INSIDE Note: Use wood glue (not includ- ed) between Wall Panels and Gus-...
-
Page 10: Bottom View
PARTS LIST 10’ GAZEBO R A F T E R A N D R I D G E ❑ 8 pcs. Rafters 2 x 4 x 62-3/4” B L O C K A S S E M B L Y ❑... -
Page 11: View From Top
R A F T E R A N D R I D G E B L O C K A S S E M B L Y C O N T I N U E D VIEW FROM BOTTOM VIEW FROM TOP Fig.2 Fig.1 (2) 3"Screws... - Page 12 A S S E M B L I N G A N D E R E C T I N G R A F T E R S C O N T I N U E D 4-D: Install remaining Rafters by insert- ing screws through Gusset Brack- et, as shown in 4-C Fig.
- Page 13 A S S E M B L I N G A N D E R E C T - I N G R A F T E R S C O N T I N U E D F O R 1 2 ’ O N L Y 4-E: For 12’...
- Page 14 PARTS LIST 10’ GAZEBO ❑ 1 pc. Assembled Side Wall and Rafters A N C H O R I N G ❑ 8 pcs. Metal “L” Brackets and Screws (Not included in Kit) G A Z E B O PARTS LIST 12’ GAZEBO ❑...
- Page 15 A N C H O R I N G G A Z E B O PARTS LIST ❑ Assembled Side Wall and Rafters C O N T I N U E D ❑ Anchor or Brackets and Screws (Not included in Kit) Check with our local Building Code Department for any variances.
- Page 16 PARTS LIST 10’ GAZEBO I N S T A L L I N G R O O F P A N E L S ❑ 8 pcs. Plywood Triangular Roof Panels F O R 1 0 ’ & 1 2 ’ G A Z E B O PARTS LIST 12’...
- Page 17 I N S T A L L I N G R O O F P A N E L S C O N T I N U E D 2" Nails every 8" once all Roof Panels are in place 6-B: Follow the same steps as in 6-A to install all remaining Roof Panels, only temporarily nail-...
- Page 18 PARTS LIST 10’ GAZEBO I N S T A L L I N G ❑ 8 pcs. Fascia 5/8” x 3-1/2” x 46-7/8” Ply- F A S C I A wood ❑ 8 pcs. Fascia Trim 3/8” x 1-1/2” x 3-3/4” PARTS LIST 12’...
- Page 19 Note: If installing a Screen Kit, skip Step 8 and refer to Screen Kit instruction manual before going to Step 9. PARTS LIST 10’ GAZEBO ❑ 7 pcs. Sill Plates 2 x 4 x 40-1/4” I N S T A L L I N G PARTS LIST 12’...
- Page 20 ❑ 5 Bundles Shingles (not included) for 10’ I N S T A L L I N G D R I P ❑ 7 Bundles Shingles (not included) for 12’ ❑ 40 feet Drip Edge (not included) for 10’ E D G E , S H I N G L E S , ❑...
-
Page 21: Claim Procedure
Limited Conditional Warranty* Backyard Storage Solutions, LLC warrants the following: Every product is warranted from defects in workmanship and manufacturing for one year. All hardware and metal components are warranted for two years. Trim is warranted for 10 years. Waferboard siding and sheathing is warranted for two years. SmartSide™...
Need help?
Do you have a question about the San Marino 10 and is the answer not in the manual?
Questions and answers