Advertisement
Quick Links
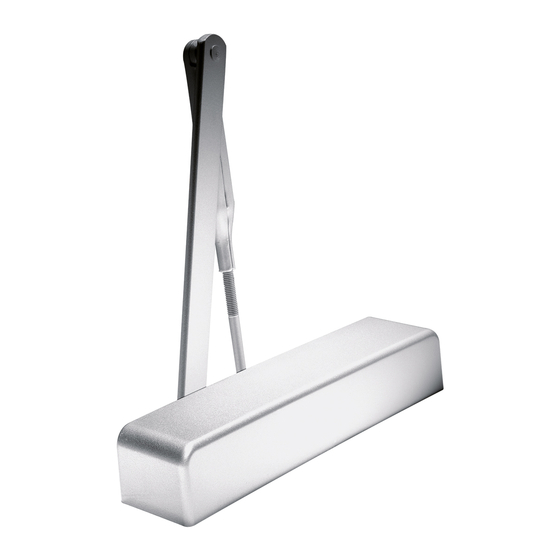
8916 AR STA
REGULAR MOUNT
AND ACCESSORY PLATE BP89
1
(REFERENCE UNIT CARTON FOR ACCESSORIES AND
OPTIONS SUPPLIED)
Determine hand of door. Prepare door and frame
utilizing full size template.
RIGHT HAND
REVERSE BEVEL
LEFT HAND DOOR
CAUTION: SEX NUTS ARE REQUIRED FOR ATTACHMENT
OF COMPONENTS TO UNREINFORCED DOORS AND TO
WOOD OR PLASTIC FACED COMPOSITE TYPE FIRE
DOORS, UNLESS AN ALTERNATIVE METHOD IS
IDENTIFIED IN THE INDIVIDUAL DOOR MANUFACTURER'S
LISTINGS.
2
BP89 Plate applications only. Attach plate to door
as shown. Arrow on plate to point toward arm
attachment.
(RH DOOR)
QTY
(4)
QTY
(4)
3
Attach closer to door or plate with sweep and
latch valves facing hinges.
C
HINGES
L
(RIGHT HAND DOOR)
METAL DOORS or SN1/SN2 (Sex Nuts)
QTY
(4)
WOOD DOORS
QTY
(4)
PLATE
QTY
(4)
LEFT HAND
REVERSE BEVEL
RIGHT HAND DOOR
(LH DOOR)
METAL DOORS or
SN1/SN2 (Sex Nuts)
WOOD DOORS
HINGES C
(LEFT HAND DOOR)
4
Attach main arm to pinion of closer in position
shown in illustration. Tighten pinion screw securely.
RIGHT HAND DOOR
6mm HEX
KEY
5
Separate main arm from connecting arm by prying apart
at the elbow with a screwdriver while making sure arms
are parallel.
L
QTY
(2)
METAL FRAMES
INSPK NO. 08279480 Rev.09/09
08279481
INS NO.
LEFT HAND DOOR
TOP VIEW
MAIN ARM
CONNECTING ARM
QTY
(1)
QTY
(1)
QTY
(2)
WOOD FRAMES
1 of 9
PAGE
09/09
Rev.
Advertisement

Related Manuals for Dorma STA Series


Summary of Contents for Dorma STA Series
- Page 1 8916 AR STA REGULAR MOUNT AND ACCESSORY PLATE BP89 Attach main arm to pinion of closer in position (REFERENCE UNIT CARTON FOR ACCESSORIES AND shown in illustration. Tighten pinion screw securely. OPTIONS SUPPLIED) Determine hand of door. Prepare door and frame RIGHT HAND DOOR LEFT HAND DOOR utilizing full size template.
- Page 2 Adjust sweep, latch and backcheck valves. CONTINUED STEP #5 Closing time from 90° to 15° (sweep range) is generally adjusted to take a minimum of 3 seconds. hinge Closing time from 15° to fully closed (latch range) should take a minimum of 1.5 seconds. Backcheck For additional 15% closing power mount arm shoe intensity should be adjusted to insure that the door is with pivot point towards hinge edge of door.
- Page 3 8916 AR STA TOP JAMB MOUNT AND ACCESSORY PLATE BP89 (REFERENCE UNIT CARTON FOR ACCESSORIES AND Attach closer to frame or plate with sweep and OPTIONS SUPPLIED) latch valves facing hinges. Determine hand of door. Prepare door and frame HINGES HINGESC utilizing full size template.
- Page 4 BACKCHECK RANGE SWEEP DECREASE RANGE DELAYED INCREASE ACTION RANGE SWEEP & LATCH LATCH RANGE POSITIONING VALVE LATCH DELAYED ACTION (SPEED) (TIME) BACKCHECK (INTENSITY) SWEEP (SPEED) INCREASE BACKCHECK OR DELAYED ACTION DECREASE NOTE: DELAYED ACTION IS AN OPTIONAL FEATURE. Adjust spring tension, if required, using a 1/4" wrench. NOTE: 8916 supplied with size 3 spring setting.
- Page 5 8916 AR STA PARALLEL ARM MOUNT AND ACCESSORY PLATE BP89 (REFERENCE UNIT CARTON FOR ACCESSORIES AND Install bracket to frame. OPTIONS SUPPLIED) Determine hand of door. Prepare door and frame utilizing full size template. RIGHT HAND LEFT HAND REVERSE BEVEL REVERSE BEVEL RIGHT HAND DOOR LEFT HAND DOOR...
- Page 6 Install main arm Adjust spring tension, if required, using a 1/4" wrench. NOTE: 8916 supplied with size 3 spring setting. CRITICAL SPRING TENSION ADJUSTER Place wrench on bottom 8916 ONLY BARRIER-FREE OPENINGS - pinion. Take an opening force reading from the pull on the door.
- Page 7 Adjust sweep, latch and backcheck valves. Closing time from 90° to 15° (sweep range) is generally adjusted to take a minimum of 3 seconds. Closing time from 15° to fully closed (latch range) should take a minimum of 1.5 seconds. Backcheck intensity should be adjusted to insure that the door is under control during the opening cycle protecting the door and objects behind the door.
-
Page 8: Troubleshooting
Trouble Shooting Detección de Problemas Reference Performance Adjustments for adjustment locations Referencias Funcionamiento Ajustes para ajustes Door will not latch. * La puerta no cierra con picaporte.* 1. Adjust latch valve counterclockwise to increase latch speed. (Do not back 1. Ajuste la válvula de cerrado (L) a la izquierda para aumentar la velocidad del cerrado. valve out past closer casting surface). - Page 9 Detección de Problemas En Cas Défaillances En las instalaciones en marcos superiores: Con la puerta cerrada y La porte se ferme trop lentement* 1. Vérifier et régler les soupapes de verrouillage, de vitesse et de butée (le cas échéant) el brazo ajustable a un ángulo de 90 grados a la puerta, la zapata dans le sens contraire des aiguilles d'une montre pour accroître la vitesse de fermeture.
Need help?
Do you have a question about the STA Series and is the answer not in the manual?
Questions and answers