Advertisement
Quick Links
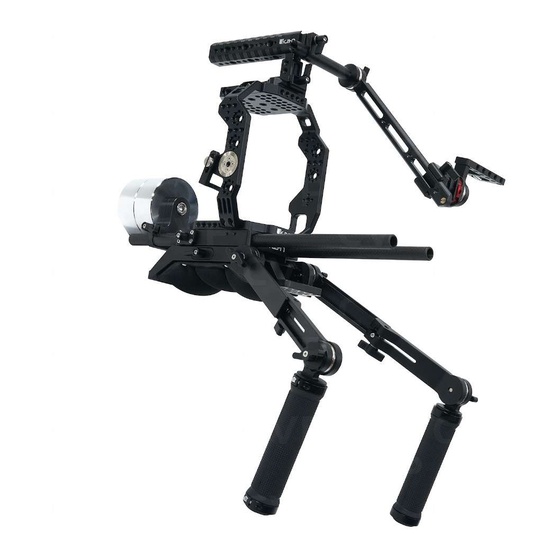
STR-CINE-C500-RIG
Stratus Complete Shoulder Mount Rig System for Canon C500 Mk II & C300 Mk III
What's Included
1 x Top Plate
1 x Manfrotto 501 Base Plate
1 x Adapter Plate
1 x Shoulder Pad
2 x 16" Carbon Fiber 15mm Rods
2 x Rubber Handgrips
2 x Extendable Dog Bones
1 x 15mm Rod Adapter
1 x Top Handle
1 x EVF/Monitor Mount
2 x Sideplates
1 x Counterweight (2x 2.5lbs)
1 x Standard NATO Rail
www.ikancorp.com | 1.713.272.8822 | sales@ikancorp.com
Quick Start Guide
Advertisement

Related Manuals for Ikan STR-CINE-C500-RIG


Summary of Contents for Ikan STR-CINE-C500-RIG
- Page 1 Quick Start Guide STR-CINE-C500-RIG Stratus Complete Shoulder Mount Rig System for Canon C500 Mk II & C300 Mk III What’s Included 1 x Top Plate 1 x Manfrotto 501 Base Plate 1 x Adapter Plate 1 x Shoulder Pad 2 x 16” Carbon Fiber 15mm Rods...
-
Page 2: What's Included
Features - Complete Shoulder Mount Rig System for Canon C500 Mk II & C300 Mk III - Includes Two Handgrips - Shoulder Pad Features Manfrotto 501 Mount - Includes Two Carbon fiber 15mm rods - Compatible with Monitors up to 7 inches - Compatible with any Arri Rosette Mounted EVF - Rotatable Monitor/EVF mount What’s Included... - Page 3 Setup Step 1: Attach the Top Plate Attach the Top Plate (15) to the C500 placing it over the camera and making sure that the main screw holes are aligned. Secure the Top plate by fastening two ¼-20 screws to the top of the camera. Step 2: Attach the Adapter Plate Attach the adapter plate (1) to the bottom of the camera by aligning the screw holes, then fasten the screws to secure the plate.
- Page 4 Step 3: Attach the Baseplate Attach the Manfrotto 501-Style Baseplate (8) to the bottom of the adapter plate (1) by aligning the baseplate (8) until the screw holes match. Fasten the large screws to the adapter plate (1) Step 4: Attach the Side Plates www.ikancorp.com | 1.713.272.8822 | sales@ikancorp.com...
- Page 5 Step 5: Attach the NATO Rail Attach the NATO rail (11) by aligning the screw holes with the Top Plate (15) and fastening the ¼-20 screws. Step 6: Attach the Top Handle To attach the Top Handle (14) to the rig, first make sure that the NATO Rail (11) attachment on the Top Handle (14) is mostly loosened.
- Page 6 Step 7: Attach the 15mm Rods Attach the Carbon Fiber 15mm rods (4) by sliding them in to the Manfrotto 501-Style Baseplate’s (8) rod slots. To secure the 15mm rods (4), tighten both of the thumb screws located on the Manfrotto 501-style Baseplate (8).
- Page 7 Step 8: Attach the Shoulder Pad Attach the Shoulder Pad (12) by sliding it into the bottom of the Manfrotto 501-style Baseplate (8). Make sure the thumbscrew on the side of the Shoulder Pad (12) is loosened before sliding the Shoulder Pad in.
- Page 8 Step 9: Attach the Handgrips and Dogbones Attach the Handgrips (7) to the Dog bones (6) by aligning the rosettes and tightening the thumbscrews. Attach the Dogbones (6) to the Shoulder Pad (12) by aligning the rosettes and tightening the thumbscrews.
- Page 9 Step 10: Assemble and Attach the Monitor Holder/EVF Holder To assemble the Monitor/EVF Holder, slide the Arri Rosette EVF holder Rotator (2) to the NATO Rail Monitor Holder (10) and tighten the thumb screw. Then attach the Monitor Holder (9) to the Arri Rosette EVF holder Rotator (2) by aligning the rosette and tightening it with the thumb screw.
- Page 10 Step 10: Assemble and Attach the Monitor Holder/EVF Holder (cont.) Once the monitor is mounted, you can rotate the pitch to your liking. The monitor rotator tension can be altered by tightening the screw on the NATO Rail attachment. Note: This system is compatible with any EVF that has an ARRI rosette placed on the side. To attach an EVF, remove the Monitor Holder (9) and attach the EVF directly to the rosette on the Arri Rosette EVF Holder Rotator (2).
-
Page 11: Learn More
Damage caused by abuse or misuse, dismantling, or changes to the product not made by the company. • Damage caused by natural disaster, abnormal voltage, and environmental factors, etc. ©2020 Ikan International. All rights reserved. www.ikancorp.com | 1.713.272.8822 | sales@ikancorp.com...
Need help?
Do you have a question about the STR-CINE-C500-RIG and is the answer not in the manual?
Questions and answers