
Related Manuals for Ikan beholder EC1


Summary of Contents for Ikan beholder EC1
- Page 1 V1.0 2016.07 3- axis Handheld Gimbal Stabilizer Beholder Instruction Manual Encoders...
-
Page 2: Table Of Contents
Table of Contents Introduction – About the EC1 – Features Product Description – What’s Included – Parts Diagram – Charging the batteries – Installing the battery holder – Camera Installation and Balance Getting to Know the EC1 – Powering On –... -
Page 3: About The Ec1
Beholder EC1 is lightweight and easy to use and can be carried in the supplied case or a small photographer bag. EC1 can be widely used in movies, professional wedding films, and other applications. -
Page 4: Features
▲ Features Beholder EC1 features Dimensions: 360x184x79mm Compatibility: Mirrorless & DSLR Cameras up to 5 lbs Main Features: • 32-bit controller with motor control units (MCUs) and 12bit Encoder system • OLED screen display for power and battery level • OLED screen display for Profile Mode and joystick •... -
Page 5: What's Included
▲ What’s Included After you’ve received the product and before you use it, please check whether the package contains all the items in the following inventory. If any item is missing, please get in touch with the dealer to resolve the situation. EC1 body (Fig. -
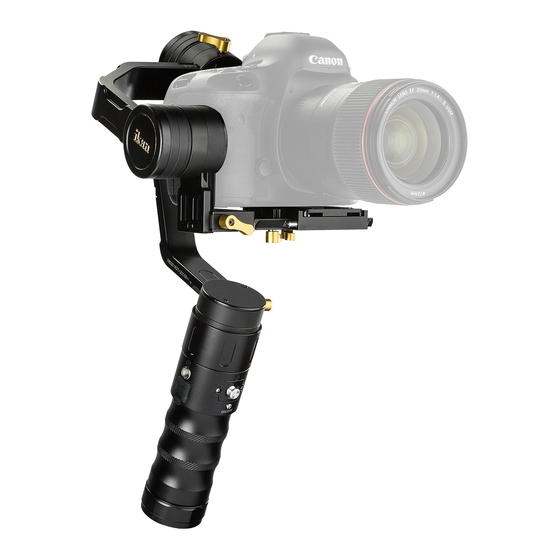
Page 6: Parts Diagram
▲ Parts Diagram In the box Fig A. Beholder EC1 parts... -
Page 7: Charging The Batteries
Note: The battery holder can only be used as a charger stand temporarily. When the battery LED indicator turns green to indicate the completion of charging, the batteries are only charged to 80% of the battery capacity. For 100% charge, please buy a professional charge adapter or use ikan’s ICH- SC4 smart charger. -
Page 8: Installing The Battery Holder
▲ Installing the battery holder Instructions to use the battery holder Mount the 18650 batteries with the negative electrode of the battery (-) towards the spring (Fig. 2). Push the three 18650 batteries inward. Fig. 2. Inserting batteries into the battery holder Install the battery holder into the battery compartment with the two electrical terminals toward the direction of insertion (Fig. -
Page 9: Camera Installation And Balance
▲ Camera Installation and Balance Instructions to install the camera WARNING Before installing the camera and adjusting the balance, remove the camera lens cover, attach the lens hood, and insert a memory card and camera batteries, as well as any other accessories. - Page 10 Install the camera on gimbal base • Install the camera with quick release mounted into the Beholder EC1 bottom mount base (Fig. 5). • Slightly adjust the position of the camera into the base until you find a horizontal balance.
- Page 11 STEP 3 Adjust the gimbal roll – left and right balance • Release the roll thumb screw (Fig. 6). • Slide the roll arm left or right until the camera finds a balance position and doesn’t lean left or right. •...
- Page 12 STEP 4 Adjust the gimbal pitch - up and down balance • Release the pitch thumb screw (Fig. 7). • Move the pitch/tilt arm up and down, until the camera stays in place at any lens angle. • If needed, readjust the camera in quick release base back and forth until horizontal balance is found. •...
- Page 13 1. Repeat steps 1-5 otherwise a different camera/lens combo is required. Beholder EC1 uses the latest 32-bit systems, a multi-processor technology and inductive motor technology, with greatly improved torque. Therefore, it's able to start and level the camera if it is out of balance, but for shot stability, battery life and power saving, we strongly recommend you find the best balance first and then power the gimbal on and shoot the video.
-
Page 14: Powering On
Fig. 9. Gimbal joystick Make sure the batteries are fully charged before starting the gimbal. Adjust the gimbal and camera position before use. Beholder EC1 uses the latest 32-bit encoding technology and can start up in any direction and at any angle. -
Page 15: Modes Of Operation (Profiles)
▲ Modes of Operation (Profiles) Switching the gimbal to different modes of operation (profiles) • Press the mode button one time, which is located under the OLED screen (Fig. 9 [3]) to enter Lock Mode (Profile 1): camera will hold the direction and not follow, pan, or tilt. •... -
Page 16: Oled Display
▲ OLED display Description of OLED display functions Boot up interface with company logo Charge: 30% to 45% 85% to 100% 65% to 85% 10% to 30% 45% to 65% 10% or less joystick right direction joystick tilt up joystick left direction joystick tilt down profile1: Press mode button once: Lock mode profile2: Press mode button twice: Pan Follow mode... -
Page 17: Compatible Camera Models
▲ Compatible cameras Compatible camera models • Beholder EC1 supports lighter than 2KG (including lenses) DSLR or mirrorless cameras • List of supported cameras: • DSLR: Canon 6D / 5D / 7D • Mirrorless: A6300, A7R2, A7S + 24- 70 / 16- 35, GH4 + 12- 35, GH3 + 14- 140 and so on. - Page 18 Mount modes Mounting options Beholder EC1 supports two camera mounting options: Roll arm to the left or roll arm to the right of the center (Fig. 12). The right side is useful if your camera has a flip screen. Fig. 12 Camera mount – left side or right side roll arm...
-
Page 19: Precautions
Things to consider before use Beholder EC1 is shipped from the factory with perfect calibration. However, after a long period of unuse or if the temperature difference is too large, it may cause the gyro to drift automatically or to tilt during use. -
Page 20: Safety
▲ Safety Important safety instructions 1. Do not get too close to a magnetic field or a source of extreme heat and fire. 2. Using and storing this product under high temperature and humidity, water, or in a highly corrosive environment can cause the device to have internal failure. -
Page 21: Copyright/Trademark Statement
Copyright/Trademark Statement Copyright/Trademark statement Beholder® and ikan® are certified trademarks, which cannot be used without our permission for any other purposes. The product has a number of patents so if copies of the product are found, the perpetrator will hold the relevant legal responsibility. -
Page 22: Product Specifications
▲ Product specifications Beholder EC1 technical specification Model: EC1 3-axis single handheld gimbal stabilizer Load Capacity 2000 g Battery 3x 18650 3.7v Battery Operating Time Approx. 8-10 hours Battery Charging time Approx. 3-4 hours Working temperature: -10 to 70 degrees Celsius Working angles: (360°... -
Page 23: Frequently Asked Questions
Frequently asked questions and answers 1. How do you charge the gimbal? Beholder EC1 can be charged in two ways: using the built-in battery holder micro USB or using a separate authorized dedicated charger (recommended) such as the ikan ICH-SC4. - Page 24 5. When I start up the stabilizer (the camera’s center of gravity has been adjusted), why is it always twisted to one side? This may be from gyro magnetic fields that are affecting the surrounding environment, leading to an incorrect gyro direction. Solution: Press and hold the mode button for about 6 seconds to enter the calibration mode.
Need help?
Do you have a question about the beholder EC1 and is the answer not in the manual?
Questions and answers