PIKO SmartControl User Manual
Hide thumbs
Also See for SmartControl:
- User manual (80 pages) ,
- Instruction manual (30 pages) ,
- Quick manual (2 pages)
Table of Contents
Advertisement
Advertisement
Table of Contents

Related Manuals for PIKO SmartControl


Summary of Contents for PIKO SmartControl
- Page 1 PIKO SmartControl – ® the digital future of model train control! User ManUal...
- Page 2 System...
- Page 3 PIKO SmartControl System ® User Manual...
-
Page 4: Table Of Contents
System Directory Introduction ..........................6 System description ........................7 2.1. The new system’s brain: the PIKO SmartBox ..............8 ® 2.2. PIKO SmartController ......................10 ® PIKO SmartBox ........................12 ® Getting started ........................15 Installing the PIKO SmartBox ....................16 ®... - Page 5 Safety notice ........................... 74 FAQ ............................74 Notes ............................80 Products, specifications and availability subject to change. Duplications and reproductions of this documentation are strictly forbidden and need to be allowed by PIKO in writing. PIKO , PIKO SmartControl , PIKO SmartController and PIKO SmartBox are registered trademarks.
-
Page 6: Introduction
The constant development of model trains and model train control required a completely new approach to digital train control. Therefor PIKO, as one of the very first model train companies, decided to introduce a novel system that really is easy to use and yet is still capable of handling complex train control scenarios. -
Page 7: System Description
CV-programming and all system configuration can easily be managed with the touch display. The controller can be easily charged via USB during breaks. Notice: The PIKO SmartController can only be used in conjunction with the PIKO SmartBox , that transfers ® ®... -
Page 8: The New System's Brain: The Piko Smartbox
A separate programming track comes in handy when configuring other DCC-compliant decoders without RailComPlus support. For expanding layouts, additional boosters and occupancy detectors can be connected to the PIKO SmartBox without difficulty. A PC running model railroad software can be connected to the system via ®... - Page 9 • suitable for N, TT and H0 scale Integrated programming track output for decoder programming • full support of all DCC service mode commands • import of all decoders used by PIKO to date (excludes old AnDi decoders!) • import of locomotives possible Loconet-T extension port** •...
-
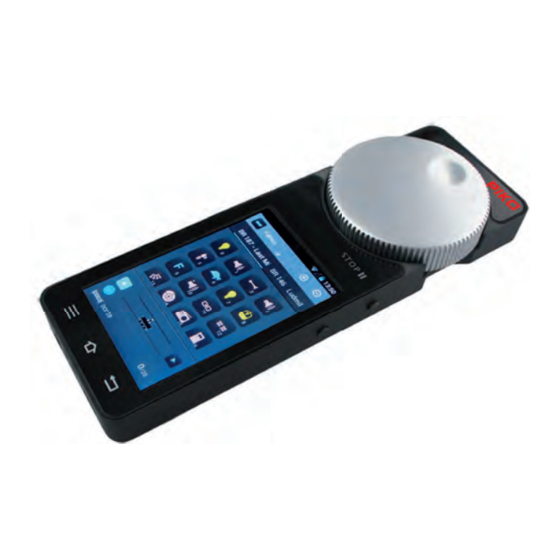
Page 10: Piko Smartcontroller
The motorized analog dial automatically adjusts to the current speed of the loco when setting the speed on the display, taking over control of a loco or when changing direction. „Stop / II“-button The STOP-button is something like a panic switch for the PIKO SmartControl system. ®... - Page 11 The status-LED displays the current state of your system. If the LED is green you can control and steer as you like. If the LED is red the PIKO SmartBox either detected a short circuit or you triggered ® an emergency-stop.
-
Page 12: Piko Smartbox
Information about the Android operating system You may already be familiar with Google’s “Android” operating system from your personal smartphone. Getting used to the system will be easy, as the PIKO SmartControl app can be used just like any other ®... - Page 13 Hardware top: (each from left to right) 1 status LED for WPS connection 2 button for WPS connection 3 status LED for active connection between PIKO SmartBox and PIKO SmartControl -app ® 4 jumper (WiFi on/off) 5 status LED for track power...
- Page 14 Ethernet interface for connecting to a local network. USB-socket (8) USB interface can be used PIKO SmartBox system updates. ® More details can be found in “Update and Reset of the PIKO SmartBox ” ® Notice about PIKO SmartBox ®...
-
Page 15: Getting Started
(e.g. screws or nails). Please take the time to double check this. It will safe you a lot of time later, in case there is a problem! • Choose a proper and safe place to mount the PIKO SmartBox . This position should meet the ®... -
Page 16: Installing The Piko Smartbox
The best way to do that is ® to use the two handling areas on the left and right side. Please take care for the fan which is placed in the bottom part of the PIKO SmartBox housing. It has a ®... - Page 17 Connecting your PIKO SmartBox to the track ® After making sure that your layout is setup according to above mentioned criteria you can connect the Piko SmartBox to the track. You begin by connecting the wires to the the terminal / socket-connector.
- Page 18 Once everything above is in place you can connect your PIKO SmartBox to the power supply. ® Just insert the 5.5mm terminal of the power supply into the socket on the back of the PIKO SmartBox ® (socket “PWR”). The PIKO SmartBox will start automatically and setup a local Wi-Fi network, to ®...
-
Page 19: First Start Of The Piko Smartcontrol ® System
3.2 First Start of the PIKO SmartControl System ® Activating the PIKO SmartController ® Turn on your device by holding the power-button for ca. 2 seconds. As soon as the status-LED is blinking you can release the button. The device will boot for the first start now (this may take up to one minute). - Page 20 System Setting up the device (Android-setup) Setup Date and time To set the date and time on your device, please go to the main menu (press the on home screen and enter settings). Then enter “Date and Time” in the column “System”. To enter the time manually, please press “Automatic time zone / Use network-provided time zone”...
- Page 21 If your PIKO SmartBox is already powered on you will see it here. ® The standard name is “SmartBox”. This is the local Wi-Fi network created by your PIKO SmartBox ® More settings / options: You also can connect your PIKO SmartControl with other Wi-Fi networks (symbol „plus“...
- Page 22 PIKO SmartBox you cannot control your layout ® ® / track. To control your layout again you have to reconnect the PIKO SmartControl with the PIKO ® SmartBox . Just repeat the steps above in the WiFi menu to reconnect.
- Page 23 • use the USB wire of the included charger and connect it with a USB socket on your computer • use the USB socket of the PIKO SmartBox ® As the USB socket is standardized, it is possible to connect the PIKO SmartControl to any other USB ®...
-
Page 24: Piko Smartcontrol ® App
You will also find the app in the main menu. This is the main link, that cannot be removed. All other links, like those on the home screen, can be deleted or moved to other positions. More information about those functions can be found in chapter „more detailed Tipps for the PIKO SmartControl App“. -
Page 25: Overview Of Features
After a successful connection you will see this screen: 4.1. Overview of features 4.1.1 Settings Via the Menu button you can access „Settings“. The following options can be found there: * Please note the change of the text when activating / deactivating any function. - Page 26 System Select command station Here you can see all available PIKO SmartBoxes. Usually there will be only one choice here. Please check your WiFi settings in case the list is empty. Act as main controller This is a safety feature. It allows you to choose how the system reacts when the connection between...
-
Page 27: Main-Pages Of The Piko Smartcontrol ® App
Key Bindings Here you have the option to assign functions to the four buttons along both sides of the PIKO SmartControl ® You can choose from all 28 functions, change driving steps or direction, do an emergency stop or choose to add no function. -
Page 28: Overview Of Features
System 4.1.3 Overview of features Switching between different menus The control panel and switch panel can be accessed by touching the relevant symbols in the menu bar on top of the screen (loco symbol = control panel / switch symbol = switch panel). Switch Panel Control Panel CV-Programming... -
Page 29: The Control Panel
If you decided to buy one of the PIKO Premium Train Sets you just need to put a loco on the track, confirm the automatic RailComPlus registration and you can experience how simple it can be to control... -
Page 30: Edit Locomotive
System Additional menus in the control panel You can access more options via the hardware menu-button or with 4.2.1 Edit locomotive Here you can edit the currently selected loco from the control panel. You can change the name, the loco’s picture/symbol, the address and the available functions. To change the name touch the line below „name“. - Page 31 For the available functions you can configure the following: • The symbol – just touch it to change it • The way the function will operate: permanent, momentary or inverted A permanent function will remain active after touching it once. A momentary function will only remain active as long as the button is pressed.
-
Page 32: Create New Locomotive
System 4.2.2 Create new locomotive This menu is similar to „edit locomotive“. You can use the preset settings for the new loco, you only have to enter a name and an address for the loco (so that it an be clearly identified in the control panel). - Page 33 Notice: The locomotive list also provides the built-in Android system menu. If you press on a locomotive for a little bit longer the status bar on top will change. It will show the options “back” (arrow left), “edit“ (pencil) and “delete” (trash bin). You can leave the menu with the hardware back-button. When touching „edit“...
-
Page 34: Create Consist
System 4.2.3 “create consist” With the help of this menu you can „virtually“ create consists, including up to four locomotives. After choosing “create consist” you will be redirected to a new menu. First of all you can enter a name for the new consist. According to the consist-type you also can choose whether it’s a diesel, steam or electric consist by touching the picture. -
Page 35: Switching Between Locos
Changing driving direction via the analog knob: When using the analog knob, you have to manually stop the loco first. If the loco has stopped just push the knob a little bit into it’s end-position. The installed end-switch will “click” and change the direction of travel. - Page 36 System Information about automatic registration via RailComPlus ® As soon as you place a RailComPlus locomotive on the track it will automatically register. A notification ® will be shown on the display in that case. By pressing “open” this locomotive will be added to the control panel as the currently active locomotive.
-
Page 37: The Switch Panel
4.3 The switch panel The switch panel allows you to add as many accessories and switches as you want, more than 16,000 in total. The top menu bar is similar to the control panel, only the switch symbol has changed to a loco symbol. You can toggle back to the control panel by pressing the loco symbol. - Page 38 System The ”items list“ will show items that you already added to the list. The items list is stored centrally on the PIKO SmartBox so you will see the same list on all controllers ® no matter where an item was added to the list.
- Page 39 Similar to the menu “new locomotive” you have to enter a name and an address first. Additionally, you have the choice of different symbols and accessory settings. After entering a name, use the keyboard-button „next“ to enter the address. Confirm with “done”. Now you can choose a symbol, just by touching it.
- Page 40 System Notice for accessories: (logical system for addresses) Items like signals, switches or other accessories which have more than one state require more than one address (for example signals with 6 lamps). Addresses are assigned as follows: • enter an address for the base state of the item •...
- Page 41 Notice for items list: Just as the locomotive list the item list provides the standard Android menu. Just press an item a little bit longer and the upper status bar will change. You will have the option to edit or delete items then. By pressing „back „...
-
Page 42: Control The Switch Panel
System 4.3.2 Control the switch panel After creating a switch panel, you can easily control your accessories just by touching the related symbol on the screen. For items that only have two states, the symbol will change immediately. For items with more than two states you have to select the desired state. Please remember the accessory address scheme for items with more than two states described above. -
Page 43: Programming
4.4 Programming 4.4.1 Read and write CV’s The screen for decoder programming can be reached with the main menu button On this screen you can read and write decoder CVs. Read CV’s To read a CV’s value you first have to enter the related CV. Touch the line with the CV and enter the number. -
Page 44: Dcc-Address
With this menu you can read and write long addresses. The complicated method of entering long addresses with the help of different CV’s is not necessary anymore. The PIKO SartBox will automatically calculate which CV’s to modify in order to enter a long address. -
Page 45: Options And Settings Of The Piko Smartcontrol ® System
5. Options and settings of the PIKO SmartControl System ® 5.1 Link the PIKO SmartBox into a local network ® There are two options for connecting your PIKO SmartBox to a network: WiFi or LAN. ® Connection via LAN The Ethernet-socket of the PIKO SmartBox is working in DHCP-mode. -
Page 46: Connecting The Piko Smartcontroller ® To A Local Network
5.2 Connecting the PIKO SmartController to a local network ® Connecting to an existing WiFi network If you already have a router with an internet connection at home you can connect your handheld PIKO SmartController to the existing network. ®... - Page 47 PIKO SmartBox is already activated ® ® and has created a WiFi network. Your PIKO SmartControl should also show the WiFi symbol in the top ® status bar. You can choose your PIKO SmartBox by selecting it.
- Page 48 If this option is active, you just need to touch any function of a loco or change the speed to assume control of it. If the function is not active a locomotive will remain under the control of the original PIKO SmartControl .
- Page 49 This option controls what happens if an address is already in use. By default all decoders are set to address #3. This won’t cause a problem if you only have one loco, but if you have more all other locomotives will need to be assigned other addresses. You can configure the starting address the PIKO SmartBox uses when automatically assigning addresses.
- Page 50 System „Access point settings“ Here you can change the WiFi-settings like the network name or the password, for example to be abled to use two PIKO SmartBox within one WiFi range. ® Enter a new network name and a new password.
-
Page 51: Update And Reset Of The Piko Smartbox
You can release the button now, the PIKO SmartBox is ready to update. ® To perform an update you need to insert a specially prepared USB-stick**. The PIKO SmartBox ® should automatically identify the USB-stick and start looking for the update data. -
Page 52: Backup And Restore / Rescue Of The Piko Smartbox
® ® this case. You can easily restore the connection with WPS (see “WiFi settings” in chapter 3.2). Attention: If there is more than one backup file stored on the USB-stick the PIKO SmartBox will choose one ® randomly. -
Page 53: Updating The Piko Smartcontroller ® With A Computer
Unpack the compressed file to a folder of your choice. Start the installation by double-clicking on the file “SCUpdateSetup.exe”. Follow the instructions on the screen and start the Updater after successful installation. You will be asked to connect your PIKO SmartController to your computer. ®... - Page 54 System After you pressed the „Start Update“ button, the Android system of the PIKO SmartController will ask ® which program it should use to install the updates. Please choose “paket installer” and confirm with “always”. It is possible that a second update needs to be installed. Please follow the instructions of the PIKO SmartControl Updater to see whether this is necessary or not.
-
Page 55: Overview Of The Android Operating System
The so called home screen, the status bar and the main menu. On the home screen, which serves more or less the same purpose as the desktop on a PC, you can find links to different applications, the so called “apps”. On the PIKO SmartControl this home screen is ®... -
Page 56: Downloading And Installing Apps From The Google ® Playstore
6.2 Changing the background picture You can customize the background of your home screen. Doing so requires downloading a gallery app first. A gallery app is not included with the PIKO SmartControl . PIKO does not recommend a specific ®... -
Page 57: Personalize Your Devices
6.3 Personalize your devices Besides apps you can also put files on the device with the help of a computer. Just connect your PIKO SmartControl to the computer via USB cable. Usually the device should install its drivers automatically ®... -
Page 58: Android-Tips
System 7. Android-Tips 7.1 Display settings: Brightness and timeout To change the brightness of the display, go to main menu -> settings -> display. Touch brightness and a small window will open where you can set your desired brightness. Please note that increasing brightness will reduce battery life. The timeout is the time after which display will switch off automatically. -
Page 59: Font Size
As soon as you click another font size you will see the user interface changing. This option controls the font size for all Android-menus and information. The font size of the PIKO SmartControl app can not be changed. -
Page 60: Manage Installed Apps
If an app causes problems you can quit it, remove its data or uninstall it completely. Please take care in this menu, otherwise data may be lost. If you clear the data of the PIKO SmartControl app, all settings and data on this device will be ®... -
Page 61: Checking Battery Usage
7.4 Checking battery usage Main menu - > settings - > device -> battery This is an overview of the battery usage by application. In case you installed a new app and suddenly have battery problems use this menu to identify the cause of the problem. -
Page 62: Detailed Instructions For The Piko Smartcontrol ® App
System 8. Detailed instructions for the PIKO SmartControl ® Up to this point we just talked about the basic functions of your new PIKO SmartControl system in ® order to give you a quick start. For those of you interested in more detail you will find more information following, like tips for handling and hidden features. - Page 63 If you press a button a little bit longer the app will show an explanation of the associated function. Long pressing the locomotive name in the control panel will open a list of locomotives. You can use this to switch to a different locomotive. The same functionality is available in the switch panel.
- Page 64 System In the edit locomotive menu when editing the loco picture, you can sort the available pictures by locomotive type or origin of the picture. Press the loco picture in the editing menu. You will enter the picture archive. Now press the menu button in the display .
-
Page 65: Android Menus And Features
8.2 Android menus and features You can create links on the home screen for all installed apps. Just enter the main menu where you can find all installed apps. Press and hold the app of your choice until the display jumps back to the home screen. You can now create a link to your app at the desired position on the home screen. - Page 66 System The keyboard of your PIKO SmartControl is very similar to a computer keyboard. ® To switch between regular and capital letters, you use the shift-button of the keyboard (arrow on left side). The letters displayed on the key caps will change accordingly.
- Page 67 If that does not help, try pressing the home button. In the vast majority of cases this should solve the problem. If none of the above helps restart the PIKO SmartControl ®...
-
Page 68: Piko Smartcontroller ® Accessories
4th step: Open the loop and put the clip through it 5th step: Pull on the clip to close the loop. Now you may attach the lanyard string to the clip. 9.2 Changing the battery of the PIKO SmartController ®... - Page 69 *In case the wire attached to the cover is accidentally removed from the main circuit board. It can be easily plugged into the main circuit board again. The plug can be inserted either direction. For easier assembly we suggest placing the wire towards the front of the unit. Warranty All manipulations of the system will void the warranty, such as: All manipulations of the system will void the warranty, such as:...
-
Page 70: Glossary
System 10. Glossary 10.1 Digital glossary AnDi – A small and simple digital decoder that controls driving direction in analog mode Bit – Smallest unit of digital information with values of 0 and 1 (off / on) Booster – Additional power for your layout. Provides power and amplifies digital signal BUS / BUS-System –... - Page 71 Protocol – Defines how data is formatted and transmitted between system components RailComPlus – System for bidirectional communication between decoder and command station. ® Decoders equipped with this feature will automatically register itself and its available functions with the command station. You can start playing immediately Command station –...
-
Page 72: Android Glossary
System 10.2 Android glossary Access point – Allows wireless device to connect to the network. App (Application) – A software program that provides a user interface and allows the user to perform specific tasks or actions. Status bar / notification bar – Provides a quick overview of the system status at the top edge of the display. -
Page 73: Function Symbols
11. Function symbols The symbol categories are color coded: • blue: common controls • yellow: lights • cyan: Mechanical loco functions • pink: Sound functions... -
Page 74: Safety Notice
PIKO SmartControl ® ® I started my device. A WiFi connection as shown in the status bar. But when I open the PIKO SmartControl app there are unknown locomotives which I didn’t store there. I also cannot control any ®... - Page 75 2. press the menu-button (top right or hardware-button) 3. choose “settings” 4. go to “command station” 5. in case your WiFi is OK you should see your correct PIKO SmartBox here. Choose it by touching on ® 6. Now the app should redirect you to the settings menu now. Press “undo” once and you should be redirected to the control panel.
- Page 76 None of the above mentioned suggestion helped. What should I do now? In fact the system is a communicating mix of software. Due to technical reasons this software may “crash” or “freeze”. In this case please unplug the power supply of the PIKO SmartBox , wait for ca. 10 ®...
- Page 77 ® If you want to avoid this to happen altogether you can adjust the settings in the PIKO SmartControl ® App. In main menu -> settings you will find the option “act as main controller”. This option will perform...
- Page 78 System I would like to personalize my device, for example with Music or more apps. Basically the PIKO SmartControl offers the same functionality as a common smartphone. ® To add additional apps to your device you need a valid Google (Gmail) account.
- Page 79 Notes...
-
Page 80: Notes
System Notes... - Page 81 Notes...
- Page 82 System Notes...
- Page 84 PIKO model trains – for every layout! PIKO Spielwaren GmbH Lutherstr. 30 96515 Sonneberg, GERMANY www.piko.de · hotline@piko.de...
Need help?
Do you have a question about the SmartControl and is the answer not in the manual?
Questions and answers
Jak zresetować centralkę smart5 Control WLAN
To reset the PIKO SmartControl WLAN central unit (PIKO SmartBox®), press and hold the Reset button while powering on the device. You have two options:
- Partial reset: Resets the WiFi password to the factory default “123456789”.
- Factory reset: Restores all user settings to factory defaults and deletes all stored items, including locos, switch panels, accessories, and WiFi settings.
The reset is triggered after booting when the reset LED lights up for about 1 second. Release the button at that moment to perform the reset.
This answer is automatically generated