Table of Contents
Advertisement
Quick Links
ENWARE TOUCH FREE WALL SENSOR TAP
- ON/OFF DEMAND SENSOR
Installation and Maintenance Instructions
EMW803A-150
EMW803A-200
EMW803A-LO
I00314_Dec19
Call 1300 369 273
www.enware.com.au
Enware Australia Pty Limited
9 Endeavour Rd Caringbah NSW 2229 Australia
Ph: 02 8536 4000 info
enware.com.au
@
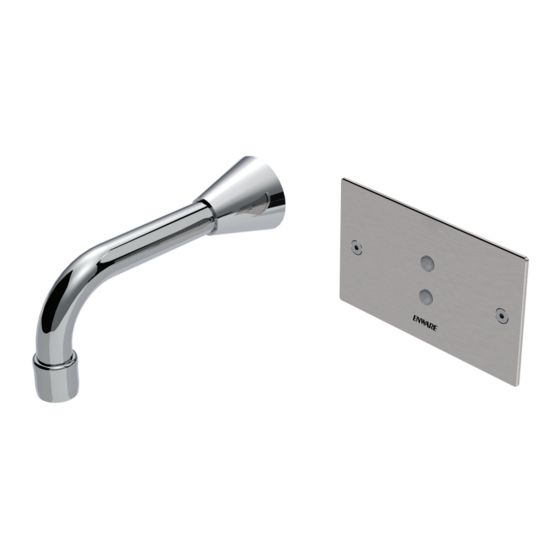
On / Off Demand Stainless Steel Wall Sensor Panel
With 150mm Spout
On / Off Demand Stainless Steel Wall Sensor Panel
With 200mm Spout
On / Off Demand Stainless Steel Wall Sensor
Panel Only
Advertisement
Table of Contents

Related Manuals for enware EMW803A-150


Summary of Contents for enware EMW803A-150
- Page 1 ENWARE TOUCH FREE WALL SENSOR TAP - ON/OFF DEMAND SENSOR Installation and Maintenance Instructions EMW803A-150 On / Off Demand Stainless Steel Wall Sensor Panel With 150mm Spout EMW803A-200 On / Off Demand Stainless Steel Wall Sensor Panel With 200mm Spout...
-
Page 2: Product Description
Enware Touch-Free Wall Sensor Tap is a sensor operated, hands-free tap that is installed onto walls above sinks, basins or wash troughs. It operates by sensing a hand in front of the sensor unit. Once the sensor is activated, the valve will remain open and water will flow until the hand is again placed in front of the sensor, closing the solenoid valve. -
Page 3: Technical Data
The optional settings are available at the time of ordering. Contact Enware for more details. installation compliance *Enware products are to be installed in accordance with the Plumbing Code of Australia (PCA) and AS/NZS3500. Installations not complying with PCA and AS/NZS 3500 may void the product and performance warranty provisions. -
Page 4: Location Of Sensor
Also consider the path of the water drips from a wet hand turning off the sensor. The sensor should not be so far away that water drips outside of basin or sink and onto the floor. Call 1300 369 273 www.enware.com.au... -
Page 5: Water Supply Temperature
WARNING: Do not cut the wires or extend Thermostatic Mixing Valve be used to the existing cables without using the provide pre-mixed water to the valve. correct lead extension from Enware, as this will void warranty. www.enware.com.au Call 1300 369 273... -
Page 6: Installation In-Wall
BSP male thread (not included) for the spout to connect to. Connect the line to the outlet of the solenoid. SEE IMAGE 01 Note: If flexible connectors are used, they must be made accessible for future servicing or replacement. Call 1300 369 273 www.enware.com.au... - Page 7 55mm high rectangular hole, and at least 50mm WALL CUT OUT deep to allow for installation of bracket. Sensor EMW803A cable to come through the top, bottom, or back of SENSOR BRACKET sensor inside wall. SEE IMAGE 05 IMAGE 05 www.enware.com.au Call 1300 369 273...
- Page 8 3 metre lead from the sensor 4.5m to the solenoid. Additional lead lengths up to 15 metres can be accommodated with extension cables (available separately from Enware). SEE IMAGE 06 TRANSFORMER CABLE WARNING: Do not cut the electrical cable of IMAGE 06 the sensor tap, or alter the product in any way to suit installation.
- Page 9 Turn on the power to the unit and test the unit. Any water entering behind the sensor See Operating Instructions overpage. plate will cause damage to sensor components and void warranty. Fix the sensor panel using two screws provided. www.enware.com.au Call 1300 369 273...
-
Page 10: To Turn Off
When hand is within sensor range, sensor responds with a Red LED light in the sensor lens. *Longer flow time settings are available – contact Enware for more information. Hand too close to sensor Wave quickly in front of sensor... -
Page 11: Troubleshooting
Replace solenoid valve Tap/ water turns off slowly Debris in solenoid valve Take solenoid apart and clean diaphragm. Refer to Solenoid Maintenance section. Solenoid diaphragm is Replace solenoid diaphragm damaged or solenoid. Refer to Solenoid Maintenance section. www.enware.com.au Call 1300 369 273... -
Page 12: Spare Parts
PART ENWARE PRODUCT CODE Sensor – On / Off Demand EMS807A (Stainless steel plate, includes bracket, 2x fixing screws, sensor connector cable) Solenoid 1/2” – DC 24v (includes DC solenoid 1/2”, WMS8200 2x 1/2” nipples) Solenoid Service Kit - DC... -
Page 13: Service And Maintenance
Take note of the order of parts assembled. SEE IMAGES 10, 11 4. Check seat and diaphragm for debris or any damage. SEE IMAGE 12 IMAGE 12 www.enware.com.au Call 1300 369 273... - Page 14 DIRECTION OF FLOW 11. Finally place the black coil body back over the core tube, and tighten the hex nut back up. IMAGE 15 DIRECTION OF FLOW IMAGE 16 DIRECTION OF FLOW IMAGE 17 Call 1300 369 273 www.enware.com.au...
-
Page 15: Replacing The Sensor
Ensure that the plate is CLEANING thoroughly sealed to the wall and Enware Product should be cleaned with a soft damp that no water can get in behind the cloth using only mild liquid detergent or soap and plate. -
Page 16: Making A Claim
All notifications and accompanying forms must be sent to us marked for the attention of the Enware Australia Pty Except as provided or referred to in this document, we Limited, 9 Endeavour Road, Caringbah NSW 2229. We...
Need help?
Do you have a question about the EMW803A-150 and is the answer not in the manual?
Questions and answers