Table of Contents
Advertisement
Quick Links
Advertisement
Table of Contents

Related Manuals for MIR MiR Hook 200 TM


Summary of Contents for MIR MiR Hook 200 TM
- Page 1 Operating Guide 02/2019 v1.9...
- Page 2 All rights reserved. No parts of this manual may be reproduced in any form without the express written permission of Mobile Industrial Robots ApS (MiR). MiR makes no warranties, express or implied, in respect of this document or its contents. In addition, the contents of the document is subject to change without prior notice.
-
Page 3: Table Of Contents
9.3 Perform a short manual test..................14 9.4 Perform a homing of the hook ..................14 9.5 Create an overall cart type ..................14 9.6 Calibrate a specific cart in the MiR system..............15 9.7 Create a specific cart in the Robot interface .............16 9.8 Test the setup ......................17 10 Map..........................19... -
Page 5: About This Manual
Updated for SW release 1.8. Cart specifications changed. New section Modifying the gripper for different thickness and/ or length. 22-02-2019 New version for MiR Robot Interface 2.0. Major update MiRHook 100 throughout document. 1.3 and MiRHook 200 Includes both MiRHook 100 and MiRHook 200. -
Page 6: Further Information
You can download all manuals from the MiR website where you will also find training videos, product pictures and technical specifications. • Manuals and more: www.mobile-industrial-robots.com/products Your MiR distributor is your first point of contact for all service queries. Find distributor contact on our website. • Distributor contact info: www.mobile-industrial-robots.com/distributors. -
Page 7: Hardware
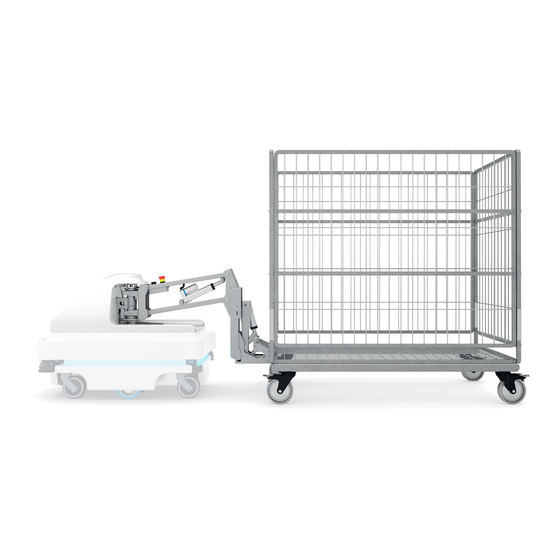
Hardware • • • • • • 2.1 Hardware MiRHook 100 and MiRHook 200 is equipped with a camera, a gripper and an emergency stop for the complete system, i.e. the MiR100 robot and the hook. The gripper can be exchanged for different cart types. Figure 1. -
Page 8: Mount The Hook On A Robot
Hardware 2.2 Mount the hook on a robot The photos illustrate a MiR100 robot and a MiRHook 100, but MiRHook 200 is mounted on a MiR200 robot in the same way. 2. Remove the hook cover and lift the hook onto the robot fitting the frame holes above the four mooring holes on the robot. - Page 9 Hardware 1. Network cable (from robot to hook PC) 2. Application hardware cable 3. Emergency stop cable 4. USB cable for top camera 5. Antenna connector 5. Place the cover on top of the hook frame. The cover is held in place with magnets. 6.
-
Page 10: Cart
Cart • • • • • • 3.1 Cart specifications MiRHook can accommodate carts with the following dimensions: • Width: between 400 mm and 1500 mm. • Height: maximum 2000 mm. • Length: between 500 mm and 2400 mm. In addition, the carts must have a gripper area / gripper bar at the front, bottom part of the cart (typically a square tube) with the following dimensions: •... -
Page 11: Modifying The Gripper
Modifying the gripper • • • • • • 4.1 Modifying the gripper for different thickness and/or length If the length or thickness of the cart is slightly out of the specification, then it is possible to modify the gripper. The gripper length can be altered by unscrewing the upper gripper and changing the length between the arms –... -
Page 12: Space Requirements
Space requirements • • • • • • 5.1 Space required to pick up a cart As system operator, you are responsible of ensuring that MiR100/MiR200 has enough space to pick up a cart. When preparing to pick up a cart, the robot moves to a position in front of the given cart position (1.7 m from the position). -
Page 13: Space Required To Park A Cart
Space requirements Tips: 1. Less than 500 mm may work in areas with no or few dynamic obstacles. 2. Driving pattern and sensibility to dynamic obstacles depend on whether the front or rear wheels of the cart are locked. If the corner space is limited, we recommend to test which works best in the individual case 5.4 Space required to park a cart To park a cart, the robot needs at least 50 cm of space to either side of the cart. -
Page 14: Space Required To Park Cart In Reverse
Space requirements 5.5 Space required to park cart in reverse As system operator, you are responsible of ensuring that under normal operation MiR100/MiR200 has enough space to park the cart. The space required is a square in front of the position equal to the full length (MiR100/MiR200 + cart) plus 50 cm. -
Page 15: Accuracy
Accuracy • • • • • • 6.1 Accuracy The robot parks and picks up carts with an accuracy of 20 cm radius from the specified position and with an angle difference less than 10° relative to the specified position. Similarly, a cart is picked up at a given position if the cart is placed with the above accuracy. - Page 16 Accuracy • • • MiRHook User Guide, Robot Interface 2.0, 02/2019 v.1.9 • • •...
-
Page 17: Safety
Safety • • • • • • 7.1 Safety Each individual application of MiRHook 100 and MiRHook 200 requires its own safety evaluation. The robot cannot detect objects between the robot and the cart and it cannot detect objects behind the cart (the robot does not reverse as part of the route;... - Page 18 Safety • • • MiRHook User Guide, Robot Interface 2.0, 02/2019 v.1.9 • • •...
-
Page 19: Creating Qr Markers
Creating QR markers • • • • • • 8.1 Creating QR markers A QR marker is needed for MiRHook to identify the individual carts. The QR code contains the dimension of the marker and a unique name. The format is SizeUnit-Name. •... - Page 20 Creating QR markers • • • MiRHook User Guide, Robot Interface 2.0, 02/2019 v.1.9 • • •...
-
Page 21: Set Up Mirhook
5. Create a mission to test and confirm that the setup was done correctly. 9.2 Enable the Hook feature in the Robot interface The Hook related menus are not automatically shown in the MiR Robot interface. To enable those, the Hook feature must be activated. -
Page 22: Perform A Short Manual Test
Set up MiRHook 9.3 Perform a short manual test Before creating cart types and carts, a short manual test must be performed to see if the hook is correctly connected. In Manual control, perform the following steps: • Open: opens the hook gripper. •... -
Page 23: Calibrate A Specific Cart In The Mir System
Set up MiRHook 4. Select OK. 9.6 Calibrate a specific cart in the MiR system The next step is to calibrate the relation between MiRHook and the cart. In the Manual control menu under Hook you must now enter values into the Change height field to define Entry and Lock heights for the hook to use when docking to and gripping a cart. -
Page 24: Create A Specific Cart In The Robot Interface
Set up MiRHook 5. Now attach the QR-marker to the cart so that the camera on MiRHook 100 / MiRHook 200 can see the QR-marker when MiRHook 100 / MiRHook 200 is ready to grip the cart. The QR-marker must be placed straight on the cart grating. Otherwise the camera may have problems reading the code. -
Page 25: Test The Setup
Set up MiRHook 6. Select OK. Now the cart is registered in the Robot interface. 9.8 Test the setup To test the setup, move the cart approximately one meter away from the robot and create a mission with one action Pick up cart and launch it. The action Pick up cart has two parameters, Position and cart ;... - Page 26 Set up MiRHook If possible, always use missions when locking / unlocking carts. Do not drive the robot in manual mode with the brake activated as this may damage the motor. Use Change height with the hook closed. • • •...
-
Page 27: Map
10 Map • • • • • • 10.1 Setting robot and cart positions in the map To create Pick Up Cart and Place Cart missions, cart positions must be defined in the map. To do this, navigate to either a dashboard with a map or the loaded map and select Create new position. Under Position type, select Cart position. - Page 28 • • • MiRHook User Guide, Robot Interface 2.0, 02/2019 v.1.9 • • •...
-
Page 29: Example
11 Example • • • • • • 11.1 Example of a small application The task at hand is to pick up a cart at position A, drive with the cart attached to position B and return it to position A. This can be done in the following way: First define two positions, A and B. - Page 30 Example • • • MiRHook User Guide, Robot Interface 2.0, 02/2019 v.1.9 • • •...
-
Page 31: Updating Mirhook Software
12 Updating MiRHook software • • • • • • 12.1 Update MiRHook software Follow this procedure to upgrade MiRHook software: 1. Go to the Distributor site on our website: www.mobile-industrial-robots.com/account and select Downloads. Select product, go to the newest version and download the latest software file. 2. - Page 32 Updating MiRHook software • • • MiRHook User Guide, Robot Interface 2.0, 02/2019 v.1.9 • • •...
Need help?
Do you have a question about the MiR Hook 200 TM and is the answer not in the manual?
Questions and answers