Advertisement
Table of Contents
- 1 Top Panel
- 2 Rear Panel
- 3 Using the Arpeggiator
- 4 Chord Memory
- 5 Changing the Tempo
- 6 Saving a Patch
- 7 Saving a Pattern
- 8 Patch Parameters
- 9 Delay Parameters
- 10 Sequencer Settings
- 11 System Settings
- 12 Returning to the Factory Settings
- 13 Data Backup/Restore
- 14 Main Specifications
- Download this manual
Advertisement
Table of Contents

Subscribe to Our Youtube Channel
Related Manuals for Roland JU-06A


Summary of Contents for Roland JU-06A
- Page 1 JU-06A Operation Manual...
- Page 2 Corporation or anyone employed by, or someone is trying to charge you for this associated with Roland at all. This is a remix of document, give them a piece of your mind and the leaflet that comes with the Roland JU-06A then head over to http://sunshine-jones.com and...
- Page 4 The JU-06A is a sound module that can be used Using the JU-06A in conjunction with the DK-01 in conjunction with the K-25m keyboard unit (sold Boutique Dock (sold separately) separately). The sound can be heard through the For installation / removal / angle adjustment, refer built-in speakers.
-
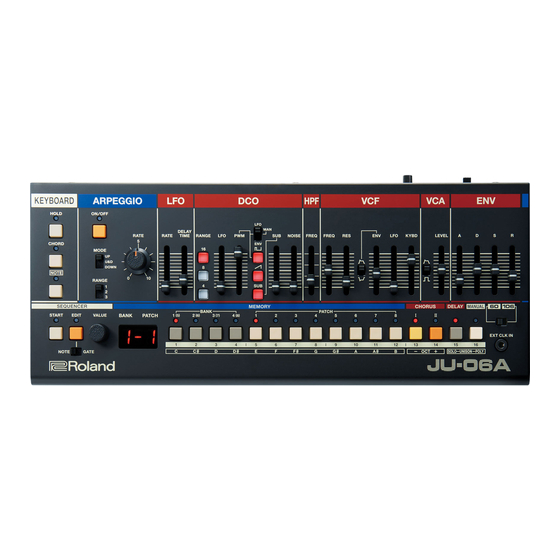
Page 5: Top Panel
TOP PANEL 1 KEYBOARD CONTROLLER EXPLANATION [HOLD] button If you press this button to make it light, the sound of the key you played most recently continues to be heard even after you release your hand. If you play a different key while hold is applied, the sound also changes. - Page 6 [RATE] knob Specifies the note length for each step of the arpeggiator. 4 (quarter note) 4t (quarter note triplet) 8 (8th note) 8t (8th note triplet) 16 (16th note) 16t (16th note triplet) 32 (32nd note) 32t (32nd note triplet) 64 (64th note) 64t (64th note triplet) 3 LFO...
- Page 7 Button (Square wave/Asymmetrical pulse wave). [SAW/RAMP] Button [SUB] Button Turns the sub-oscillator on/off. [SUB] Slider Adjusts the volume of the sub oscillator. [NOISE] Slider Adjusts the volume of the noise. 5 HPF This is a high-pass filter that passes the high frequencies and cuts the low frequencies. CONTROLLER EXPLANATION [FREQ] slider...
- Page 8 8 ENV Here you can create time-varying change (envelope). CONTROLLER EXPLANATION [A] slider Attack time [D] slider Decay Time [S] slider Sustain time [R] slider Release time 9 SEQUENCER CONTROLLER EXPLANATION [START] button Makes the sequencer play (lit) or stop (unlit). [EDIT] button Lets you edit the step sequencer. ...
- Page 9 select and then press another bank button to select it. 2. Press the PATCH [1]–[8] buttons to switch the patch. To store the patch * When you edit a patch, a dot appears in the display. 1-1. 1. Press the save-destination BANK [1 (5)]–[4 (8)] button. Each time you press the same bank button, you alternate between banks 1–4 and 5–8. ...
-
Page 10: Rear Panel
It can be used to transfer USB MIDI and USB audio data. You must install the USB driver when connecting the JU-06A to your computer. Download the USB driver from the Roland website. For details, refer to Readme.htm which is included in the download - https://www.roland.com/support/... - Page 11 USING THE BUTTONS AS A KEYBOARD If you don’t have a midi controller, or the K25 keyboard attachment, you can still play the JU-06A as an instrument without anything else. It’s odd, but it’s also nice to be able to just bring it with you, and nothing else.
-
Page 12: Using The Arpeggiator
And I wanted to write a few pages about this and share the love. I waited a year for Roland to update the firmware, and it didn’t happen. No one from Roland even replied. -
Page 13: Chord Memory
CHORD MEMORY Chord memory has been around since the 70’s. Early synths were capable of it, but we didn’t see a lot of use of it unitl the 80’s. Think of Kevin Saunderson’s infectious keys on Inner City’s ‘Good Life’ and what would come to be the classic “rave”... - Page 14 Further, whenever the sequencer receives midi clock, it will start playing. This has disturbed many users and every few days someone asks “How do I make it not play?” It’s not just Roland. The Moog Mother 32 does the same thing, and I disliked their software so much that I didn’t even keep it. Even with a blank pattern in position 1, the sequencer needed to be manually stopped in order to play sound from it remotely.
-
Page 15: Changing The Tempo
Step button [1]–[16] In step sequencer mode, the [1]–[16] buttons are called “step buttons.” SELECTING/PLAYING PATTERNS 1. Hold down the [START] button and press a [1]–[16] button to select a pattern. The display shows the pattern number. * You can also select a pattern by holding down the [START] button and turning the [VALUE] knob. 2. - Page 16 ENTERING A PATTERN WITH AUTOMATICALLY ADVANCING STEPS 1. Hold down the SEQUENCER [EDIT] button and press the [START] button. Step button [1] blinks, the display indicates “S 1,” and the unit is in step entry mode. 2. Press the KEYBOARD [NOTE] button to make it blink. 3.
-
Page 17: Saving A Patch
ENTERING A TIE 1. Press the SEQUENCER [EDIT] button to make it light. 2. Hold down the step button for which you want to enter a tie, and press the SEQUENCER [EDIT] button. You can enter a tie for the following step as well by pressing the SEQUENCER [EDIT] button again. If you turn a step button off, that step’s tie is deleted. -
Page 18: Saving A Pattern
SAVING A PATTERN If you modify the pattern settings, a decimal point appears in the display. P 1. 1. Hold down the SEQUENCER [START] button and long-press a step button [1]–[16]. When the data is saved, the indicator blinks. EDITING Numeric buttons [1]–[16] In edit mode, the 16 numeric buttons shown in the illustration are called buttons [1]–[16]. -
Page 19: Patch Parameters
PATCH PARAMETERS 1. Press the SEQUENCER [EDIT] button to make it go dark. 2. Hold down the [MANUAL (16)] button and select a parameter by pressing one of the numeric buttons shown in the following table. 3. Use the [VALUE] knob to edit the value. 4. -
Page 20: Delay Parameters
DELAY PARAMETERS 1. Press the SEQUENCER [EDIT] button to make it go dark. 2. Hold down the [DELAY (15)] button and select a parameter by pressing one of the numeric buttons shown in the following table. 3. Use the [VALUE] knob to edit the value. ... -
Page 21: Sequencer Settings
SEQUENCER SETTINGS 1. Hold down the SEQUENCER [EDIT] button and select a parameter by pressing one of the numeric buttons shown in the following table. 2. Use the [VALUE] knob to edit the value. 3. Press the SEQUENCER [EDIT] button once again to exit sequencer settings editing. BUTTON PARAMETER VALUE... -
Page 22: System Settings
IN connector or the USB port, the JU-06A’s tempo will automatically synchronize to MIDI clock (default). INT The JU-06A operates at the tempo (Internal) specified on the unit itself. Choose the “INTERNAL” setting if you don’t want to synchronize to an external device. ... - Page 23 Chain Mode Although the JU-06A is four-note polyphonic, you can increase the polyphony by using a MIDI cable to connect two or more JU-06A units and turning Chain mode on. OFF If Chain mode is on, the fifth voice and subsequent notes are passed “thru”...
-
Page 24: Returning To The Factory Settings
It takes about 20 seconds to prepare the drive. 3. Open the “JU-06A” drive on your computer. The backup files are located in the “BACKUP” folder of the “JU-06A” drive. 4. Copy the backup files into your computer. 5. After copying is completed, eject the USB drive. - Page 25 Restore 1. As described in the procedure for “Backup” Step 1–3, open the “JU-06A” drive on your computer. 2. Copy the JU-06A backup files into the “RESTORE” folder of the “JU-06A” drive. 3. After copying is completed, eject the USB drive and then press the ARPEGGIO [ON/OFF] button.
-
Page 26: Main Specifications
MAIN SPECIFICATIONS Roland JU-06A Sound Module Maximum 4 Voices Polyphony Power Supply Ni-MH battery (AA, HR6) x4, Alkaline battery (AA, LR6) x4, USB bus power Current Draw 500 mA (USB bus power) Dimensions 300 (W) x 128 (D) x 49 (H) mm... - Page 27 NOTES:...
Need help?
Do you have a question about the JU-06A and is the answer not in the manual?
Questions and answers