Table of Contents
Advertisement
Advertisement
Table of Contents

Subscribe to Our Youtube Channel
Related Manuals for Roland JU-06


Summary of Contents for Roland JU-06
- Page 1 PROGRAMMABLE POLYPHONIC SYNTHESIZER A USER’S GUIDE TO THE ROLAND JU-06 JU-06...
-
Page 2: Acknowledgements
The document is intended as a companion guide for the Roland JU-06 Synthesizer Module. It is in no way offered as a criticism, or intended to be an authoritative guide to replace the official documentation which accompanies the commercial purchase of Roland Boutique, or Roland AIRA musical instruments. -
Page 5: Table Of Contents
Contents Acknowledgements …………… Introduction …………………… Basic Connections …………… I. General Functions ………… Common Section ……………… USB Interface ……………… Data Backup & Restore …… Auto Off …… II. Functions for Sound Creation ………………….…… ………………………. ………………………. ………………………. ………………………. ………….…………… SOLO/UNISON/POLY ………………… 20 III. -
Page 6: Introduction
And that’s still the case with the JU-06, which features 23 knobs and sliders from the original – all inviting you to start tweaking and creating your own customized version of this legendary sound engine. -
Page 7: Basic Connections
Basic Connections NOTE - the use of the Mac Classic™ for the purposes of illustrating a personal computer in this diagram does not suggest that a Mac Classic™ will work in this instance. The fact is, the Mac Classic™ doesn’t even have a USB port on it, nor do we know of a currently produced or functional ADB to USB adaptation technique. -
Page 8: General Functions
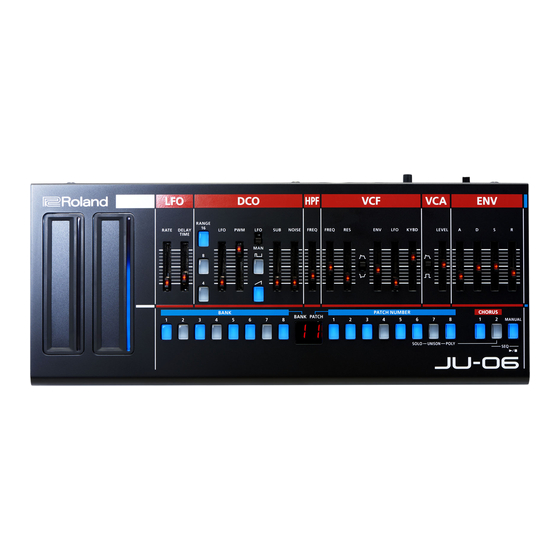
I. General Functions Common Section The Common Section of the JU-06 is where bank and patch information is stored and recalled for performance. The first set of buttons 1-8 are the BANK selection buttons The second set of buttons 1-8 are the PATCH selection buttons To select a patch first choose the bank, and then select the patch. -
Page 9: Usb Interface
Both will work, but make sure that whichever you’ve chosen can provide sufficient power to run the JU-06. If the JU-06 goes to sleep while you believe you’re plugged into the wall, then your power supply is either faulty, or it isn’t powerful enough to run the synth (and you’re running off the batteries.) -
Page 10: Data Backup & Restore
To bring patches from your computer into the JU-06: Follow the above procedure for mounting the JU-06 2. Copy the backup files, or the new patches you’d like to check out into the “RESTORE” folder on the JU-06 drive 3. When copying is completed, eject the JU-06 drive. -
Page 11: Functions For Sound Creation
II. Functions for Sound Creation DCO is the digitally controlled oscillator that controls the pitch and creates two types of waveforms which are the sound source of the synthesizer. Compared to VCO (Voltage Controlled Oscillator), DCO has superior stability. The operations and functions of the DCO are virtually the same as those of the VCO. 1. - Page 12 < Pulse Width > When the top and bottom portions of the square wave are unequal, the result is what is called a pulse wave. The harmonic content of the pulse wave will depend greatly on the width of the pulses, it is possible to modulate, or change the pulse width by means of the LFO.
- Page 13 MANUAL PWM PWM Mode Switch (2) Set to MAN Pulse Width Modulation Knob (3) Determines the Pulse width. PWM by LFO PWM Mode Switch (2) Set to LFO Pulse Width Modulation Knob (3) Adjusts the intensity of the modulation.
-
Page 14: Hpf
Voltage Controlled Filter This filter lets the high frequency harmonics pass and cuts off the iow frequency harmonics. As this fitter is not voltage controlled, Cutoff Point is changed by only moving the knob. 1. HPF Cutoff Frequency This knob sets the Cutoff point of the HPF. With this set to 1, the DCO output passes the filter unprocessed, and as it is raised, Cutoff point is heightened, higher harmonics being passed. - Page 15 6. LFO • LFO Modulation Knob When the Cutoff Point of the VCF is being modulated by the output CV of the LFO, this knob adjusts the depth of the grow! or wah effect. 7. KYBD • Key Follow Knob When the Cutoff Point is being controlled by the KYBD-CV {Keyboard control voltage), this knob adjusts the level of the KYBD-CV.
- Page 16 NOTE When modulating the VCF using the Envelope, set the knob (2) to a fairly low level in case of positive polarity, and set it to a fairly high level in case of negative. Otherwise there will be little effect.
-
Page 17: Vca
White writing a patch into memory, adjust its level with this knob. * When this knob is set too high, a sound distortion might occur, but this is not because of the trouble of the JU-06. -
Page 18: Env
This generates the Control Voltage applied to the VCF and the VCA, thereby controlling the volume and the tone color of each note. This output voltage is generated whenever you press a key. 1. A (Attack Time) This sets the time required for the voltage to reach its maximum from the moment the key is pressed down. 2. -
Page 20: Lfo
This sets the rate of the LFO. 2. DELAY TIME This sets the time needed for the LFO to start to function. SOLO/UNISON/POLY The JU-06 has three methods of voicing: SOLO Monophonic mode, where only once voice will sound at a time. UNISON All voice available will play back at the same time. -
Page 21: Ribbon Controller
16 Persian NOTE - In the Roland documentation often keys 1-16 are described. This refers to Bank 1-8 and Patch 1-8 combined. So for example Seeking out key 12 would mean simply pressing Patch 4 (8 + 4 = 12) -
Page 22: Portamento
Velocity Sensitivity The JU-06 input via the common keys as well as the ribbon controller are not velocity sensitive, however, if you are using the K-25M keyboard or a MIDI controller which is velocity sensitive you can take advantage of it. -
Page 23: Octave Switch
The default setting of +/- 0 is the 8 key Chain Mode Although the JU-06 is four-note polyphonic, you can increase the polyphony by using a MIDI cable to connect two of more JU-06 modules together and turning chain mode on. -
Page 24: Layering And Split
While this is not exclusively a JP-08 or even a Roland Boutique technique, it is an often overlooked result of using MIDI enabled synthesizers creatively to produce pads and drones, or leads and performance combinations which go far beyond what a mono timbral synthesizer can do. -
Page 25: Step Sequencer
Step Sequencer The Step Sequencer allows you to input notes in patterns of up to 16 steps and play them back as selectable loops. You can change the length of each pattern, and address the way steps are taken. 16 patterns can be stored and recalled. - Page 26 ON/OFF STEP [1-16] To turn notes on and off, simply press the corresponding buttons. ENTER NOTE [1-16 + C1 NOTE INPUT OR KEYBOARD] To enter note information for each step. TIE NOTES [STEP BUTTON + NEXT STEP BUTTON ex: 1 + 3 for a 3 step tie] In order to enter note data which plays for longer than one step, tie notes together for more expressive patterns.
- Page 27 Further, When programming sequences there is not way to ask the sequencer to not play when a midi clock is received at the JU-06’s MIDI IN port. Thus if you program a sequence and save it into pattern [1] then this pattern will begin to play every time you send a midi clock to the module (from a DAW, or a hardware sequencer.)
-
Page 28: Effects
IV. Effects Chorus The chorus effect of the JU-06 is intended as an accurate replica of the classic chorus effect found on the Roland Juno-106, Juno-60 and Juno-6. To activate the chorus effect: 1. Press Chorus 1, Chorus 2, or Both. -
Page 29: System Settings
V. System Settings Settings Overview Numeric Buttons [1] - [16] in settings mode, the 16 buttons of the common section are called the [1] - [16] buttons. SOLO/UNISON/POLY/OCTAVE SHIFT/PORTAMENTO While holding down the CHORUS 2 button, specify the value by using the numeric buttons or the C1/C2 ribbon controller to make adjustments. -
Page 30: Main Specifications
PATCH SETTINGS While holding down the MANUAL button, press one of the numeric buttons to select the parameter BEND RANGE [13] 1-12,13,16 Specifies the pitch bend range in semitones - Default is [2] OFF is [16] DELAY LEVEL [14] 1-16 Adjusts the volume of delay (OFF = 1) DELAY TIME [15]... -
Page 31: Midi
Starting with firmware 1.10 the boutique line of modules from Roland are capable of sending CC data. This means that all the slider and knob movements performed on the front panel of the JU-06 are cable of transmitting via MID for recording into a DAW or MIDI sequencer. -
Page 32: Midi Implementation Chart
MIDI Implementation Chart JU-06 Firmware Version 1.01... -
Page 33: Midi Cc Numbers
MIDI CC List The following is list of MIDI Control Change Data which can and can not be transmitted for reception remotely The From Software Version 1.20 Supplementary Manual FUNCTION MIDI CC# MODULATION LFO RATE LFO DELAY TIME DCO RANGE [12] DCO LFO MOD [13]... -
Page 34: Sound Synthesis Memo
Sound Synthesis Memo... -
Page 35: Bank Patch Memo
Bank Patch Memo...
Need help?
Do you have a question about the JU-06 and is the answer not in the manual?
Questions and answers