Table of Contents
Advertisement
Quick Links
Advertisement
Table of Contents

Related Manuals for Aqua Lung ATLANTIS


Summary of Contents for Aqua Lung ATLANTIS
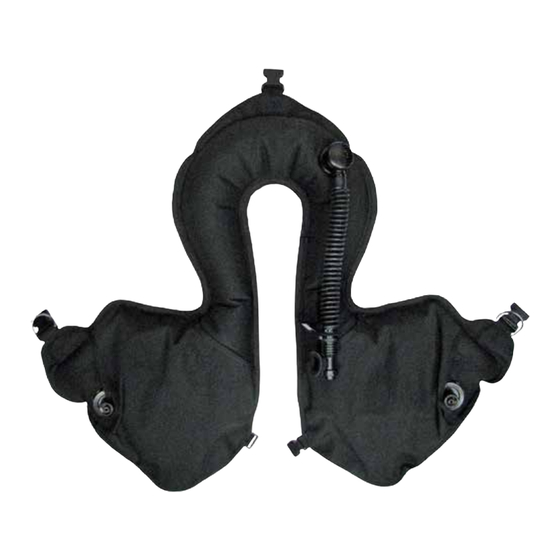
- Page 1 ATLANTIS Military Buoyancy Compensator TECHNICAL MANUAL...
- Page 2 Aqua Lung International. It may not be distributed through the internet or computer bulletin board systems without prior consent in writing from Aqua Lung International.
-
Page 3: Table Of Contents
CoNteNtS ChANge reCorD ..................5 iNtroDuCtioN ..................6 geNerAL preCAutioNS & WArNiNgS ..........8 proDuCt oVerVieW ................9 Military Oral Inflator Assembly (Standard) .............. 9 Powerline Inflator Assembly ................... 9 Auxiliary Air Cylinders ................... 10 Filling the Auxiliary Air Cylinders................10 Attaching the Auxiliary Air Cylinders .............. - Page 4 DiAgrAmS ............. 29 AtLANtiS CompoNeNtS ..............32 oVerhAuL pArtS KitS ................ 33 teChNiCAL DAtA ................... 34 AtLANtiS reCommeNDeD SpAre pArtS LiSt ........ 35 AtLANtiS ACCeSSorieS ..............35 ANNuAL SerViCe AND iNSpeCtioN reCorD ........37 mAiNteNANCe NoteS ................38...
-
Page 5: Change Record
Aqua Lung America 007-13 20 Feb 13 updated powerline exploded parts Diagram Aqua Lung America 008-13 20 Feb 13 updated Atlantis Components Aqua Lung America 009-13 20 Feb 13 Added overhaul parts Kits Aqua Lung America 010-13 20 Feb 13... -
Page 6: Introduction
4. Auxiliary air cylinders are full and no leaks are a threaded part, turn the part clockwise. detected. If the Atlantis fails any of the 4 steps it should be serviced by an Aqua Lung trained service 3. When instructed to remove an o-ring, use the technician. - Page 7 CAutioN: use only a plastic (pn 103102) or brass o-ring removal tool (pn 944022) when removing o-rings to prevent damage to the sealing surface. even a small scratch across an o-ring sealing surface could result in leakage. Once an o-ring sealing surface has been damaged, the part must be replaced with new.
-
Page 8: General Precautions & Warnings
WArNiNg: In the event of an uncontrolled, rapid ascent, it is important to immediately begin venting air from the Atlantis. Continue venting air to slow your ascent rate if neutral buoyancy cannot be reestablished. -
Page 9: Product Overview
SCUBA, semi-closed circuit or closed circuit rebreathers. The Atlantis features two air cylinder attachments that allow you to inflate the vest with compressed breathing air. The air cylinders come equipped with a standard connection for use on the jacket. -
Page 10: Auxiliary Air Cylinders
Atlantis Technical Manual Auxiliary Air Cylinders Two cylinders are attached to the Atlantis by means of a threaded hand fitting. Air is added to the Atlantis by opening the cylinder valves (Fig. 3). *Required for closed circuit and semi-closed circuit diving. - Page 11 1. Before attempting to fill the auxiliary air cylinder, ensure that the fill adapter and valve are completely dry, especially in the area surrounding the valve outlet. Examine the cylinder markings to verify that it is rated for a fill pressure of 3000 psi (206 BAR). 2.
-
Page 12: Attaching The Auxiliary Air Cylinders
Atlantis Technical Manual 6. Open the handwheel on the auxiliary air cylinder counter-clockwise until the valve is completely open. 7. VERY SLOWLY open the valve on the scuba cylinder. NOTE: Always fill the auxiliary air cylinder as slowly as possible by turning the handwheel of the supply valve slowly to control the rate of fill. -
Page 13: Inflation Methods
The Atlantis accommodates three different inflation systems: Inflation via the Military Oral Inflator To orally inflate your BC (Fig. 9), place your lips on the oral inflator mouthpiece (A) and exhale a small amount of air into the mouthpiece to purge away water that may still be in the housing. While continuing to exhale into the mouthpiece, depress the oral inflator button (B) to inflate the BC. -
Page 14: Deflation Methods
DeFLAtioN methoDS Throughout the course of a dive, it may be necessary to release air from the Atlantis using one of the two methods described in the following instructions. Each method uses a valve that is in a different location. -
Page 15: Donning & Adjustment Procedures
1. The upper back strap has a single male quick-release buckle. Attach the single male quick-release buckle to the female buckle at the top of the Atlantis (Fig. 13A). 2. Connect one waist strap male quick-release buckle to the female buckle located on the side lobe of the BC (Fig. -
Page 16: Pre-Dive Inspection Checklist
______ 7. Check the dual valve connector, caps and cylinder valve connectors, making sure they are sealed and no air is escaping. ______ 8. Fully inflate the Atlantis once again and let it sit for 10 minutes to check for leaks and firmness. -
Page 17: Post Dive Inspection Checklist
• To prevent premature damage from corrosion, salt crystals or chlorine attack, thoroughly rinse the Atlantis and components inside and out with fresh water at the end of each diving day using the following procedure: initials ______ 1. -
Page 18: Cylinder Valve Connector Maintenance Procedures
Atlantis Technical Manual Cylinder Valve Connector maintenance Cylinder Valve maintenance procedures procedures Cylinder Valve Disassembly 1. Open cylinder valve counter-clockwise and ensure cylinder note: Before performing any disassembly, refer to the (17) is fully depressurized. Place cylinder in cylinder vise jaws (pn... - Page 19 4. Holding the valve body assembly in a vise, unscrew the valve 7. Remove the spindle (10) from valve body (12). Remove back-up seat adapter (15) from the valve body (12) using a flex wrench (pn ring (6), o-ring (7), metal washer (8) and plastic washer (9) from the spindle (10).
-
Page 20: Assembly
Christo-Lube , check to ensure it is clean, ® supple and free of any blemish. WArNiNg: use only genuine Aqua Lung parts, sub- ® assemblies and components whenever assembling any Aqua Lung product. Do Not attempt to substitute an ®... -
Page 21: Testing Procedures
This Concludes Assembly of the Cylinder Valve 6. Install washer (3) and handwheel (2) onto spindle (10). Cylinder Valve testing procedures 1. Fill cylinder to 500 psi (34 bar) and listen for audible leaks. Sub- merge in a fresh water supply and visually inspect valve for any leaks that may be present. -
Page 22: Final Assembly And Testing
Atlantis Technical Manual FiNAL ASSemBLy AND teStiNg 4. Manually inflate the BC until it is taut and fully inflated. Press the deflation button and then pull down on the oral inflator to ensure a rapid and unobstructed exhaust using both methods of deflation. Fully inflate the BC once again and listen closely for any signs of leakage. -
Page 23: Bc Patch Kit Instructions
BC patch Kit instructions 3. Apply a generous coat of Weld-On 4784® adhesive to the material of the BC surrounding the hole or tear. Allow this preliminary coat to set for at least twenty four hours. WARNING: Do not attempt to perform these procedures using patches or adhesive other than those provided in the BC patch Kit pn 42611. -
Page 24: Manufacturers Recommended Maintenance Checks
6. every 5 years – Hydrostatically test cylinders (if desired, not DOT required). 7. As required - Paint HP air cylinders. 8. As required - Prepare the Atlantis for extended storage in excess of 30 days a. Perform #2 annual check- perform complete leak check on jacket. - Page 25 tABLe 1: LiSt oF tooLS PART # DESCRIPTION APPLICATION 3000 psi Equipment Testing (206 bar) 101215 Charging Cylinder Tank Fill Adapter 944022 O-ring Tool Kit Removal/Installation of O-rings (Brass) 944022 O-ring Tool Kit Removal/Installation of O-rings (Plastic, 5pk) 820466 (2 oz.) Christo-Lube Lubrication of O-rings MCG 111...
- Page 26 Atlantis Technical Manual tABLe 1: LiSt oF tooLS (CoNtiNueD) PART # DESCRIPTION APPLICATION 769354 22 mm or 7/8” Socket Removal/Installation of Valve Plug (4) 3/8 Drive Torque Tightening of Parts Wrench; 0-125 in/lb. Range 3/8 Drive Torque Tightening of Parts Wrench;...
- Page 27 10.2 Nm (90 in/lbs) 487590 Burst Plug Assy. (13) 10.2 Nm (90 in/lbs) tABLe 3: reCommeNDeD CLeANerS AND LuBriCANtS LuBriCANt/CLeANer AppLiCAtioN SourCe Aqua Lung, PN 820466 or Lubrication Technologies Christo-Lube mCg 111 All o-rings 310 Morton Street Jackson, OH 45640 (800) 477-8704 CAutioN: Silicone rubber requires no lubrication or preservative treatment.
-
Page 28: Procedure A: Cleaning And Lubricating
Atlantis Technical Manual proCeDure A: CLeANiNg AND LuBriCAtiNg Cleaning Brass and Stainless Steel parts 1. Preclean in warm, soapy water* using a nylon bristle tooth brush. 2. Thoroughly clean parts in an ultrasonic cleaner filled with soapy water. If there are stubborn deposits, household white distilled vinegar (acetic acid) in an ultrasonic cleaner will work well. -
Page 29: Exploded Parts Diagrams
VALVe eXpLoDeD pArtS DiAgrAm 101271Z Valve Assembly w/ 1.5 cf Cylinder Key # Description 101173Z Nut, Handwheel, Mag 101172 Handwheel 101171 Washer, Handwheel 90 in/lbs 101169Z Plug, Valve, Mag (10 Nm) 820088P O-ring (10 pk) 828009 Ring, Backup 820010P O-ring (25 pk) 101168 Washer, Metal 101167... - Page 30 Atlantis Technical Manual miLitAry iNFLAtor eXpLoDeD pArtS DiAgrAm 101270 Airway Complete Military Oral Inflator Key # p/N Description 15309 Gasket, Connector Seal 42743 Dual Valve Assembly 15719 Clamp, Black, Plastic Tie 15149 Hose, Spiral 11.5 in. D/V 104913 Clamp, Strap Black...
- Page 31 poWerLiNe iNFLAtor eXpLoDeD pArtS DiAgrAm 769347 Airway Complete, powerline Key # p/N Description 15309 Gasket, Connector Seal 42743 Dual Valve Assembly 15719 Clamp, Black, Plastic Tie 15261 Hose, Chevron, Powerline 15262 Clip, Chevron Hose 15610 Pin, Retaining S/S 15029 Cover, QD, Powerline 15280 Lower Inflator Assy, Powerline, Char 44827 mp hose 27”...
-
Page 32: Atlantis Components
Kit, Strap, Complete 1.5”, Atlantis 762956 Removable Chest Strap, 1.0” Atlantis 762957 Kit, Waist Strap, 1.5” Atlantis 762958 Kit, Back Strap, 1.5” Atlantis 762952 Crotch Strap Kit, 1.5”, Atlantis 15665 Cap, Universal Connector 8762900 Kit, Upgrade Atlantis Vest to 1.5” Straps... -
Page 33: Overhaul Parts Kits
oVerhAuL pArtS KitS 394099 Kit, maintenance, Cylinder Valve Key # pN Description 820088 O-ring 828009 Ring, Backup 820010 O-ring 101167 Washer 101165Z Seat, Valve, Non-02, Mag 487590 Burst Plug Assembly, Non-Mag 820013 O-ring 820316 O-ring 101314Z Connector, Cylinder Valve, Fixed, mag Key # pN Description 820310P O-ring (10 pk) -
Page 34: Technical Data
Atlantis Technical Manual teChNiCAL DAtA Annual maintenance The Atlantis is subject to annual maintenance. All parts listed in the overhaul parts kits, must be replaced annually, even if they appear to be in good condition. Composition • 1 Vest only (Key #36) is constructed of heavy duty urethane coated 1000 denier black fabric with RF welded seams and connectors. -
Page 35: Atlantis Recommended Spare Parts List
AtLANtiS reCommeNDeD SpAre pArtS LiSt Key # Description 101173Z Nut Handwheel, Mag 101171 Washer Handwheel 820088P O-ring (10 pk) 13abc 487590 Burst Plug Assy, 3000 PSI (206 BAR), Non-Mag 820316P O-ring (10 pk) 820310P O-ring (10 pk) 15309 Gasket, Connector Seal... - Page 36 Atlantis Technical Manual AtLANtiS ACCeSSorieS Key # Description 762961 Containment Collar, Atlantis 762962 Kit, Latex tubing, Atlantis Cont. Collar Key # Description 17541 Tubing, Bungee, Latex, 1/4 in, Black (66 in) 104913 Clamp Strap Black 18099 Lit, Instruction Sheet, Collar, Atlantis...
-
Page 37: Annual Service And Inspection Record
ANNuAL SerViCe & iNSpeCtioN reCorD Serial Number _________________________ Purchase Date _________________________ Date Service Technician Name & Number Technician Signature Stamp... -
Page 38: Maintenance Notes
Atlantis Technical Manual mAiNteNANCe NoteS... -
Page 39: Warranty Information
® ™ Aqua Lung America warrants to the original purchaser for a period of one year from the date of purchase that the product will be free from defects in material and workmanship; provided that it receives normal use, proper care and prescribed dealer service subject to those restrictions stated below. - Page 40 ATLANTIS Military Buoyancy Compensator 2340 Cousteau Court • Vista, CA 92081 Phone (760) 597-5000 • Fax (760) 597-4900 www.aqualung.com/militaryandprofessional ©2013 Aqua Lung International Literature p/N 762989 reV 03/13...
Need help?
Do you have a question about the ATLANTIS and is the answer not in the manual?
Questions and answers