
Related Manuals for WPI MPS-4


Summary of Contents for WPI MPS-4
- Page 1 WORLD PRECISION INSTRUMENTS INSTRUCTION MANUAL MPS-4 Multichannel Perfusion System Serial No._____________________ www.wpiinc.com 011720...
-
Page 3: Table Of Contents
Theoretical Calculation ......................14 APPENDIX B: DISABLE DRIVER SIGNATURE ENFORCEMENT (WIN10) ......15 APPENDIX C: HOW TO INSTALL AN UNSIGNED DRIVER ON WINDOWS 8 ..... 19 APPENDIX D: INSTALL THE MPS-4 SOFTWARE ON WINDOWS 10 ........22 WARRANTY .............................31 Claims and Returns ........................31 Repairs ............................31... - Page 4 World Precision Instruments...
-
Page 5: About This Manual
The MPS-4 is a programmable 8-channel perfusion system designed for single channel and whole-cell patch preparations. It offers the best combination of performance and value. The improvement of MPS-4 over the previous MPS-2 is the use of a diaphragm type solenoid valve that completely isolates the perfusion solution from the outside to avoid the influence of metal ions in the moving iron of the solenoid valve on the experimental results. -
Page 6: Notes And Warnings
Unlike PVC based tubing, polyurethane tubing contains no plasticizer, which can cause contamination. The most unique feature of the MPS-4 is its perfusion µ-manifold. Using the latest microfluidic techniques, the injection molded µ-manifold provides the least flow resistance and dead volume of any product on the market. The flow channel inner diameter is approximately 1 mm, except for the last 5 mm before the junction point. -
Page 7: Parts List
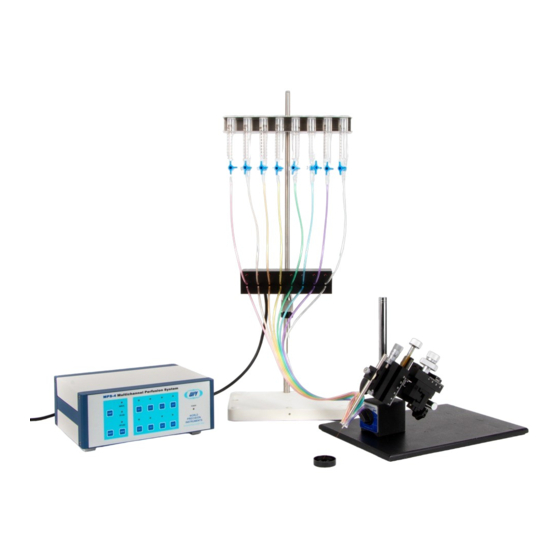
(1) Instruction Manual Manifold Holder Valve Console Syringe Holder Luer Fitting for 1/16” ID tubing (#13156-100) 3-way Stopcock (#3744-100) 10 mL Syringe (#3744-100) µ-Manifold 100µm: #502110 250µm: #502125 Stand, post Fig. 2—These components are included with the MPS-4 system. World Precision Instruments... -
Page 8: Unpacking
Concealed damage should be reported at once to the carrier and an inspection requested. Please read the section entitled “Claims and Returns” on page 31 of this manual. Please contact WPI Customer Service if any parts are missing at 941.371.1003 or customerservice@wpiinc.com. -
Page 9: Operating Instructions
13. Connect the MPS-4 to a computer USB port. 14. Connect a cable with a BNC plug to the socket on the back panel of MPS-4 controller corresponding to the channel to be controlled. Connect the other end of the cable to the equipment that generates the control signal. -
Page 10: Software Installation
The perfusion software can be found in the Start menu of Windows under C:\Program Files (x86). The software automatically connects to the MPS-4 on startup. If the MPS-4 is plugged into the computer after the program has been loaded, press the button to establish a connection. -
Page 11: Set The Experiment Time
MPS-4 Fig. 5—The View window and the Setup window pop up. Set the Experiment Time The first step in creating a new experiment is to set the (Total) Experiment Time. The format is Hours:Minutes:Seconds:Milliseconds. Hold down the left mouse key over one of these fields to get the a double arrow ( ) cursor. - Page 12 Time and Stop Time. Click once on a start time or a stop time to select it. Once selected, the values of its fields can be set the same way as the Experiment Time. If the “Time Setup” option in the Mode Setup window (F3) is changed, then “Duration”...
-
Page 13: Saving Your Experimental Parameters
Fig. 11—Use the Mode Setup window to select a mode. Manual mode, Online mode, Offline mode and Master Manual mode are settings for the MPS-4 electronic unit. When a mode is chosen, the appropriate LED illuminates on its front panel. Master Manual mode makes the Manual LED blink continuously. -
Page 14: Computer Perfusion Control Modes
Data Download Mode–The experimental procedure created with the software is downloaded into the RAM of the MPS-4 control box when you press the button or select Download from the Operation menu. The Online LED on the MPS-4 control box blinks while the program is being transferred. -
Page 15: Hardware Testing Procedure
TTL Control Mode–Each channel is independently controlled by its own input voltage from the BNC socket on the back panel. The MPS-4 automatically goes into this mode when any one of the control inputs goes high (+3~5 V) and this channel will open. -
Page 16: Testing Drug Delivery
Testing Drug Delivery The drug perfusion area of the MPS-4 series can cover the whole view field of a 200X microscope (objective 20X, eyepiece 10X). However, in order to perform the experiments in an effective and reliable way, we suggest several preliminary experiments as a control result. -
Page 17: Maintenance
Clean the tubing system before and after each experiment. Although the solution path of the solenoid valve in MPS-4 does not contact with any metal parts, but the drugs remaining in the solenoid valve will affect the accuracy of subsequent experiments. -
Page 18: Appendix A: Determining Flow Rate
The MPS-4 system is designed to work with aqueous solutions. Fluids that are more viscous than water might not flow through the µ-manifold. NOTE: If you have a problem/issue with that falls outside the definitions of this troubleshooting section, contact the WPI Technical Support team at 941.371.1003 or... -
Page 19: Appendix B: Disable Driver Signature Enforcement (Win10)
MPS-4 APPENDIX B: DISABLE DRIVER SIGNATURE ENFORCEMENT (WIN10) Since we are using legacy drivers and have not yet gotten the driver signature for Windows 10, you must disable driver signature enforcement temporarily before installing the 64 bit driver. Please follow those steps below. - Page 20 Click the option Update & security and a new window appears. Fig. 14—Select the Recovery tab. After selecting the Recovery tab, the Advanced startup area appears on the right side of the window. Fig. 15—Click Restart now. World Precision Instruments...
- Page 21 MPS-4 Click the Restart now button under the Advanced startup area and the computer will restart. After restart, the Option screen displays. Fig. 16—Click Troubleshoot. After clicking the option Troubleshoot, the Troubleshoot screen appears. Fig. 17—Click Advanced Options. Click the option Advanced Options, and the screen conversion display as follows to see more recovery options.
- Page 22 11. You can press “7” on your keyboard to choose the Disable driver signing enforcement. The computer will restart automatically. At this point, you can proceed to install the software. For driver installation instructions, see “Appendix D: Install the MPS-4 software on Windows 10” on page 22. World Precision Instruments...
-
Page 23: Appendix C: How To Install An Unsigned Driver On Windows 8
MPS-4 APPENDIX C: HOW TO INSTALL AN UNSIGNED DRIVER ON WINDOWS 8 Windows 8 by default will not let you install unsigned drivers. In order to install an unsigned driver, you can follow the steps shown below to start Windows 8 in “Disable Driver Signature Enforcement”... - Page 24 Choose General on the left hand side and then click Restart now button on the right. Fig. 23—Select the General tab and click Restart now. After a restart, click Troubleshoot. Fig. 24—Select the Troubleshoot option. Click Advanced options. Fig. 25—Choose Advance options. World Precision Instruments...
- Page 25 MPS-4 Click Startup Settings. Fig. 26—Press Startup Settings. Click the Restart button. Fig. 27—Press Restart Choose the Disable Driver Signature Enforcement and hit the Enter key to start Windows Fig. 28—Select the Disable Driver Signature Enforcement option and press Enter.
-
Page 26: Appendix D: Install The Mps-4 Software On Windows 10
Using the provided USB cable, connect the USB port of host computer to the USB port (square) of the MPS-4 controller, and then turn on the power of the MPS-4 controller. At this time, the note appears in the lower right corner of the computer display screen. - Page 27 MPS-4 The windows shown in this procedure are an example of how to install driver software in the directory. The windows will display differently on your computer depending on what is installed on your computer. When the device manager is opened, the Other devices\Unknown device with yellow background exclamation mark will appear in the directory, as shown in the figure below.
- Page 28 Click the Update Driver... button. The following window appears. Fig. 33—Select the option to Browse my computer. Select and click Browse my computer for driver software. A similar window appears. Fig. 34—Click the Browse button. World Precision Instruments...
- Page 29 C:\Program Files(x86)\MPS-4\Driver\ x64. Fig. 35—This is the location for the previous version of the software. 10. Click on the subdirectory of MPS-4, find MPS-4\driver\x64, click on it, then click OK, as shown below: Fig. 36—Select the x64 directory and press OK.
- Page 30 Fig. 37— Click the Next button. 12. This directory should conform to the location where the MPS-4 driver software was installed from running MPS-4 19.07.exe in step 2. Click the Next in the lower right corner, and the following window appears.
- Page 31 15. After the installation, just click on the icon on the screen to run the MPS-4 program. World Precision Instruments...
- Page 32 World Precision Instruments...
- Page 33 MPS-4 World Precision Instruments...
- Page 34 World Precision Instruments...
-
Page 35: Warranty
WPI shall not be liable for any damage to data or property that may be caused directly or indirectly by use of this product. - Page 36 175 Sarasota Center Blvd., Sarasota FL 34240-9258 Tel: 941-371-1003 • Fax: 941-377-5428 • E-mail: sales@wpiinc.com 1 Hunting Gate, Hitchin, Hertfordshire SG4 0TJ Tel: 44 (0)1462 424700 • Fax: 44 (0)1462 424701 • E-mail: wpiuk@wpi-europe.com Germany Pfingstweide 16, D-61169 Friedberg (Hessen), Germany Tel: +49 (0)6031 67708-0 •...
Need help?
Do you have a question about the MPS-4 and is the answer not in the manual?
Questions and answers