
Related Manuals for DHS Fitness 3615


Summary of Contents for DHS Fitness 3615
- Page 1 MANUAL DE UTILIZARE DHS 3615 IMPORTANT! VA RUGAM SA CITITI CU ATENTIE ACEST MANUAL INAINTE DE A FOLOSI APARATUL. PASTRATI ACEST MANUAL PENTRU REFERINTA VIITOARE.
-
Page 2: Instructiuni De Siguranta
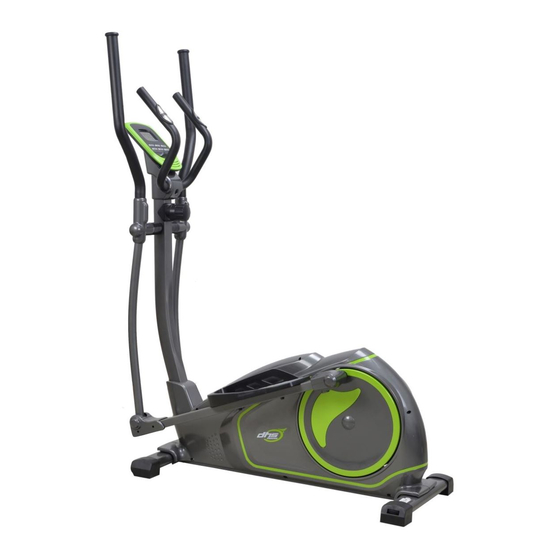
Instructiuni de siguranta Va multumim ca ati ales acest produs. Pentru a va garanta siguranta si sanatatea dumneavoastra, va rugam sa folositi corect aparatul. Va rugam sa cititi cu atentie acest manual inainte de a folosi aparatul. 1. Este important sa cititi intregul manual inainte de a incepe asamblarea si de a folosi aparatul. - Page 3 LISTA PARTILOR COMPONENTE: 25 26 67 66 43R 44 25 26 35 26...
- Page 4 LISTA PARTILOR COMPONENTE Descriere Descriere Buc. Buc. Computer 38L/R (S/D) Capac ghidon vertical Fire alimentare Firele de conectare a computer. Φ25*16 Cadru principal Capac plastic Ghidon mijlociu Capac frontal bara ghidon Φ23*500 Surub M8*45 Spuma, protectie ghidon Tub sensor puls Φ25 43S/D Pedala (stanga/dreapta) Surub ST4.0*19 Suport pedale St./Dr...
- Page 5 PASUL 1 : 49 49 40 40 50 50 50 50 35 35 49 49 35 35 50 50 a. Asamblati bara stabilizatoare fata si spate (49) pe cadrul principal (40) folosind surubul (50), saibele (35).
- Page 6 PASUL 2 : a. Inserati capacul frontal (41) in suportul ghidon (31) b. Conectati firul 1(2) cu firul 2(68) c. Conectati reglajul tensiunii (65) cu firele de reglaj ale tensiunii (39) d. Fixati suportul ghidonului (31) pe cadrul principal (40) folosind surubul (34), saibele (73), (11) si (36).
- Page 7 PASUL 3: a. Fixati barele de miscare (27 stanga/dreapta) la suportul de ghidon (31) cu ajutorul suruburilor (19), saibelor (11) si piulitelor (20). b. Prindeti conectorul de pedala (44) la cadrul principal (40) cu ajutorul piulitelor nylon (55) si saibelor (56) c.
- Page 8 PASUL 4: 38R 30 Fixati pedala (43 stanga/dreapta) la conectorul pedala (44) cu ajutorul surburilor (42), piulitelor (26) si a pilitelor nylon (26); b. Prindeti capacul ghidon (37 stanga/dreapta) si capacul ghidon (38 stanga/dreapta) conectorul pedala (44) cu suruburi (30) Prindeti capacul tijei (46 standga/dreapta) si capacul tijei (47 stanga/dreapta) de tija (57) cu ajutorul suruburilor (59).
- Page 9 PASUL 5: 24 24 25 25 26 26 24 24 25 25 26 26 29L 29R a. Prindeti manerul (14 S/D) la tija balansoare (27 S/D) cu ajutorul suruburilor (24), saibelor (25) si piulitelor (26) b. Prindeti capacul tijei balansoare (stanga/dreapta 28&29) de tija.
- Page 10 PASUL 6: a. Fixati ghidonul mijlociu (4) la suportul de ghidon (31) cu suruburi (10) si saibe (11). b. Conectati computerul (1) cu firul 1 (2) apoi fixati computerul (1) pe suportul ghidonului (31) cu suruburi (60) si saibe (61) c.
- Page 11 INSTRUCTIUNI EXERCITII Un exercitiu eficient consta in incalzire, exercitiu aerobic si relaxare. Efectuati un program complet cel putin de doua sau de trei ori / saptamana, cu pauza de o zi intre exercitii. Dupa mai multe luni, puteti spori frecventa la patru sau cinci ori / saptamana. Incalzirea este o parte foarte importanta a antrenamentului, care trebuie realizata la inceputul fiecarei sesiuni de exercitii.
- Page 12 4. Ridicarea umerilor Ridicati umerii spre ureche. Apoi, ridicati umarul stang, iar in acelasi timp coborati umarul drept. 5. Intinderea calcaielor Asezati-va la perete cu piciorul stang in fata celui drept si cu mainile inainte. Pastrati intins piciorul drept si piciorul stang pe podea, apoi inclinati piciorul stang si inclinati-va in fata prin miscarea soldurilor spre perete.
- Page 13 USER’S MANUAL IMPORTANT! PLEASE READ THIS MANUAL CAREFULLY BEFORE USING THE BIKE.
-
Page 14: Important Safety Information
Important Safety Information We thank you for chosing our product. To guarantee your safety and health ,please use this equipment correctly, Please read the information as below carefully before using this equipment。 1. It is important to read this entire manual before assembling and using the equipment.Safe and effective use can only be achieved if the equipment is assembled, maintained and used properly. -
Page 15: Exploded View
Exploded View: 25 26 67 66 43R 44 25 26 35 26... -
Page 16: Parts List
PARTS LIST Description Description Computer 38L/R The cover with handle bar (R/L) Trunk wire 1 Tension cable End cap Φ25*16 Main frame The middle handlebar Front cover Foam grip Φ23*500 Bolt M8*45 Handle pulse withΦ25 Tube 43L/R Pedal (Right &left) Screw ST4.0*19 Connecting rod Washer d6*Φ12*1... - Page 17 Step 1: 49 49 40 40 50 50 50 50 35 35 49 49 35 35 50 50 a. Secure front stabilizer and rear stabilizer(49) to main frame(40) with bolt(50) and washer(35).
- Page 18 Step 2: 31 31 73 73 36 36 34 34 11 11 34 34 34 34 11 11 65 65 73 73 41 41 39 39 68 68 40 40 a. Insert front cover (41) into handle bar post (31). b.
- Page 19 Step 3: 19 19 11 11 20 20 31 31 45 45 20 20 11 11 44 44 19 19 35 35 26 26 55 55 56 56 35 35 26 26 45 45 40 40 44 44 55 55 56 56 a.
- Page 20 Step 4: 38R 30 Secure pedal (43 L/R) to connecting rod (44) with bolts(42) and nuts(26), nylon nut(26). b. Attach handle bar cover (37 L/R) and handle bar cover (38 L/R) to connecting rod (44) with screws (30); c. Then attach rod cover (46L/R) and rod cover (47L/R) to connecting rod (57) with screws (59).
- Page 21 Step 5: 24 24 25 25 26 26 24 24 25 25 26 26 29L 29R a. Secure handle bar(14L/R) to swing rod(27L/R) with bolts(24), arc washers(25 ) and nuts(26 ). b. Attach swing rod cover (29 L/R) and swing rod cover (28L/R) to swing rod (27L/R).
- Page 22 Step 6: a. Secure middle handle bar (4) to handle bar post (31) with screws(10) and spring washers(11). b. Connect computer wire (1) with trunk wire 1(2), then secure computer (1) to handle bar post(31) with screw(60) and washers (61). c.
-
Page 23: Exercise Tips
EXERCISE TIPS Warm up and cool down Stretching routine Aerobic exercise is any sustained activity that sends oxygen to your muscles via your heart and lung . It will improve fitness is promoted by any activity that, uses your large muscle groups-arms legs or buttocks, for example. - Page 24 5. Calf-Achilles Stretch Lean against a wall with your left leg in front of the right and your arms forward, keep your right leg straight and the left foot on the floor, then bend the left leg and lean forward by moving your hips toward the wall, Hold, then repeat on the other side for 15 counts.
Need help?
Do you have a question about the 3615 and is the answer not in the manual?
Questions and answers