
Related Manuals for Delta M70A


Summary of Contents for Delta M70A
- Page 1 Installation and Operation Manual Solar Inverter M70A_260 (Delta part number RPI703M260000) Europe United Kingdom...
- Page 2 Delta Electronics (Netherlands) B.V. Tscheulinstraße 21 79331 Teningen Germany Authorized representative for this product in the EU: Delta Electronics (Netherlands) B.V. Zandsteen 15 2132 MZ Hoofddorp Netherlands Installation and Operation Manual for Solar Power Inverter M70A EU V1.1 EN 2020-02-20...
-
Page 3: Table Of Contents
..........34 Installation and Operation Manual for Solar Power Inverter M70A EU V1.1 EN 2020-02-20... - Page 4 MyDeltaSolar app with DC1 Data Collector from Delta ....... . .
- Page 5 Commissioning with the Delta Service Software (DSS) ........
-
Page 6: About This Manual
4. Product overview, 5. Plan- ning the installation and 6. Planning the Commissioning. Installation and Operation Manual for Solar Power Inverter M70A EU V1.1 EN 2020-02-20... -
Page 7: Warning Notices And Warning Symbols
If necessary, the warning labels are also marked with warning symbols indicating the source of the danger. LED flashes. High electrical voltages or currents LED is off. Hot surfaces Heavy weight General danger Installation and Operation Manual for Solar Power Inverter M70A EU V1.1 EN 2020-02-20... -
Page 8: Basic Safety Instructions
Check that the doors are properly sealed. WARNING Heavy weight The inverter is heavy. ► The inverter must be lifted and carried by at least two people. Installation and Operation Manual for Solar Power Inverter M70A EU V1.1 EN 2020-02-20... -
Page 9: Intended Purpose
● Use in stand-alone mode, i.e. without a connection to the public grid. The inverter has functions that prevent isolated operation. ● Use in mobile solar systems. Installation and Operation Manual for Solar Power Inverter M70A EU V1.1 EN 2020-02-20... -
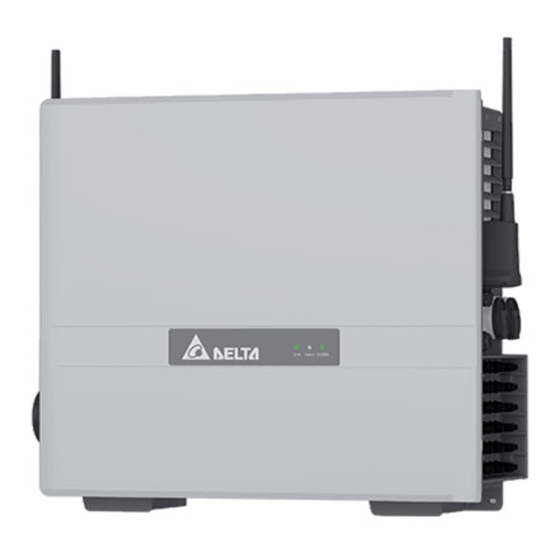
Page 10: Product Overview
DC plug for DC+ DC plug for DC– For releasing the door screws and securing the open door from slam- ming shut. Quick Installation Allen key Guide Installation and Operation Manual for Solar Power Inverter M70A EU V1.1 EN 2020-02-20... -
Page 11: Sub-1G Antenna
Feet for floor mounting 2 Mounting screws Wi-Fi module Screws with spring washer and washer Wi-Fi module Mounting screws Installation and Operation Manual for Solar Power Inverter M70A EU V1.1 EN 2020-02-20... -
Page 12: Overview Of Components And Connections
Cable gland for RS485, digital inputs, dry contacts, external power-off DC isolating switch 1+2 Type plate DC connector panel Air inlet with fan module Grounding connection Sub-1G antenna Installation and Operation Manual for Solar Power Inverter M70A EU V1.1 EN 2020-02-20... - Page 13 12 Internal fan 2 15 Internal fan 1 13 Type 2 AC surge protection devices 16 Connection terminals for RS485, digital inputs, external power- off and dry contacts Installation and Operation Manual for Solar Power Inverter M70A EU V1.1 EN 2020-02-20...
-
Page 14: Leds
LED flashes yellow. low. LED flashes green. LED lights up green. LED flashes red. LED lights up red. Table 4.2.: Meaning of the LED symbols used in this manual Installation and Operation Manual for Solar Power Inverter M70A EU V1.1 EN 2020-02-20... -
Page 15: Ac-Side Components
Updating firmware. Related topics Standby mode. “5.4 Grid connection (AC)”, page 34 “7.10.3 AC cable gland”, page 85 Table 4.3.: Meaning of the LED displays on the inverter Installation and Operation Manual for Solar Power Inverter M70A EU V1.1 EN 2020-02-20... -
Page 16: Ac Connection Terminal
“5.4.11 Specification for copper cable”, page 36 tection devices Type 1+2 combined AC surge protection devices can be ordered as accessories. Related topics “10.10 Replacing the AC surge protection devices”, page 132 Installation and Operation Manual for Solar Power Inverter M70A EU V1.1 EN 2020-02-20... -
Page 17: Dc-Side Components
The assignment of the individual DC connectors to the strings is shown on a label. Related topics “5.5 Connecting the solar modules (DC)”, page 37 “7.11 Connecting the solar modules (DC)”, page 88 Installation and Operation Manual for Solar Power Inverter M70A EU V1.1 EN 2020-02-20... -
Page 18: Dc Isolating Switches
The connection between the inverter and the solar modules isdisconnected when both DC isolating switches are in the OFF position. Installation and Operation Manual for Solar Power Inverter M70A EU V1.1 EN 2020-02-20... -
Page 19: Type 2 Dc Surge Protection Devices
1 Digital inputs and external power-off (terminal block) 2 DIP switch for the RS485 termination resistor 3 2 x dry contacts (terminal block) 4 RS485 (terminal block) 5 Protection against electromagnetic interference (EMI) Installation and Operation Manual for Solar Power Inverter M70A EU V1.1 EN 2020-02-20... -
Page 20: Grounding Connection
The M6 screw, spring washer and washer are included in the scope of delivery. A toothed washer is not required Related topics “5.4.6 Grounding the inverter”, page 35 Installation and Operation Manual for Solar Power Inverter M70A EU V1.1 EN 2020-02-20... -
Page 21: Internal Pe Connection
The fan module can be replaced. Related topics “10.7 Cleaning/replacing the fan module”, page 121 “10.8 Cleaning the air outlets”, page 125 Installation and Operation Manual for Solar Power Inverter M70A EU V1.1 EN 2020-02-20... -
Page 22: Internal Fans
Position of internal fan 1 Fig. 4.19: Position of internal fan 2 Related topics “10.5 Clean/replace internal fan 1”, page 112 “10.6 Clean/replace internal fan 2”, page 116 Installation and Operation Manual for Solar Power Inverter M70A EU V1.1 EN 2020-02-20... -
Page 23: Sub-1G Antenna
“6. Planning the Commissioning”, page 48 “6. Planning the Commissioning”, page 48 “7.8 Installing the Sub-1G antenna (optional)”, page 77 “7.9 Installing the Wi-Fi module before commissioning (optional)”, page 80 Installation and Operation Manual for Solar Power Inverter M70A EU V1.1 EN 2020-02-20... -
Page 24: Type Plate And Other Markings
The inverter must not be disposed of as standard household waste, but in accor- dance with the applicable electronic waste disposal regulations of your country or region. Installation and Operation Manual for Solar Power Inverter M70A EU V1.1 EN 2020-02-20... - Page 25 - Réseau de distribution - Panneaux photovoltaiques For France: Warning notice according to UTE 15712-1 Isoler les deux sources avant toute intervention Isoler les deux sources avant toute intervention Installation and Operation Manual for Solar Power Inverter M70A EU V1.1 EN 2020-02-20...
-
Page 26: Planning The Installation
This is normal operating behavior for the inverter and is necessary to protect the internal electronics. 5.1.4 Lifting and transporting the inverter ► The inverter must be lifted and carried by at least two people. Installation and Operation Manual for Solar Power Inverter M70A EU V1.1 EN 2020-02-20... -
Page 27: Installation Clearances
► In areas with many trees or fields, plant parts can clog the air filters and obstruct the air flow. Installation and Operation Manual for Solar Power Inverter M70A EU V1.1 EN 2020-02-20... - Page 28 Fig. 5.25, p. 28Shows example use of mounting brackets so that the inverter is positioned off the ground. The cable duct is located behind the inverter. Fig. 5.25: Standing installation with clearance from the ground Installation and Operation Manual for Solar Power Inverter M70A EU V1.1 EN 2020-02-20...
-
Page 29: Characteristic Curves
600 V 720 V Ambient temperature [°C] Fig. 5.26: Characteristic curve "Active power control depending on the ambient temperature, cos φ = 0.90, AC voltage 230/400 V" Installation and Operation Manual for Solar Power Inverter M70A EU V1.1 EN 2020-02-20... - Page 30 800 V 720 V Ambient temperature [°C] Fig. 5.27: Characteristic curve "Active power control depending on the ambient temperature, cos φ = 1.00, AC voltage 230/400 V" Installation and Operation Manual for Solar Power Inverter M70A EU V1.1 EN 2020-02-20...
- Page 31 800 V 720 V Ambient temperature [°C] Fig. 5.28: Characteristic curve "Apparent power control depending on the ambient temperature, cos φ = 0.90, AC voltage 230/400 V" Installation and Operation Manual for Solar Power Inverter M70A EU V1.1 EN 2020-02-20...
- Page 32 Efficiency [%] = 400 V 100% 600 V 800 V 520 V 100% AC Output power P/P [%]; P = 125 kW Fig. 5.29: Efficiency characteristic curve Installation and Operation Manual for Solar Power Inverter M70A EU V1.1 EN 2020-02-20...
-
Page 33: Dimensions
5 Planning the installation Dimensions Dimensions 144,5 263,4 Fig. 5.30: Dimensions Installation and Operation Manual for Solar Power Inverter M70A EU V1.1 EN 2020-02-20... -
Page 34: Grid Connection (Ac)
PV system, and the ambient conditions ( e.g. humidity). The tripping current must not, how- ever, be less than the specified minimum tripping current. Installation and Operation Manual for Solar Power Inverter M70A EU V1.1 EN 2020-02-20... -
Page 35: Grounding The Inverter
► The grounding cable cross-section must be at least 6 mm Fig. 5.32: Position of the external ground connection Fig. 5.31: Position of the internal PE connection Installation and Operation Manual for Solar Power Inverter M70A EU V1.1 EN 2020-02-20... -
Page 36: Requirements For The Grid Voltage
31 Nm (L1, L2, L3, N) conductor into acid-fee and alkaline-free (= Tightening torque neutral) Vaseline and straight away insert it ● 14, 7 Nm (PE) into the Al-Cu compression joint. Installation and Operation Manual for Solar Power Inverter M70A EU V1.1 EN 2020-02-20... -
Page 37: Instructions Regarding Selection And Utilization Of Al-Cu Compression Joints
DC connections with the rubber plugs that are attached to the DC connections. Before connecting the solar modules, turn both DC isolating switches to the OFF position. Installation and Operation Manual for Solar Power Inverter M70A EU V1.1 EN 2020-02-20... -
Page 38: Special Tools Required
► Check the polarity of the DC voltage of the DC strings be- fore connecting the solar modules. Amphenol DC plug 5.3–7.65 H4CFC4D●S DC– 5.3–7.65 H4CMC4D●S Included in scope of delivery Installation and Operation Manual for Solar Power Inverter M70A EU V1.1 EN 2020-02-20... -
Page 39: Connection Of The Module Strings
With 2 module strings per MPP tracker, no string fuses are String fuses must be used for 3 module strings per MPP tracker. required. It does not matter which DC inputs are used. Installation and Operation Manual for Solar Power Inverter M70A EU V1.1 EN 2020-02-20... -
Page 40: Mains And System Protection
100 ms. This inverter meets the requirement in (2). External grid and sys- tem protection is not required. Installation and Operation Manual for Solar Power Inverter M70A EU V1.1 EN 2020-02-20... -
Page 41: Device Communication And System Monitoring
1x VCC (12 V, 0.5 A) Terminal block 6x digital inputs Terminal block 2x dry contacts Terminal block 1x external power-off (EPO) Terminal block Table 5.1.: Connections on the communication card Installation and Operation Manual for Solar Power Inverter M70A EU V1.1 EN 2020-02-20... -
Page 42: Communication Cable Requirements
► Lay the cable with a suitable clearance to the AC and DC cables to prevent interference in the data connection. The inverter has 1 cable gland for 2 communication cables. Installation and Operation Manual for Solar Power Inverter M70A EU V1.1 EN 2020-02-20... -
Page 43: Connection Of A Dc1 Data Collector From Delta
Termination resistor = ON 120Ω Termination resistor = ON Termination resistor = OFF Termination resistor = ON Fig. 5.36: RS485 connection diagram for a DC1 data collector with multiple inverters Installation and Operation Manual for Solar Power Inverter M70A EU V1.1 EN 2020-02-20... -
Page 44: Connecting An External Alarm Unit
A warning message has been sent. Warning Table 5.3.: Events for which the external alarm device relay can trigger The default setting for both relays is Disabled. Installation and Operation Manual for Solar Power Inverter M70A EU V1.1 EN 2020-02-20... -
Page 45: Connecting A Ripple Control Receiver
Table 5.4.: Pin assignment of the terminal block with digital inputs V1 + K6 Reserved for connecting a ripple control receiver Table 5.5.: Pin assignment of the terminal block for the external power-off Installation and Operation Manual for Solar Power Inverter M70A EU V1.1 EN 2020-02-20... -
Page 46: Connecting A Pc
Changing the inverter settings To select a suitable USB/RS485 adapter, please contact Delta Customer Service. You can download the software from https://partnerportal.del- ta-emea.com. Cable requirements Bell wire. Both ends open. Installation and Operation Manual for Solar Power Inverter M70A EU V1.1 EN 2020-02-20... -
Page 47: Use Of Combined Type 1+2 Dc Surge Protection Devices
If the inverter is already in operation, the replacement is consid- erably more complicated for safety reasons. Related topics “7.6 Installing the type 1+2 combined DC surge protection devices before commissioning (optional)”, page 60 Installation and Operation Manual for Solar Power Inverter M70A EU V1.1 EN 2020-02-20... -
Page 48: Planning The Commissioning
DC1 via the respective connection variant. When RS485 is used, the DC1 is connected to the RS485 termi- nal block of one of the inverters in the RS485 series. Installation and Operation Manual for Solar Power Inverter M70A EU V1.1 EN 2020-02-20... -
Page 49: Installation
► Disconnect the inverter from all AC and DC voltage sources. Make sure that none of the connections can be restored accidentally. ► Ensure that the DC cables cannot be touched accidentally. Installation and Operation Manual for Solar Power Inverter M70A EU V1.1 EN 2020-02-20... -
Page 50: Sequence Of Installation And Commissioning Steps
“7.11 Connecting the solar modules (DC)”, Connecting the solar modules (DC) page 88 Completing electrical installation “7.12 Completing electrical installation”, page 89 Commissioning the inverter “8. Commissioning”, page 92 Installation and Operation Manual for Solar Power Inverter M70A EU V1.1 EN 2020-02-20... -
Page 51: Mounting The Inverter
1. Attach the mounting plate to the wall/mounting system with at least 8 M6 screws. 2. Tighten the 8 points highlighted in the image at a mini- mum. Installation and Operation Manual for Solar Power Inverter M70A EU V1.1 EN 2020-02-20... - Page 52 4. Check that the inverter hangs correctly on the mounting plate. 5. Screw the lower left side of the inverter onto the wall or mounting system using the M10 screw, spring washer and washer. Installation and Operation Manual for Solar Power Inverter M70A EU V1.1 EN 2020-02-20...
- Page 53 7 Installation Mounting the inverter 6. Screw the lower right side of the inverter onto the wall or mounting system using the M10 screw, spring washer and washer. Installation and Operation Manual for Solar Power Inverter M70A EU V1.1 EN 2020-02-20...
-
Page 54: Grounding The Inverter Housing
2. Perform a continuity check of the grounding connection. → If there is not a sufficiently conductive connection, clean the contact surface on the grounding screws or use a toothed washer if necessary. Installation and Operation Manual for Solar Power Inverter M70A EU V1.1 EN 2020-02-20... -
Page 55: Grounding Via The Pe Screw Of The Ac Connection
1. Screw the PE/PEN cable onto the PE screw (torque: 14.7 Nm). M8 nut, spring washer and washer are pro- vided. 2. Perform a continuity check of the grounding connection. Installation and Operation Manual for Solar Power Inverter M70A EU V1.1 EN 2020-02-20... -
Page 56: Preparing Electrical Installation
Secure all the isolating switches to prevent them from be- ing switched back on accidentally. 2. Turn both DC isolating switches to the OFF position. 3. Remove the Allen key from the upper door lock. Installation and Operation Manual for Solar Power Inverter M70A EU V1.1 EN 2020-02-20... - Page 57 7 Installation Preparing electrical installation 4. Unscrew and open the upper door lock cover. 5. Unscrew and open the lower door lock cover. Installation and Operation Manual for Solar Power Inverter M70A EU V1.1 EN 2020-02-20...
- Page 58 7 Installation Preparing electrical installation 6. Open the upper and lower door lock. 7. Open the door and secure it on top with the Allen key. Installation and Operation Manual for Solar Power Inverter M70A EU V1.1 EN 2020-02-20...
- Page 59 7 Installation Preparing electrical installation Installation and Operation Manual for Solar Power Inverter M70A EU V1.1 EN 2020-02-20...
-
Page 60: Installing The Type 1+2 Combined Dc Surge Protection Devices Before Commissioning (Optional)
1. Remove the protective cover from the DC surge protection devices. 2. Pull out the power supply cable of internal fan 2. 3. Pull out the signal cable. Installation and Operation Manual for Solar Power Inverter M70A EU V1.1 EN 2020-02-20... - Page 61 Installing the type 1+2 combined DC surge protection devices before commissioning (optional) 4. Loosen all screws on the printed circuit board with the DC surge protection devices and remove the printed circuit board. Installation and Operation Manual for Solar Power Inverter M70A EU V1.1 EN 2020-02-20...
- Page 62 Installing the type 1+2 combined DC surge protection devices before commissioning (optional) 5. Install the new printed circuit board and tighten all screws on the printed circuit board. Installation and Operation Manual for Solar Power Inverter M70A EU V1.1 EN 2020-02-20...
- Page 63 7. Plug in the power supply cable of internal fan 2. 8. Insert the cover for the DC surge protection devices. þ The installation of the combined DC surge protection devices is complete. Installation and Operation Manual for Solar Power Inverter M70A EU V1.1 EN 2020-02-20...
-
Page 64: Connecting The Communication Card
1x VCC (12 V, 0.5 A) Terminal block 6x digital inputs Terminal block 2x dry contacts Terminal block 1x external power-off (EPO) Terminal block Table 7.1.: Connections on the communication card Installation and Operation Manual for Solar Power Inverter M70A EU V1.1 EN 2020-02-20... -
Page 65: Threading The Communication Cable
2. Thread all communication cables through the cable gland and seal. 3. Insert the seal and cable gland of the communication con- nection and fasten the cable gland. Installation and Operation Manual for Solar Power Inverter M70A EU V1.1 EN 2020-02-20... - Page 66 7 Installation Connecting the communication card Installation and Operation Manual for Solar Power Inverter M70A EU V1.1 EN 2020-02-20...
-
Page 67: Connecting A Data Logger Via Rs485
RS485. The second terminal pair can also be used to connect a PC. Data format Baud rate 9600, 19200, 38400; Standard: 19200 Data bits Stop bit Parity Not applicable Installation and Operation Manual for Solar Power Inverter M70A EU V1.1 EN 2020-02-20... - Page 68 Termination resistor = ON Termination resistor = OFF Termination resistor = OFF Data logger RS485 Fig. 7.3: RS485 connection diagram for several inverters Installation and Operation Manual for Solar Power Inverter M70A EU V1.1 EN 2020-02-20...
- Page 69 Termination resistor = ON 120Ω Termination resistor = ON Termination resistor = OFF Termination resistor = ON Fig. 7.4: RS485 connection diagram for a DC1 data collector with multiple inverters Installation and Operation Manual for Solar Power Inverter M70A EU V1.1 EN 2020-02-20...
- Page 70 1. Connect the DATA+ wire to terminal 5 and the DATA– wire to terminal 6. 2. Set the DIP switch for the RS485 termination resistor (DIP 2) to the ON position. Installation and Operation Manual for Solar Power Inverter M70A EU V1.1 EN 2020-02-20...
- Page 71 2. Depending on the RS485 connection diagram (see “RS485 connection diagram for multiple inverters”, page 68), switch the DIP switch for the RS485 termina- tion resistor on or off. Installation and Operation Manual for Solar Power Inverter M70A EU V1.1 EN 2020-02-20...
- Page 72 On the cable going to the next inverter: Connect the DATA+ wire to terminal 3 and the DATA– wire to terminal 4. Set the DIP switch for the RS485 termination resistor to the OFF position. Installation and Operation Manual for Solar Power Inverter M70A EU V1.1 EN 2020-02-20...
- Page 73 5. Connect the DATA+ wire to terminal 5 and the DATA– wire to terminal 6. 6. Set the DIP switch for the RS485 termination resistor to the ON position. Installation and Operation Manual for Solar Power Inverter M70A EU V1.1 EN 2020-02-20...
-
Page 74: Connecting An External Alarm Unit
► An event can be assigned to the dry contacts with Delta Service Software or the MyDeltaSolar app after commis- sioning. Installation and Operation Manual for Solar Power Inverter M70A EU V1.1 EN 2020-02-20... -
Page 75: Connecting A Ripple Control Receiver
100% Terminals V1 and K4 Digital inputs V1 K0 K1 K2 K3 K4 K5 K6 Ripple control receiver Fig. 7.7: Connection diagram for a ripple control receiver Installation and Operation Manual for Solar Power Inverter M70A EU V1.1 EN 2020-02-20... -
Page 76: Connecting A Pc Via Rs485 (Optional)
You can use terminal pairs 3+4 or 5+6 to connect the PC. DATA+ Terminal 3 or 5 DATA– Terminal 4 or 6 Cable requirements Bell wire. Both ends open. Installation and Operation Manual for Solar Power Inverter M70A EU V1.1 EN 2020-02-20... -
Page 77: Installing The Sub-1G Antenna (Optional)
1. Unscrew and remove the cover cap of the Sub-1G con- nector. 2. Mount the Sub-1G antenna and screw it on so that it can still be rotated. Installation and Operation Manual for Solar Power Inverter M70A EU V1.1 EN 2020-02-20... - Page 78 3. Rotate the Sub-1G antenna downward. 4. Slide the mounting frame over the Sub-1G antenna upside down from below. 5. Rotate the mounting frame with the Sub-1G antenna upward. Installation and Operation Manual for Solar Power Inverter M70A EU V1.1 EN 2020-02-20...
- Page 79 7 Installation Installing the Sub-1G antenna (optional) 6. Screw on the mounting frame. þ The installation of the Sub-1G antenna is complete. Installation and Operation Manual for Solar Power Inverter M70A EU V1.1 EN 2020-02-20...
-
Page 80: Installing The Wi-Fi Module Before Commissioning (Optional)
1. Unscrew the cable gland of the Wi-Fi connection and remove the cable gland and seal. 2. Mount and fasten the Wi-Fi module. Installation and Operation Manual for Solar Power Inverter M70A EU V1.1 EN 2020-02-20... - Page 81 4. Remove the protective cover from the DC surge protection devices. 5. Plug the cable into the power supply connection on the printed circuit board with the DC surge protection devices. Installation and Operation Manual for Solar Power Inverter M70A EU V1.1 EN 2020-02-20...
- Page 82 6. Mount the protective cover of the DC surge protection devices. 7. Insert the seal and cable gland of the Wi-Fi connection and screw the cable gland in place. Installation and Operation Manual for Solar Power Inverter M70A EU V1.1 EN 2020-02-20...
- Page 83 7 Installation Installing the Wi-Fi module before commissioning (optional) þ The installation of the Wi-Fi module is complete. Installation and Operation Manual for Solar Power Inverter M70A EU V1.1 EN 2020-02-20...
-
Page 84: Connecting To The Grid (Ac)
Al-Cu compression joints”, page 37) Min./max. Cable diameter 26.0 to 57.0 mm Min./max. Wire cross-section Without wire end sleeve ● Rigid cable 35–120 mm ● Multi-wire cable 35–120 mm Installation and Operation Manual for Solar Power Inverter M70A EU V1.1 EN 2020-02-20... -
Page 85: Ac Cable Gland
∅ 36 ... 43 mm ∅ 30 ... 36 mm ∅ 26 ... 30 mm Fig. 7.8: Use of the parts of the AC cable glands depending on the cable diameter Installation and Operation Manual for Solar Power Inverter M70A EU V1.1 EN 2020-02-20... - Page 86 2. Thread the cable through the cable gland and seal. 3. Insert the seal and cable gland for the AC connection and screw the cable gland in place. Installation and Operation Manual for Solar Power Inverter M70A EU V1.1 EN 2020-02-20...
-
Page 87: Connection Examples
7 Installation Connecting to the grid (AC) 7.10.4 Connection examples Connection example: 3 phases + N + PE Connection example: 3 phases + PE Installation and Operation Manual for Solar Power Inverter M70A EU V1.1 EN 2020-02-20... -
Page 88: Connecting The Solar Modules (Dc)
2. Insert the metal brackets to support the DC cables. 3. Plug in the DC cables. 4. The illustration on the left shows how the wiring should look when all DC connections are in use. Installation and Operation Manual for Solar Power Inverter M70A EU V1.1 EN 2020-02-20... -
Page 89: Completing Electrical Installation
Software (DSS)”, page 97)! 1. Remove the Allen key from the top of the door. 2. Close the door. 3. Close the upper and lower door locks. Installation and Operation Manual for Solar Power Inverter M70A EU V1.1 EN 2020-02-20... - Page 90 7 Installation Completing electrical installation 4. Close and tighten the cover of the upper door lock. 5. Close and tighten the cover of the lower door lock. Installation and Operation Manual for Solar Power Inverter M70A EU V1.1 EN 2020-02-20...
- Page 91 7. Close the isolating switch between the inverter and the grid connection point or inverter and the solar modules. 8. Continue to chapter “8. Commissioning”, page 92. Installation and Operation Manual for Solar Power Inverter M70A EU V1.1 EN 2020-02-20...
-
Page 92: Commissioning
If multiple inverters are connected to the PV system, a different inverter ID must set for each inverter. The inverter ID is used, for example, by monitoring systems to uniquely identify each inverter. Installation and Operation Manual for Solar Power Inverter M70A EU V1.1 EN 2020-02-20... - Page 93 → See “8.3 Commissioning troubleshooting”, page 95 if an error message ap- pears. 7. To set the date and time for all inverters, click on the Sync time (1) button. Installation and Operation Manual for Solar Power Inverter M70A EU V1.1 EN 2020-02-20...
- Page 94 8 Commissioning Commissioning with the commissioning software → The message "Sync Time successful" appears if the setting was successful. þ Commissioning is now complete. Installation and Operation Manual for Solar Power Inverter M70A EU V1.1 EN 2020-02-20...
-
Page 95: Commissioning Troubleshooting
► To finish, click on the Scan Fewer inverters were found when scanning the RS485 ring than specified in the Inv num Inverters button (2). text box. Installation and Operation Manual for Solar Power Inverter M70A EU V1.1 EN 2020-02-20... - Page 96 ► Check the time on the PC. "Time Sync failed." ► To finish, click on the Sync time button (1). (German: "Synchronisierung der Uhrzeit fehlgeschlagen.") Cause of error Time synchronization failed. Installation and Operation Manual for Solar Power Inverter M70A EU V1.1 EN 2020-02-20...
-
Page 97: Commissioning With The Delta Service Software (Dss)
2. Follow the instructions in the app to connect your mobile device to the DC1. 3. Once the connection is established, follow the instructions in the commissioning procedure. Installation and Operation Manual for Solar Power Inverter M70A EU V1.1 EN 2020-02-20... -
Page 98: Error Events And Troubleshooting
► Do not open the door if water or dirt might enter the inverter. ► After work is completed, ensure that the door is properly shut and tightened again. Check that the doors are properly sealed. Installation and Operation Manual for Solar Power Inverter M70A EU V1.1 EN 2020-02-20... -
Page 99: Error
Check the insulation of the DC inputs. Insulation Large PV system capacitance between Plus Check the capacitance. Dry the PV modules if and Ground or Minus and Ground or both. necessary. Installation and Operation Manual for Solar Power Inverter M70A EU V1.1 EN 2020-02-20... -
Page 100: Warnings
Check that the signal cable is inserted correctly. The two cables are not inserted correctly. Installation and Operation Manual for Solar Power Inverter M70A EU V1.1 EN 2020-02-20... -
Page 101: Faults
DC input voltage. permissible DC input voltage. F31, F33, HW Bus OVR Overvoltage during operation. Contact Delta Customer Service. Internal error. Contact Delta Customer Service. Installation and Operation Manual for Solar Power Inverter M70A EU V1.1 EN 2020-02-20... - Page 102 Internal error. Contact Delta Customer Service. Internal error. Contact Delta Customer Service. HW ZC Fail F60, F61, Internal error. Contact Delta Customer Service. DC Current High F70, F71 Installation and Operation Manual for Solar Power Inverter M70A EU V1.1 EN 2020-02-20...
- Page 103 Installation and Operation Manual for Solar Power Inverter M70A EU V1.1 EN 2020-02-20...
-
Page 104: Maintenance
► Do not open the door if water or dirt might enter the inverter. ► After work is completed, ensure that the door is properly shut and tightened again. Check that the doors are properly sealed. Installation and Operation Manual for Solar Power Inverter M70A EU V1.1 EN 2020-02-20... -
Page 105: Periodic Maintenance
The following components may be replaced: ● Fan module and air filters ● Internal fans ● AC surge protection devices ● DC surge protection devices ● Sub-1G antenna ● Wi-Fi module Installation and Operation Manual for Solar Power Inverter M70A EU V1.1 EN 2020-02-20... -
Page 106: Making Preparations For Maintenance Work - Disconnecting The Inverter From The Grid (Ac) And Solar Modules (Dc)
● Voltmeter to check for the absence of voltage inside the inverter Installation and Operation Manual for Solar Power Inverter M70A EU V1.1 EN 2020-02-20... - Page 107 2. Turn both DC isolating switches to the OFF position. 3. Wait at least 60 seconds until the internal capacitors have discharged. 4. Remove the Allen key from the upper door lock. Installation and Operation Manual for Solar Power Inverter M70A EU V1.1 EN 2020-02-20...
- Page 108 Making preparations for maintenance work - disconnecting the inverter from the grid (AC) and solar modules (DC) 5. Unscrew and open the upper door lock cover. 6. Unscrew and open the lower door lock cover. Installation and Operation Manual for Solar Power Inverter M70A EU V1.1 EN 2020-02-20...
- Page 109 Making preparations for maintenance work - disconnecting the inverter from the grid (AC) and solar modules (DC) 7. Open the upper door lock. 8. Open the lower door lock. 9. Open the door and secure it on top with the Allen key. Installation and Operation Manual for Solar Power Inverter M70A EU V1.1 EN 2020-02-20...
- Page 110 → If you detect no voltage, continue to the next step. 11. Use the mounting tool to release the DC cables and then pull them out. 12. Unscrew the AC cable gland. Installation and Operation Manual for Solar Power Inverter M70A EU V1.1 EN 2020-02-20...
- Page 111 Making preparations for maintenance work - disconnecting the inverter from the grid (AC) and solar modules (DC) 13. Unscrew the conductors of the AC cable and pull out the AC cable. Installation and Operation Manual for Solar Power Inverter M70A EU V1.1 EN 2020-02-20...
-
Page 112: Clean/Replace Internal Fan 1
1. Pull out the power supply cable plug located on the top right of the communication card 2. Unscrew and pull out the cover. The fan is screwed onto the cover. Installation and Operation Manual for Solar Power Inverter M70A EU V1.1 EN 2020-02-20... - Page 113 The work step is not necessary for cleaning the fan. ∫ 3. Unscrew the fan from the cover and pull it out. Installation and Operation Manual for Solar Power Inverter M70A EU V1.1 EN 2020-02-20...
- Page 114 This work step must only be carried out if the fan is to be replaced. The work step is not necessary for cleaning the fan. ∫ 5. Insert and screw the fan into the cover. Installation and Operation Manual for Solar Power Inverter M70A EU V1.1 EN 2020-02-20...
- Page 115 10 Maintenance Clean/replace internal fan 1 6. Insert the cover with the fan attached and screw the cover in place. 7. Plug in the power supply cable plug. Installation and Operation Manual for Solar Power Inverter M70A EU V1.1 EN 2020-02-20...
-
Page 116: Clean/Replace Internal Fan 2
1. Remove the protective cover from the DC surge protection devices. 2. Pull out the power supply cable plug located on the bottom of the card with the DC surge protection devices. Installation and Operation Manual for Solar Power Inverter M70A EU V1.1 EN 2020-02-20... - Page 117 10 Maintenance Clean/replace internal fan 2 3. Unscrew and pull out the cover. The fan is screwed onto the cover. Installation and Operation Manual for Solar Power Inverter M70A EU V1.1 EN 2020-02-20...
- Page 118 ∫ 4. Unscrew the fan from the cover and pull it out. 5. Clean the fan and metal housing with compressed air or a firm brush. Installation and Operation Manual for Solar Power Inverter M70A EU V1.1 EN 2020-02-20...
- Page 119 This work step must only be carried out if the fan is to be replaced. The work step is not necessary for cleaning the fan. ∫ 6. Insert and screw the fan into the cover. Installation and Operation Manual for Solar Power Inverter M70A EU V1.1 EN 2020-02-20...
- Page 120 7. Insert the cover with the fan attached and screw the cover in place. 8. Plug in the power supply cable plug. 9. Insert the cover for the DC surge protection devices. Installation and Operation Manual for Solar Power Inverter M70A EU V1.1 EN 2020-02-20...
-
Page 121: Cleaning/Replacing The Fan Module
You should therefore use a magnetic screwdriver. ∫ The fan module is located on the left side of the inverter. Installation and Operation Manual for Solar Power Inverter M70A EU V1.1 EN 2020-02-20... - Page 122 10 Maintenance Cleaning/replacing the fan module 1. Unscrew and remove the fan module. Installation and Operation Manual for Solar Power Inverter M70A EU V1.1 EN 2020-02-20...
- Page 123 3. Clean the fan module with a compressed air cleaner or a firm brush. 4. Plug in the 4 power supply cable plugs until they engage. It does not matter which power cable you use for which fan. Installation and Operation Manual for Solar Power Inverter M70A EU V1.1 EN 2020-02-20...
- Page 124 Cleaning/replacing the fan module 5. Insert the fan module so that the power cables are on the right side of the fan module. 6. Screw on the fan module. Installation and Operation Manual for Solar Power Inverter M70A EU V1.1 EN 2020-02-20...
-
Page 125: Cleaning The Air Outlets
This procedure is the same for both air outlets. ∫ 1. Unscrew and remove the air filter. 2. Clean the air filter with a compressed air cleaner or a firm brush. Installation and Operation Manual for Solar Power Inverter M70A EU V1.1 EN 2020-02-20... - Page 126 10 Maintenance Cleaning the air outlets 3. Insert and screw on the air filter. The fins must be facing downward. Installation and Operation Manual for Solar Power Inverter M70A EU V1.1 EN 2020-02-20...
-
Page 127: Replacing The Dc Surge Protection Devices
Make sure that no screws fall into the inverter. 1. Remove the protective cover from the DC surge protection devices. 2. Pull out the power supply cable of internal fan 2. Installation and Operation Manual for Solar Power Inverter M70A EU V1.1 EN 2020-02-20... - Page 128 3. Pull out the signal cable. 4. Loosen all screws on the printed circuit board with the DC surge protection devices and remove the printed circuit board. Installation and Operation Manual for Solar Power Inverter M70A EU V1.1 EN 2020-02-20...
- Page 129 10 Maintenance Replacing the DC surge protection devices 5. Install the new printed circuit board and tighten all screws on the printed circuit board. Installation and Operation Manual for Solar Power Inverter M70A EU V1.1 EN 2020-02-20...
- Page 130 10 Maintenance Replacing the DC surge protection devices 6. Plug in the signal cable. Installation and Operation Manual for Solar Power Inverter M70A EU V1.1 EN 2020-02-20...
- Page 131 9. To complete the maintenance work, follow the instructions in the following section: “10.12 Finishing the maintenance work - connecting the inverter to the grid (AC) and solar modules (DC)”, page 139 Installation and Operation Manual for Solar Power Inverter M70A EU V1.1 EN 2020-02-20...
-
Page 132: Replacing The Ac Surge Protection Devices
Make sure that no screws fall into the inverter. 1. Unscrew and remove the cover of the type 2 AC surge protection devices. Installation and Operation Manual for Solar Power Inverter M70A EU V1.1 EN 2020-02-20... - Page 133 2. Pull out both cables from the top of the printed circuit board. 3. Loosen all screws on the printed circuit board with the AC surge protection devices and remove the printed circuit board. Installation and Operation Manual for Solar Power Inverter M70A EU V1.1 EN 2020-02-20...
- Page 134 4. Install the new printed circuit board and tighten all screws on the printed circuit board. 5. Plug the two cables into the top of the printed circuit board. Installation and Operation Manual for Solar Power Inverter M70A EU V1.1 EN 2020-02-20...
- Page 135 10 Maintenance Replacing the AC surge protection devices 6. Mount and screw on the cover of the AC surge protection devices. Installation and Operation Manual for Solar Power Inverter M70A EU V1.1 EN 2020-02-20...
-
Page 136: Replacing The Sub-1G Antenna
Replacing the Sub-1G antenna 10.11 Replacing the Sub-1G antenna 1. Unscrew the mounting frame. 2. Rotate the mounting frame with the Sub-1G antenna downward. 3. Pull the mounting frame downward. Installation and Operation Manual for Solar Power Inverter M70A EU V1.1 EN 2020-02-20... - Page 137 4. Unscrew the Sub-1G antenna. 5. Mount the new Sub-1G antenna and screw it on so that it can still be rotated. 6. Rotate the Sub-1G antenna downward. Installation and Operation Manual for Solar Power Inverter M70A EU V1.1 EN 2020-02-20...
- Page 138 7. Slide the mounting frame over the Sub-1G antenna upside down from below. 8. Rotate the mounting frame with the Sub-1G antenna upward. 9. Screw on the mounting frame. Installation and Operation Manual for Solar Power Inverter M70A EU V1.1 EN 2020-02-20...
-
Page 139: Finishing The Maintenance Work - Connecting The Inverter To The Grid (Ac) And Solar Modules (Dc)
(AC) and solar modules (DC) 1. Plug in and tighten the conductors of the AC cable. 2. Tighten the AC cable gland. 3. Plug in the DC cables. Installation and Operation Manual for Solar Power Inverter M70A EU V1.1 EN 2020-02-20... - Page 140 Finishing the maintenance work - connecting the inverter to the grid (AC) and solar modules (DC) 1. Remove the Allen key from the top of the door. 2. Close the door. 3. Close the upper and lower door locks. Installation and Operation Manual for Solar Power Inverter M70A EU V1.1 EN 2020-02-20...
- Page 141 Finishing the maintenance work - connecting the inverter to the grid (AC) and solar modules (DC) 4. Close and tighten the cover of the upper door lock. 5. Close and tighten the cover of the lower door lock. Installation and Operation Manual for Solar Power Inverter M70A EU V1.1 EN 2020-02-20...
- Page 142 7. Close the isolating switch between the inverter and the grid connection point or inverter and the solar modules. 8. Turn both DC isolating switches to the ON position. Installation and Operation Manual for Solar Power Inverter M70A EU V1.1 EN 2020-02-20...
- Page 143 10 Maintenance Finishing the maintenance work - connecting the inverter to the grid (AC) and solar modules (DC) Installation and Operation Manual for Solar Power Inverter M70A EU V1.1 EN 2020-02-20...
-
Page 144: Technical Data
Total harmonic distortion <3% at rated apparent power DC power supply <0.5% at rated current Power loss in night mode Overvoltage category Surge protection devices Type 2, replaceable Installation and Operation Manual for Solar Power Inverter M70A EU V1.1 EN 2020-02-20... - Page 145 IEC 60664-1, IEC 62109-1 EN 50539-11 EN 61463-11 For cos phi = 1 (VA = W) AC voltage and frequency range are programmed using the corresponding country specifications. Installation and Operation Manual for Solar Power Inverter M70A EU V1.1 EN 2020-02-20...
- Page 146 Other European countries support.europe@solar-inverter.com +49 7641 455 549 © Copyright – Delta Electronics (Netherlands) B.V. – All rights reserved. All information and specifications can be modified without prior notice. Installation and Operation Manual for Solar Power Inverter M70A EU V1.1 EN 2020-02-20...
Need help?
Do you have a question about the M70A and is the answer not in the manual?
Questions and answers