Delta M70A 260 Installation And Operation Manual
Solar inverter
Hide thumbs
Also See for M70A 260:
- Operation and installation manual (88 pages) ,
- Installation and operation manual (166 pages) ,
- Operation and installation manual (88 pages)

Related Manuals for Delta M70A 260


Summary of Contents for Delta M70A 260
- Page 1 Installation and Operation Manual Installation and Operation Manual Solar Inverter Solar Inverter M70A_260 (Delta part number RPI703M260000) M70A_260 (Delta part number RPI703M260000) Europe...
- Page 2 Electronics (Netherlands) B.V. must be marked with the words ● M70A_260 (Delta part number RPI703M260000) "Translation of the original operating instructions." The Delta part number can be found on the type plate of the Delta Electronics (Netherlands) B.V. inverter. Tscheulinstraße 21...
-
Page 3: Table Of Contents
Table of Contents Table of Contents 1. About this manual ............7 Purpose of this manual. - Page 4 MyDeltaSolar app with DC1 Data Collector from Delta ....... . .
- Page 5 Commissioning with the Delta Service Software (DSS) ........
- Page 6 Table of Contents 12.5 Installing the Wi-Fi module after commissioning ........191 12.6 Finishing the work - connecting the inverter to the grid (AC) and solar modules (DC) .
-
Page 7: About This Manual
10. Maintenance. All other maintenance Always follow the safety instructions and work instructions in this and repair work must only be carried out by Delta personnel or manual. This will ensure that the inverter can be safely installed, after consultation with Delta Customer Service. -
Page 8: Warning Notices And Warning Symbols
1 About this manual Warning notices and warning symbols Warning notices and warning symbols Writing and labeling conventions This manual uses the following warning notices and symbols Some sections in this manual are specially labeled. to describe potential dangers and the measures necessary for Labeling of work instructions reducing these dangers. -
Page 9: Basic Safety Instructions
Electric shock ● All repair work on the inverter must be carried out by Delta Potentially fatal voltages are present at the DC Electronics. Otherwise the warranty will be void. connections of the inverter. When light falls on ●... -
Page 10: Intended Purpose
3 Intended purpose Intended purpose The inverter may be used only for the specified intended pur- pose. The intended purpose of the inverter is defined as follows: ● Use in stationary solar systems that are connected to the public grid. For conversion of the DC power that is generat- ed by the solar modules of the solar system into AC power which is fed into the local power grid. -
Page 11: Product Overview
4 Product overview Scope of delivery Product overview Scope of delivery ► Check the delivery for completeness and all components for damage before starting installation work. ► Do not use any damaged components. ► Keep the packaging. 4.1.1 Inverter Part Description Part Description... -
Page 12: Sub-1G Antenna
4 Product overview Scope of delivery 4.1.2 Sub-1G antenna For mounting the Sub-1G antenna to the inverter. Sub-1G antenna Bracket For screwing the bracket onto the inverter; screws with spring washer and washer Mounting screws 4.1.3 Accessories to be ordered separately Accessories for ground mounting For screwing the inverter onto the For mounting the feet to the... -
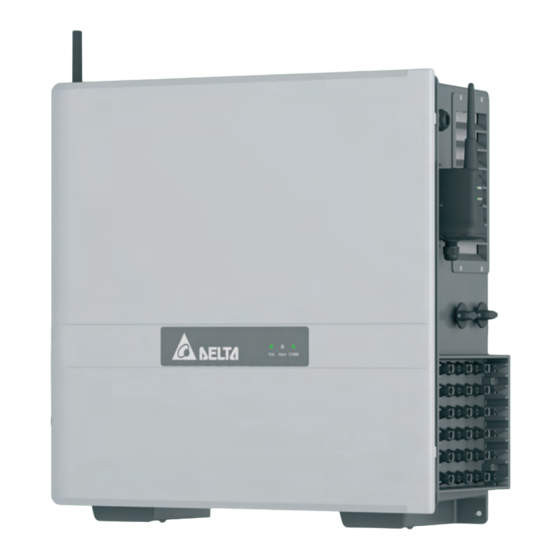
Page 13: Overview Of Components And Connections
4 Product overview Scope of delivery Overview of components and connections Fig. 4.1: Overview of external components and connections Air outlet AC cable feed-through Wi-Fi module (optional accessory) Cable feed-through for RS485, digital inputs, dry contacts, external power-off DC disconnectors 1+2 Type plate DC connector panel Air inlet with fan module... - Page 14 4 Product overview Overview of components and connections Fig. 4.2: Overview of internal components 11 Type-2 DC surge protection devices 14 AC connection terminals 12 Internal fan 2 15 Internal fan 1 13 Type-2 AC surge protection devices 16 Connection terminals for RS485, digital inputs, dry contacts and external power-off Installation and Operation Manual for Solar Power Inverter M70A EU V2.0 EN 2020-08-03...
-
Page 15: Leds
4 Product overview LEDs LEDs Explanation Grid Alarm Countdown (inverter is starting up). The inverter is connected to the grid. Error. Power-off via external signal. Warning. Solar system failure. Grid LED: green Grid Solar system warning. Alarm Alarm LED: red / yellow Comm. -
Page 16: Ac-Side Components
4 Product overview AC-side components AC-side components 4.4.2 AC connection terminals 4.4.1 AC cable feed-through Fig. 4.4: AC connection terminals The inverter is suitable for 3-phase grids with/without neutral conductor. Fig. 4.3: AC cable feed-through The PE connection is realized as a separate bolt. The M10 nut, The AC cable gland consists of several sealing rings for different spring washer and washer are already mounted in the inverter. -
Page 17: Type-2 Ac Surge Protection Devices
4 Product overview DC-side components DC-side components 4.4.3 Type-2 AC surge protection devices 4.5.1 DC connector panel Fig. 4.5: View of Type-2 AC surge protection devices with the cover removed The inverter has replaceable type-2 AC surge protection devices Fig. 4.6: DC connector panel which protect the inverter against excessive voltages. -
Page 18: Dc Disconnectors
4 Product overview DC-side components 4.5.2 DC disconnectors Both DC disconnectors in the ON position = the con- Fig. 4.10: nection to the solar modules is closed Fig. 4.8: DC disconnectors The connection between the inverter and the solar modules is The DC disconnectors are marked on the inverter with the words closed when both DC disconnectors are in the ON position. -
Page 19: Type-2 Dc Surge Protection Devices
4 Product overview DC-side components 4.5.3 Type-2 DC surge protection devices Fig. 4.11: View of the Type-2 DC surge protection devices with the cover removed The inverter has replaceable Type-2 DC surge protection devices which protect the inverter against excessive voltages. The Type-2 DC surge protection devices are replaced as a block. -
Page 20: Communications Connection
4 Product overview Communications connection Communications connection Connection Connector type 2 x RS485 (DATA+ and DATA–) Terminal block 1 x VCC (12 V, 0.5 A) Terminal block 6 x digital inputs Terminal block 2 x dry contacts Terminal block 1 x external power-off (EPO) Terminal block Table 4.6.: Connections on the communication card Shielded and twisted pair cable... -
Page 21: Grounding Connection
4 Product overview Grounding connection Grounding connection 4.7.2 PE connection 4.7.1 Grounding screw Fig. 4.15: PE connection The M10 nut, spring washer and washer are already mounted in the inverter. A toothed lock washer is not required. Fig. 4.14: Grounding screw on the left foot of the inverter M6 screw, spring washer and washer are included in the scope of delivery. -
Page 22: Cooling System Management
4 Product overview Cooling System Management Cooling System Management 4.8.2 Internal fans The internal fans circulate the air inside the inverter to prevent heat buildup. 4.8.1 Air inlet, air outlet and fan module Fig. 4.18: Position of internal fan 1 Fig. -
Page 23: Internal Heat Sinks
4 Product overview Sub-1G antenna Sub-1G antenna 4.8.3 Internal heat sinks Fig. 4.20: Rear cover plate Fig. 4.21: Sub-1G antenna The rear cover plate can be removed to gain access to the inter- Sub-1G antenna and mounting materials are included in the nal heat sinks. -
Page 24: Wi-Fi Module
4 Product overview Wi-Fi module 4.10 Wi-Fi module Fig. 4.22: Wi-Fi module The Wi-Fi module is an accessory that must be ordered sepa- rately. Related Topics “6. Planning the Commissioning”, page 53 “7.10 Installing the Wi-Fi module before commissioning (optional)”, page 90 “10.12 Replacing the Wi-Fi module”, page 148 “12.5 Installing the Wi-Fi module after commissioning”, page Installation and Operation Manual for Solar Power Inverter M70A EU V2.0 EN 2020-08-03... -
Page 25: Type Plate And Markings
4 Product overview Wi-Fi module 4.11 Type plate and markings Fig. 4.23: Type plate and markings Information on the type plate Meaning Risk of death due to electric shock Potentially fatal voltage is present inside the inverter during operation and this volt- age remains present for up to 60 seconds after disconnection from the power sup- 60 seconds ply. - Page 26 4 Product overview Wi-Fi module For France Warning notice Description For France: Warning notice according to UTE 15712-1 Attention Présence de deux sources de tension - Réseau de distribution Attention Présence de deux sources - Panneaux photovoltaics de tension - Réseau de distribution - Panneaux photovoltaiques For France: Warning notice according to UTE 15712-1 Isoler les deux sources avant toute intervention...
-
Page 27: Planning The Installation
5 Planning the installation Installation location Planning the installation Special notes on floor mounting In principle, the inverter can be mounted directly onto the ground This chapter describes only the planning of the or directly onto the roof in the case of roof systems. installation work. -
Page 28: Installation Height
5 Planning the installation Installation location 5.1.2 Installation height 5.1.5 Lifting and transporting the inverter ► Mount the inverter so that the LEDs are always visible. ► The inverter must be lifted and carried by at least two people. 5.1.3 Installation position Fig. -
Page 29: Installation Clearances And Air Circulation
5 Planning the installation 5.1.6 Installation clearances and air circulation >60 cm >30 cm >30 cm and air circulation Fig. 5.4: Installation clearances and air circulation, variant 1 (Dimensions in mm) > 300 > 300 ... 600 > 300 and air circulation Fig. - Page 30 5 Planning the installation > 50 > 300 > 300 und Luftzirkulation Fig. 5.6: Installation clearances and air circulation, variant 1 (Dimensions in mm) ► Ensure sufficient air circulation. There must not be heat buildup around the inverter. For installation clearances of 30 to 60 cm between two inverters, install a separation plate (A) between the inverters.
-
Page 31: Characteristic Curves
5 Planning the installation Characteristic curves Characteristic curves = 230 / 400 V = 70 kW) cos ϕ = 0.9 110% 100% 460 V 900 V 800 V 520 V 600 V 720 V Ambient temperature [°C] Fig. 5.7: Characteristic curve "Active power control depending on the ambient temperature; cos φ = 0.90; AC voltage = 230 / 400 V" Installation and Operation Manual for Solar Power Inverter M70A EU V2.0 EN 2020-08-03... - Page 32 5 Planning the installation Characteristic curves = 230 / 400 V = 70 kW) cos ϕ = 1,0 110% 100% 460 V 900 V 520 V 600 V 800 V 720 V Ambient temperature [°C] Fig. 5.8: Characteristic curve "Active power control depending on the ambient temperature; cos φ = 1.0; AC voltage = 230 / 400 V" Installation and Operation Manual for Solar Power Inverter M70A EU V2.0 EN 2020-08-03...
- Page 33 5 Planning the installation Characteristic curves = 230 / 400 V = 70 kVA) cos ϕ = 0,9 110% 100% 460 V 900 V 520 V 600 V 800 V 720 V Ambient temperature [°C] Fig. 5.9: Characteristic curve "Apparent power control depending on the ambient temperature; cos φ = 0.90; AC voltage = 230 / 400 V"...
- Page 34 5 Planning the installation Characteristic curves Efficiency [%] = 400 V 100% 600 V 800 V 520 V 100% AC Output power P/P [%]; P = 125 kW Fig. 5.10: Efficiency characteristic curve Installation and Operation Manual for Solar Power Inverter M70A EU V2.0 EN 2020-08-03...
-
Page 35: Dimensions
5 Planning the installation Dimensions Dimensions 144,5 263,4 Fig. 5.11: Dimensions (in mm) Installation and Operation Manual for Solar Power Inverter M70A EU V2.0 EN 2020-08-03... -
Page 36: Planning The Grid Connection (Ac)
This means that the inverter meets the require- ments of DIN VDE 0100-712. Possible error events were assessed by Delta in accordance with the current installation standards. The assessments showed that no hazards arise from operating the inverter in combination with an upstream, type A residual current circuit breaker (FI circuit breaker, RCD). -
Page 37: Grounding The Inverter
5 Planning the installation Planning the grid connection (AC) 5.4.6 Grounding the inverter WARNING High current ► Always observe the local regulations relating to grounding cable requirements. ► To increase the safety of the system, always use the grounding screw to ground the inverter housing even when this is not required by the local regulations. -
Page 38: Permissible Grid Voltages
5 Planning the installation Planning the grid connection (AC) 5.4.7 Permissible grid voltages ► Germany: Follow the installation instructions of VDE 0100- 712. This standard contains the requirements for minimum 3P3W Voltage Range 3P4W Voltage Range cable diameters and for avoiding overheating due to high currents. -
Page 39: Special Tools Required
5 Planning the installation Planning the grid connection (AC) 5.4.8.5 Handling aluminum conductors during installation work ► The special properties of aluminum must be taken into con- sideration when using aluminum conductors: – Aluminum "flows", i.e. it gives way under pressure. –... -
Page 40: Planning The Connection Of The Solar Modules (Dc)
5 Planning the installation Planning the connection of the solar modules (DC) Planning the connection of the solar Before connecting the solar modules, turn both DC isolating switches to the OFF position. modules (DC) Related Topics “7.12 Connecting the solar modules (DC)”, page 97 5.5.1 Safety instructions DANGER Electric shock... -
Page 41: Distribution Of The Module Strings Via The Mpp Tracker And Dc Inputs
5 Planning the installation Planning the connection of the solar modules (DC) 5.5.3 Distribution of the module strings via the MPP tracker and DC inputs The inverter has 6 MPP trackers. Up to 18 module strings can be connected to the inverter. 5.5.3.1 Why is this topic important? The inverter has an integrated string monitoring function, which is performed via current sensors. - Page 42 5 Planning the installation Planning the connection of the solar modules (DC) 5.5.3.2 Connecting a single module string to a DC input 5.5.3.3 Connecting two module strings to a DC input If only a single module string is connected to a DC input (= MPP If two module strings are connected to a DC input (= MPP tracker), only use DC connector 1.
-
Page 43: Notes On The Assignment Of The Dc Connections If Fewer Than 18 Module Strings Are Connected
DC 2 If you want to implement connection variants other than those shown in this section, please contact Delta Customer Support. You can find DC 3 the contact information on the last page of this manual. DC 4 Always assign the DC connections in the order indicated (Fig. -
Page 44: Use Of String Fuses
Note that no string fuses are installed in the inverter. Suitable 15 A and 20 A inline string fuses are available as accessories from Delta. These string fuses are integrated into the DC cable. Should you require this, please contact Delta Support by telephone. -
Page 45: Specifications For The Dc Cables
5 Planning the installation Planning the connection of the solar modules (DC) 5.5.6 Specifications for the DC cables The DC plugs for all DC connections are supplied with the inverter. The DC plugs are only suitable for copper wire. You can download the assembly instructions for the DC plugs from Amphenol at: www.amphenol-solar.com. -
Page 46: Planning The Device Communication And Plant Monitoring
5 Planning the installation Planning the device communication and plant monitoring Planning the device communication 5.6.2 Components of the communication card and plant monitoring The connections for RS485, the digital inputs, the dry contacts and the external power-off (EPO) are all on the communication card. -
Page 47: Communication Cable Requirements
5 Planning the installation Planning the device communication and plant monitoring 5.6.3 Communication cable requirements 5.6.5 Connection of a data logger via RS485 The inverter can be connected to a data logger via RS485, e.g. Shielded and twisted pair cable Cable type for monitoring the PV system or changing the inverter settings. -
Page 48: Connection Of A Dc1 Data Collector From Delta
5 Planning the installation Planning the device communication and plant monitoring 5.6.6 Connection of a DC1 data collector from Delta You can use the DC1 data collector for, among other things: ● Commissioning the inverter (see “6. Planning the Commis- sioning”, page 53 and “8. -
Page 49: Connecting An External Alarm Unit
A mobile device (smartphone, tablet) with the MyDeltaSolar ● A mobile device (smartphone, tablet) with the MyDeltaSolar ● A Windows PC running the Delta Service Software (DSS) ● A Windows PC running the Delta Service Software (DSS) The MyDeltaSolar app is available for iOS and Android. -
Page 50: Connecting A Ripple Control Receiver
5 Planning the installation Planning the device communication and plant monitoring 5.6.8 Connecting a ripple control receiver 5.6.9 External power-off An external ripple control receiver can be connected to the digital The inverter has a relay that can be used to trigger an external inputs. -
Page 51: Connecting A Pc
Wi-Fi module must be installed on the inverter. You can use the PC to commission the inverter and change the The Wi-Fi module must be ordered separately from Delta. settings. This requires the following accessories. In addition, you will need the MyDeltaSolar app on your mobile... -
Page 52: Use Of Combined Type 1+2 Dc Surge Protection Devices
5 Planning the installation Use of combined type 1+2 DC surge protection devices Use of combined type 1+2 DC surge Grid and system protection protection devices 1. The German standard VDE-AR-N 4105 requires external grid and system protection with a coupling switch for PV The inverter is supplied with pre-installed type 2 AC and DC systems larger than 30 kVA. -
Page 53: Planning The Commissioning
The firmware of the inverter cannot be updated using this method. 6.2.2 Delta Service Software (DSS) The Delta Service Software is available for Windows PCs. The PC is connected to the RS485 terminal block of the inverter. You must commission each inverter individually. -
Page 54: Installation
7 Installation Safety instructions Installation WARNING Electric shock ► Read chapter “5. Planning the installation”, If the doors of the inverter are open, the IP65 page 27 and this chapter in full before degree of protection is no longer guaranteed. you start installation. -
Page 55: Sequence Of Installation And Commissioning Steps
7 Installation Sequence of installation and commissioning steps Sequence of installation and commissioning steps Step Notice Description in chapter Mounting the inverter “7.3 Mounting the inverter”, page 56 Grounding the inverter housing “7.4 Grounding the inverter housing”, page 60 Preparing electrical installation “7.5 Preparing electrical installation”, page 62 “7.8 Connecting the communication card”, Connecting the communication card... -
Page 56: Mounting The Inverter
7 Installation Mounting the inverter Mounting the inverter 7.3.1 Ground mounting (upright) The mounting feet for ground mounting must be ordered separately! 1. Screw the 2 feet for ground mounting onto the underside of the inverter (torque: 24.5 Nm). The M6 screws, spring washer and washer are included in the scope of delivery. -
Page 57: Wall Mounting (Suspended)
Deviations from this are only possible in exceptional cases approved by Delta Electronics. Always check with Delta Customer Service first if you want to deviate from the work instructions given in this section. 1. Attach the mounting plate to the wall/mounting system with at least 8 M6 screws. - Page 58 7 Installation Mounting the inverter 2. Tighten the 8 points highlighted in the image at a mini- mum. 3. Mount the inverter on the mounting plate. 4. Check that the inverter is correctly mounted on the mount- ing plate. 5. Screw the lower left side of the inverter onto the wall or mounting system using the M10 screw, spring washer and washer.
- Page 59 7 Installation Mounting the inverter 6. Screw the lower right side of the inverter onto the wall or mounting system using the M10 screw, spring washer and washer. Installation and Operation Manual for Solar Power Inverter M70A EU V2.0 EN 2020-08-03...
-
Page 60: Grounding The Inverter Housing
7 Installation Grounding the inverter housing Grounding the inverter housing WARNING High current ► Always observe the local regulations relating to grounding cable requirements. ► To increase the safety of the system, always ground the inverter housing even when this is not required by the local regulations. -
Page 61: Grounding Via The Pe Screw
7 Installation Grounding the inverter housing 7.4.2 Grounding via the PE screw Cable lug selection Select the cable lugs according to the following table: PE screw material: nickel-plated Cable Cable lug ● Copper, tin coated Copper ● Pure copper ● Aluminum, tin-coated Aluminum ●... -
Page 62: Preparing Electrical Installation
7 Installation Preparing electrical installation Preparing electrical installation There is normally an isolating switch (for example in an equipment terminal box) between the inverter and the grid and between the inverter and the solar modules. This isolates the inverter from all the AC and DC voltage sources and ren- ders it de-energized. - Page 63 7 Installation Preparing electrical installation 4. Unscrew and open the upper door lock cover. 5. Unscrew and open the lower door lock cover. Installation and Operation Manual for Solar Power Inverter M70A EU V2.0 EN 2020-08-03...
- Page 64 7 Installation Preparing electrical installation 6. Open the upper and lower door lock. 7. Open the door and secure it on top with the Allen key. Installation and Operation Manual for Solar Power Inverter M70A EU V2.0 EN 2020-08-03...
- Page 65 7 Installation Preparing electrical installation Installation and Operation Manual for Solar Power Inverter M70A EU V2.0 EN 2020-08-03...
-
Page 66: Installing The Type 1+2 Combined Dc Surge Protection Devices Before Commissioning (Optional)
7 Installation Installing the type 1+2 combined DC surge protection devices before commissioning (optional) Installing the type 1+2 combined DC surge protection devices before com- missioning (optional) Type 2 DC surge protection devices are installed as standard. Type 1+2 combined DC surge pro- tection devices can be ordered as accessories. - Page 67 7 Installation Installing the type 1+2 combined DC surge protection devices before commissioning (optional) 4. Loosen all screws on the printed circuit board with the DC surge protection devices and remove the printed circuit board. Installation and Operation Manual for Solar Power Inverter M70A EU V2.0 EN 2020-08-03...
- Page 68 7 Installation Installing the type 1+2 combined DC surge protection devices before commissioning (optional) 5. Install the new printed circuit board and tighten all screws on the printed circuit board. Installation and Operation Manual for Solar Power Inverter M70A EU V2.0 EN 2020-08-03...
- Page 69 7 Installation Installing the type 1+2 combined DC surge protection devices before commissioning (optional) 6. Plug in the signal cable. 7. Plug in the power supply cable of internal fan 2. 8. Insert the cover for the DC surge protection devices. þ...
-
Page 70: Installing Type 1+2 Combined Ac Surge Protection Devices (Optional)
7 Installation Installing type 1+2 combined AC surge protection devices (optional) Installing type 1+2 combined AC surge protection devices (optional) Type 2 AC surge protection devices are installed as standard. Type 1+2 combined AC surge pro- tection devices can be ordered as accessories. Use an insulated magnetic screwdriver to prevent the screws from falling. - Page 71 7 Installation Installing type 1+2 combined AC surge protection devices (optional) 3. Loosen all screws on the block with the AC surge protec- tion devices and remove the block. 4. Install the new block and tighten all screws. Installation and Operation Manual for Solar Power Inverter M70A EU V2.0 EN 2020-08-03...
- Page 72 7 Installation Installing type 1+2 combined AC surge protection devices (optional) 5. Plug the two cables into the top of the block. 6. Mount and screw on the cover of the AC surge protection devices. Installation and Operation Manual for Solar Power Inverter M70A EU V2.0 EN 2020-08-03...
- Page 73 7 Installation Installing type 1+2 combined AC surge protection devices (optional) þ The installation of the type 1+2 combined AC surge pro- tection devices is complete. Installation and Operation Manual for Solar Power Inverter M70A EU V2.0 EN 2020-08-03...
-
Page 74: Connecting The Communication Card
7 Installation Connecting the communication card Connecting the communication card Shielded and twisted pair cable Cable type (CAT5 or CAT6) The connections for RS485, the dry contacts, the Cable diameter 2x 7.2 mm digital inputs and the external power-off (EPO) Wire cross-section 0.25 ... -
Page 75: Threading The Communication Cable
7 Installation Connecting the communication card 7.8.2 Threading the communication cable 1. Unscrew the cable gland of the communication connection and remove the cable gland and seal. 2. Thread all communication cables through the cable gland and seal. 3. Insert the seal and cable gland of the communication con- nection and fasten the cable gland. - Page 76 7 Installation Connecting the communication card Installation and Operation Manual for Solar Power Inverter M70A EU V2.0 EN 2020-08-03...
-
Page 77: Connecting A Data Logger Via Rs485
7 Installation Connecting the communication card 7.8.3 Connecting a data logger via RS485 DIP switch for the RS485 termination resistor 7.8.3.1 Introduction NOTICE Unwanted currents. In some installation variants, unwanted currents can flow when multiple inverters are connected via RS485. ►... - Page 78 Connecting the communication card RS485 connection diagram for multiple inverters If you are using a DC1 data collector from Delta, also refer to the notes in the next section. ► On the last inverter in the RS485 series, set the DIP switch of the RS485 termination resistor to ON.
- Page 79 RS485 connection diagram for a DC1 data collector with multiple inverters The DC1 data collector from Delta does not have an integrated RS485 termination resistor. Depending on where the DC1 is located in the RS485 series, an external RS485 termination resistor may need to be connected, see Fig.
- Page 80 7 Installation Connecting the communication card 7.8.3.2 Wiring for a single inverter 1. Connect the DATA+ wire to terminal 5 and the DATA– wire to terminal 6. 2. Set the DIP switch for the RS485 termination resistor (DIP 2) to the ON position. Installation and Operation Manual for Solar Power Inverter M70A EU V2.0 EN 2020-08-03...
- Page 81 7 Installation Connecting the communication card 7.8.3.3 Wiring for multiple inverters Data logger 1. On the cable coming from the data logger: Connect the DATA+ wire to terminal 5 and the DATA– wire to terminal On the cable going to the second inverter: Connect the DATA+ wire to terminal 3 and the DATA–...
- Page 82 7 Installation Connecting the communication card Data logger 3. On the cable coming from the previous inverter: Con- nect the DATA+ wire to terminal 5 and the DATA– wire to terminal 6. On the cable going to the next inverter: Connect the DATA+ wire to terminal 3 and the DATA–...
- Page 83 7 Installation Connecting the communication card Data logger 5. Connect the DATA+ wire to terminal 5 and the DATA– wire to terminal 6. 6. Set the DIP switch for the RS485 termination resistor to the ON position. Installation and Operation Manual for Solar Power Inverter M70A EU V2.0 EN 2020-08-03...
-
Page 84: Connecting An External Alarm Unit
12 V power supply to the dry contacts ► An event can be assigned to the dry contacts with Delta Service Software or the MyDeltaSolar app after commis- ► An event can be assigned to the dry contacts with Delta sioning. -
Page 85: Connecting A Ripple Control Receiver
Power limiting to: Short circuit 2. After commissioning, the relay for the external power-off Terminals V1 and K1 can be defined with Delta Service Software as a normally closed or normally open contact. Terminals V1 and K2 Terminals V1 and K3... -
Page 86: Connecting A Pc Via Rs485 (Optional)
7.8.7 Connecting a PC via RS485 (optional) This section describes how to connect a PC if you want to use a Windows PC with the Delta Service Software (DSS) or Delta commissioning software for commissioning. Note that you must disconnect the PC from the inverter again after commissioning! You can use terminal pairs 3+4 or 5+6 to connect the PC. -
Page 87: Installing The Sub-1G Antenna (Optional)
7 Installation Installing the Sub-1G antenna (optional) Installing the Sub-1G antenna (optional) The Sub-1G antenna and mounting hardware are supplied in the scope of delivery. Use an insulated magnetic screwdriver to prevent the screws from falling. 1. Unscrew and remove the cover cap of the Sub-1G con- nector. - Page 88 7 Installation Installing the Sub-1G antenna (optional) 3. Rotate the Sub-1G antenna downward. 4. Slide the mounting frame over the Sub-1G antenna upside down from below. 5. Rotate the mounting frame with the Sub-1G antenna upward. Installation and Operation Manual for Solar Power Inverter M70A EU V2.0 EN 2020-08-03...
- Page 89 7 Installation Installing the Sub-1G antenna (optional) 6. Screw on the mounting frame. þ The installation of the Sub-1G antenna is complete. Installation and Operation Manual for Solar Power Inverter M70A EU V2.0 EN 2020-08-03...
-
Page 90: Installing The Wi-Fi Module Before Commissioning (Optional)
7 Installation Installing the Wi-Fi module before commissioning (optional) 7.10 Installing the Wi-Fi module before com- missioning (optional) The Wi-Fi module is an accessory that must be ordered separately. The Wi-Fi module, cable and mounting materials are included in the scope of delivery. 1. - Page 91 7 Installation Installing the Wi-Fi module before commissioning (optional) 3. Thread the cable through the cable gland and seal. 4. Remove the cover from the DC surge protection devices. 5. Plug the cable into the power supply connection on the printed circuit board with the DC surge protection devices.
- Page 92 7 Installation Installing the Wi-Fi module before commissioning (optional) 6. Mount the cover of the DC surge protection devices. 7. Insert the seal and cable gland of the Wi-Fi connection and screw the cable gland in place. Installation and Operation Manual for Solar Power Inverter M70A EU V2.0 EN 2020-08-03...
- Page 93 7 Installation Installing the Wi-Fi module before commissioning (optional) þ The installation of the Wi-Fi module is complete. Installation and Operation Manual for Solar Power Inverter M70A EU V2.0 EN 2020-08-03...
-
Page 94: Connecting The Grid (Ac)
7 Installation Connecting the grid (AC) 7.11 Connecting the grid (AC) ► Always observe the information in section “5.4 Planning the grid connection (AC)”, page 36! 7.11.1 AC cable gland ∅ 50 ... 57 mm ∅ 43 ... 50 mm ∅... - Page 95 7 Installation Connecting the grid (AC) 1. Unscrew the cable gland for the AC connection, remove the cable gland and seal. 2. Thread the cable through the cable gland and seal. 3. Insert the seal and cable gland for the AC connection and screw the cable gland in place.
-
Page 96: Connection Examples
7 Installation Connecting the grid (AC) 7.11.2 Connection examples Connection example: 3 phases + N + PE Connection example: 3 phases + PE Installation and Operation Manual for Solar Power Inverter M70A EU V2.0 EN 2020-08-03... -
Page 97: Connecting The Solar Modules (Dc)
7 Installation Connecting the solar modules (DC) 7.12 Connecting the solar modules (DC) 1. Pull out the cover caps of the DC connections. 2. Insert the metal brackets to support the DC cables. 3. Plug in the DC cables. 4. The illustration on the left shows how the wiring should look when all DC connections are occupied. -
Page 98: Completing Electrical Installation
(see “7.8.7 Connecting a PC via RS485 (optional)”, page 86), you must disconnect the PC from the inverter again after commissioning (see “8.4 Commissioning with the Delta Service Software (DSS)”, page 106)! 1. Remove the Allen key from the top of the door. - Page 99 7 Installation Completing electrical installation 4. Close and tighten the cover of the upper door lock. 5. Close and tighten the cover of the lower door lock. Installation and Operation Manual for Solar Power Inverter M70A EU V2.0 EN 2020-08-03...
- Page 100 7 Installation Completing electrical installation 6. Insert the Allen key into the upper door lock. 7. Close the isolating switch between the inverter and the grid connection point or inverter and the solar modules. 8. Continue to chapter “8. Commissioning”, page 101. Installation and Operation Manual for Solar Power Inverter M70A EU V2.0 EN 2020-08-03...
-
Page 101: Commissioning
The PC is connected to the RS485 network of the inverters via a USB/RS485 adapter. ● Commissioning the inverter requires a PC with the com- missioning software and Delta Service Software (DSS) in- stalled. Both can be downloaded from https://solarsolutions. delta-emea.com/en/Solar-Inverter-Support-171.htm. - Page 102 8 Commissioning Commissioning with the commissioning software → A list of the inverters found is displayed. Each inverter is automatically assigned an inverter ID (1). → See “8.3 Commissioning troubleshooting”, page 104 if an error message ap- pears. If multiple inverters are connected to the PV system, a different inverter ID must set for each inverter.
- Page 103 8 Commissioning Commissioning with the commissioning software 7. To set the date and time for all inverters, click on the Sync time (1) button. → The message "Sync Time successful" appears if the setting was successful. þ Commissioning is now complete. Installation and Operation Manual for Solar Power Inverter M70A EU V2.0 EN 2020-08-03...
-
Page 104: Commissioning Troubleshooting
8 Commissioning Commissioning with the commissioning software Commissioning troubleshooting Error message and cause of error Error correction Error event ► Check whether the entry in the Inv num text box is correct. "Found more than expected inverters, please check your inverter quantity." Change the value if necessary. - Page 105 8 Commissioning Commissioning with the commissioning software Error message and cause of error Error correction Error event ► Check whether the entry in the Country-ID text box is correct "Wrong country ID setting! Please check your country ID!" (1). Change the value if neces- ("Invalid country ID.
-
Page 106: Commissioning With The Delta Service Software (Dss)
Commissioning with the MyDeltaSolar app Commissioning with the Delta Service Software (DSS) Prerequisites During installation, a Windows PC on which the Delta Service Software is installed was connected to the inverter (see “7.8.7 Connecting a PC via RS485 (optional)”, page 86). Download link https://solarsolutions.delta-emea.com/en/Solar-... -
Page 107: Error Events And Troubleshooting
“10. Maintenance”, page 113. 3. Wait at least 60 seconds for the internal For all other work, please contact Delta Cus- capacitors to discharge. tomer Service. DANGER To read error messages or change parameter... -
Page 108: Error
Non-linear load in the grid and in the vicinity of it further away. Grid Quality the inverter. If this error occurs repeatedly, contact Delta Customer Service. AC cable is not connected correctly. Check the AC cable connection. HW Connect Fail There is normally an external load-break switch between the inverter and the grid (e.g. -
Page 109: Warnings
The polarity of the DC string is reversed. Connect the DC strings correctly. String fault The string monitoring circuit is defective. Contact Delta Customer Service. One or more fans are blocked. Clean or replace the fans if necessary. Int Fan Fail One or more fans are defective. - Page 110 9 Error events and troubleshooting Warnings Warning Message Possible causes Suggestions for resolution number Check on the inverter whether the DC surge A lightning bolt has struck in the vicinity of the protection devices have tripped. inverter and the AC surge protection devices If yes, replace the card with the DC surge pro- have tripped.
-
Page 111: Faults
Faults Fault num- Message Possible causes Suggestions for resolution The grid waveform is abnormal. Contact Delta Customer Service. F01, F02, HW DC Injection Internal error. Contact Delta Customer Service. Temperature High The ambient temperature is > 60 °C. Check the system environment. - Page 112 9 Error events and troubleshooting Faults Fault num- Message Possible causes Suggestions for resolution F36, F37, Overvoltage during operation. Contact Delta Customer Service. F38, F39, AC Current High Internal error. Contact Delta Customer Service. F40, F41 HW CT A Fail Internal error.
-
Page 113: Maintenance
10 Maintenance Safety Instructions Maintenance WARNING Electric shock 10.1 Safety Instructions The IP65 protection degree is no longer guaran- teed when the door is open. ► Only open the door when absolutely DANGER necessary. ► Do not open the door if water or dirt might Electric shock Potentially fatal voltages are present in the enter the inverter. -
Page 114: Periodic Maintenance
The following components may be replaced: energy yield, but will not limit operation. ● Fan module and air filters In order to detect unusual power losses in time, Delta recom- ● Internal fans mends the use of a monitoring system in combination with the ●... -
Page 115: Making Preparations For Maintenance Work - Disconnecting The Inverter From The Grid (Ac) And Solar Modules (Dc)
10 Maintenance Making preparations for maintenance work - disconnecting the inverter from the grid (AC) and solar modules (DC) 10.4 Making preparations for maintenance work - disconnecting the inverter from the grid (AC) and solar modules (DC) DANGER Electric shock Potentially fatal voltages are present in the inverter during operation. - Page 116 10 Maintenance Making preparations for maintenance work - disconnecting the inverter from the grid (AC) and solar modules (DC) 1. To shut off the inverter at the grid, open the load-break switch between the inverter and the grid connection point. Secure the load-break switch to prevent it from being switched back on.
- Page 117 10 Maintenance Making preparations for maintenance work - disconnecting the inverter from the grid (AC) and solar modules (DC) 5. Unscrew and open the upper door lock cover. 6. Unscrew and open the lower door lock cover. Installation and Operation Manual for Solar Power Inverter M70A EU V2.0 EN 2020-08-03...
- Page 118 10 Maintenance Making preparations for maintenance work - disconnecting the inverter from the grid (AC) and solar modules (DC) 7. Open the upper door lock. 8. Open the lower door lock. 9. Open the door and secure it on top with the Allen key. Installation and Operation Manual for Solar Power Inverter M70A EU V2.0 EN 2020-08-03...
- Page 119 10 Maintenance Making preparations for maintenance work - disconnecting the inverter from the grid (AC) and solar modules (DC) 10. Use a voltmeter to check that there is no longer any volt- age at the marked connections. → If voltage is present, open the external load-break switch of the AC line and check that both DC discon- nectors are in the OFF position.
- Page 120 10 Maintenance Making preparations for maintenance work - disconnecting the inverter from the grid (AC) and solar modules (DC) 13. Unscrew the conductors of the AC cable and pull out the AC cable. Installation and Operation Manual for Solar Power Inverter M70A EU V2.0 EN 2020-08-03...
-
Page 121: Clean/Replace Internal Fan 1
10 Maintenance Clean/replace internal fan 1 10.5 Clean/replace internal fan 1 DANGER Electric shock Potentially fatal voltages are present in the inverter during operation. When the inverter is disconnected from all power sources, this voltage remains in the inverter for up to 60 seconds. - Page 122 10 Maintenance Clean/replace internal fan 1 2. Unscrew and pull out the cover. The fan is screwed onto the cover. This work step must only be carried out if the fan is to be replaced. The work step is not necessary for cleaning the fan.
- Page 123 10 Maintenance Clean/replace internal fan 1 4. Clean the fan and metal housing with compressed air or a firm brush. This work step must only be carried out if the fan is to be replaced. The work step is not necessary for cleaning the fan.
- Page 124 10 Maintenance Clean/replace internal fan 1 6. Insert the cover with the fan attached and screw the cover in place. 7. Plug in the power supply cable plug. Installation and Operation Manual for Solar Power Inverter M70A EU V2.0 EN 2020-08-03...
-
Page 125: Clean/Replace Internal Fan 2
10 Maintenance Clean/replace internal fan 2 10.6 Clean/replace internal fan 2 DANGER Electric shock Potentially fatal voltages are present in the inverter during operation. When the inverter is disconnected from all power sources, this voltage remains in the inverter for up to 60 seconds. - Page 126 10 Maintenance Clean/replace internal fan 2 2. Pull out the power supply cable plug located on the bottom of the card with the DC surge protection devices. 3. Unscrew and pull out the cover. The fan is screwed onto the cover. Installation and Operation Manual for Solar Power Inverter M70A EU V2.0 EN 2020-08-03...
- Page 127 10 Maintenance Clean/replace internal fan 2 This work step must only be carried out if the fan is to be replaced. The work step is not necessary for cleaning the fan. ∫ 4. Unscrew the fan from the cover and pull it out. 5.
- Page 128 10 Maintenance Clean/replace internal fan 2 This work step must only be carried out if the fan is to be replaced. The work step is not necessary for cleaning the fan. ∫ 6. Insert and screw the fan into the cover. Installation and Operation Manual for Solar Power Inverter M70A EU V2.0 EN 2020-08-03...
- Page 129 10 Maintenance Clean/replace internal fan 2 7. Insert the cover with the fan attached and screw the cover in place. 8. Plug in the power supply cable plug. 9. Insert the cover for the DC surge protection devices. Installation and Operation Manual for Solar Power Inverter M70A EU V2.0 EN 2020-08-03...
-
Page 130: Cleaning/Replacing The Fan Module
10 Maintenance Cleaning/replacing the fan module 10.7 Cleaning/replacing the fan module DANGER Electric shock Potentially fatal voltages are present in the inverter during operation. When the inverter is disconnected from all power sources, this voltage remains in the inverter for up to 60 seconds. - Page 131 10 Maintenance Cleaning/replacing the fan module 1. Unscrew and remove the fan module. Installation and Operation Manual for Solar Power Inverter M70A EU V2.0 EN 2020-08-03...
- Page 132 10 Maintenance Cleaning/replacing the fan module 2. Pull out the 4 power supply cable plugs. 3. Clean the fan module with a compressed air cleaner or a firm brush. 4. Insert the connectors of the 2 power supply cables until they snap into place.
- Page 133 10 Maintenance Cleaning/replacing the fan module 5. Insert the fan module so that the power cables are on the right side of the fan module. 6. Screw on the fan module. Installation and Operation Manual for Solar Power Inverter M70A EU V2.0 EN 2020-08-03...
-
Page 134: Cleaning The Air Outlets
10 Maintenance Cleaning the air outlets 10.8 Cleaning the air outlets The screws are very small and can easily fall down. You should therefore use a magnetic screwdriver. ∫ 1. Unscrew and remove the air filter. 2. Clean the air filter with a compressed air cleaner or a firm brush. - Page 135 10 Maintenance Cleaning the air outlets 3. Insert and screw on the air filter. The fins must be facing downward. Installation and Operation Manual for Solar Power Inverter M70A EU V2.0 EN 2020-08-03...
-
Page 136: Replacing The Dc Surge Protection Devices
10 Maintenance Replacing the DC surge protection devices 10.9 Replacing the DC surge protection devices DANGER Electric shock Potentially fatal voltages are present in the inverter during operation. When the inverter is disconnected from all power sources, this voltage remains in the inverter for up to 60 seconds. - Page 137 10 Maintenance Replacing the DC surge protection devices 3. Pull out the signal cable. 4. If the Wi-Fi module is installed, pull out the Wi-Fi cable. Installation and Operation Manual for Solar Power Inverter M70A EU V2.0 EN 2020-08-03...
- Page 138 10 Maintenance Replacing the DC surge protection devices 5. Loosen all screws on the printed circuit board with the DC surge protection devices and remove the printed circuit board. Installation and Operation Manual for Solar Power Inverter M70A EU V2.0 EN 2020-08-03...
- Page 139 10 Maintenance Replacing the DC surge protection devices 6. Install the new printed circuit board and tighten all screws on the printed circuit board. Installation and Operation Manual for Solar Power Inverter M70A EU V2.0 EN 2020-08-03...
- Page 140 10 Maintenance Replacing the DC surge protection devices 7. Plug in the signal cable. 8. Plug in the power supply cable of internal fan 2. 9. If the Wi-Fi module is installed, plug in the Wi-Fi cable. 10. Insert the cover for the DC surge protection devices. 11.
-
Page 141: Replacing The Ac Surge Protection Devices
10 Maintenance Replacing the AC surge protection devices 10.10 Replacing the AC surge protection devices DANGER Electric shock Potentially fatal voltages are present in the inverter during operation. When the inverter is disconnected from all power sources, this voltage remains in the inverter for up to 60 seconds. - Page 142 10 Maintenance Replacing the AC surge protection devices 2. Pull out both cables from the top of the printed circuit board. 3. Loosen all screws on the printed circuit board with the AC surge protection devices and remove the printed circuit board.
- Page 143 10 Maintenance Replacing the AC surge protection devices 4. Install the new printed circuit board and tighten all screws on the printed circuit board. 5. Plug the two cables into the top of the printed circuit board. Installation and Operation Manual for Solar Power Inverter M70A EU V2.0 EN 2020-08-03...
- Page 144 10 Maintenance Replacing the AC surge protection devices 6. Mount and screw on the cover of the AC surge protection devices. Installation and Operation Manual for Solar Power Inverter M70A EU V2.0 EN 2020-08-03...
-
Page 145: Replacing The Sub-1G Antenna
10 Maintenance Replacing the Sub-1G antenna 10.11 Replacing the Sub-1G antenna 1. Unscrew the mounting frame. 2. Rotate the mounting frame with the Sub-1G antenna downward. 3. Pull the mounting frame downward. Installation and Operation Manual for Solar Power Inverter M70A EU V2.0 EN 2020-08-03... - Page 146 10 Maintenance Replacing the Sub-1G antenna 4. Unscrew the Sub-1G antenna. 5. Mount the new Sub-1G antenna and screw it on so that it can still be rotated. 6. Rotate the Sub-1G antenna downward. Installation and Operation Manual for Solar Power Inverter M70A EU V2.0 EN 2020-08-03...
- Page 147 10 Maintenance Replacing the Sub-1G antenna 7. Slide the mounting frame over the Sub-1G antenna upside down from below. 8. Rotate the mounting frame with the Sub-1G antenna upward. 9. Screw on the mounting frame. Installation and Operation Manual for Solar Power Inverter M70A EU V2.0 EN 2020-08-03...
-
Page 148: Replacing The Wi-Fi Module
10 Maintenance Replacing the Wi-Fi module 10.12 Replacing the Wi-Fi module 1. Remove the cover from the DC surge protection devices. 2. Pull out the Wi-Fi module cable at the top of the card with the DC surge protection devices. 3. - Page 149 10 Maintenance Replacing the Wi-Fi module 4. Unscrew and remove the Wi-Fi module. 5. Mount and screw on the Wi-Fi module. Installation and Operation Manual for Solar Power Inverter M70A EU V2.0 EN 2020-08-03...
- Page 150 10 Maintenance Replacing the Wi-Fi module 6. Thread the cable through the cable gland and seal. 7. Insert the seal and cable gland of the Wi-Fi connection and screw the cable gland in place. Installation and Operation Manual for Solar Power Inverter M70A EU V2.0 EN 2020-08-03...
-
Page 151: Finishing The Maintenance Work - Connecting The Inverter To The Grid (Ac) And Solar Modules (Dc)
10 Maintenance Finishing the maintenance work - connecting the inverter to the grid (AC) and solar modules (DC) 10.13 Finishing the maintenance work - con- necting the inverter to the grid (AC) and solar modules (DC) 1. Plug in and tighten the conductors of the AC cable. 2. - Page 152 10 Maintenance Finishing the maintenance work - connecting the inverter to the grid (AC) and solar modules (DC) 2. Close the door. 3. Close the upper and lower door locks. 4. Close and tighten the cover of the upper door lock. Installation and Operation Manual for Solar Power Inverter M70A EU V2.0 EN 2020-08-03...
- Page 153 10 Maintenance Finishing the maintenance work - connecting the inverter to the grid (AC) and solar modules (DC) 5. Close and tighten the cover of the lower door lock. 6. Insert the Allen key into the upper door lock. Installation and Operation Manual for Solar Power Inverter M70A EU V2.0 EN 2020-08-03...
- Page 154 10 Maintenance Finishing the maintenance work - connecting the inverter to the grid (AC) and solar modules (DC) 7. Plug in the DC cables. 8. Close the isolating switch between the inverter and the grid connection point or inverter and the solar modules. 9.
-
Page 155: Replacing The Inverter
It is best to wait before removing the old inverter of the connections can be restored acciden- until you have received the replacement device tally. from Delta Electronics. 3. Wait at least 60 seconds for the internal capacitors to discharge. There is normally an isolating switch (for example... -
Page 156: Special Notes On Replacement
If you are continuing to use the components of the old inverter, attach the appropriate parts of the replacement device to the old inverter before returning it to Delta Electronics. This is also necessary to ensure that all openings of the inverter are properly closed and that no moisture can enter during transportation. -
Page 157: Sequence Of Work Steps
11 Replacing the inverter Sequence of work steps 11.2 Sequence of work steps Step Notice Description in chapter “11.4 Disconnecting the inverter from the grid (AC) Disconnect the inverter from AC and DC and solar modules (DC)”, page 158 Remove the communication cable “11.5 Remove the communication cable”, page 163 Dismantle the combined AC surge protec- “11.6 Dismantling the type 1+2 combined AC surge... -
Page 158: Disconnecting The Inverter From The Grid (Ac) And Solar Modules (Dc)
11 Replacing the inverter Disconnecting the inverter from the grid (AC) and solar modules (DC) 11.4 Disconnecting the inverter from the grid (AC) and solar modules (DC) 1. To shut off the inverter at the grid, open the load-break switch between the inverter and the grid connection point. Secure the load-break switch to prevent it from being switched back on accidentally. - Page 159 11 Replacing the inverter Disconnecting the inverter from the grid (AC) and solar modules (DC) 5. Unscrew and open the upper door lock cover. 6. Unscrew and open the lower door lock cover. Installation and Operation Manual for Solar Power Inverter M70A EU V2.0 EN 2020-08-03...
- Page 160 11 Replacing the inverter Disconnecting the inverter from the grid (AC) and solar modules (DC) 7. Open the upper door lock. 8. Open the lower door lock. 9. Open the door and secure it on top with the Allen key. Installation and Operation Manual for Solar Power Inverter M70A EU V2.0 EN 2020-08-03...
- Page 161 11 Replacing the inverter Disconnecting the inverter from the grid (AC) and solar modules (DC) 10. Use a voltmeter to check that there is no longer any volt- age at the marked connections. → If voltage is present, open the external load-break switch of the AC line and check that both DC discon- nectors are in the OFF position.
- Page 162 11 Replacing the inverter Disconnecting the inverter from the grid (AC) and solar modules (DC) 13. Unscrew the conductors of the AC cable and pull out the AC cable. Installation and Operation Manual for Solar Power Inverter M70A EU V2.0 EN 2020-08-03...
-
Page 163: Remove The Communication Cable
11 Replacing the inverter Remove the communication cable 11.5 Remove the communication cable 1. Remove all cables from the communication card. 2. Unscrew the cable gland of the communication connection and remove the cable, cable gland and seal. Installation and Operation Manual for Solar Power Inverter M70A EU V2.0 EN 2020-08-03... -
Page 164: Dismantling The Type 1+2 Combined Ac Surge Protection Device (Optional)
11 Replacing the inverter Dismantling the type 1+2 combined AC surge protection device (optional) 11.6 Dismantling the type 1+2 combined AC surge protection device (optional) If you have installed the type 1+2 combined AC surge protection devices, you must remove them before returning the inverter. - Page 165 11 Replacing the inverter Dismantling the type 1+2 combined AC surge protection device (optional) 3. Loosen all screws on the printed circuit board with the AC surge protection devices and remove the printed circuit board. 4. Mount and screw on the cover of the AC surge protection devices.
- Page 166 11 Replacing the inverter Dismantling the type 1+2 combined AC surge protection device (optional) Installation and Operation Manual for Solar Power Inverter M70A EU V2.0 EN 2020-08-03...
-
Page 167: Dismantling The Type 1+2 Combined Dc Surge Protection Device (Optional)
11 Replacing the inverter Dismantling the type 1+2 combined DC surge protection device (optional) 11.7 Dismantling the type 1+2 combined DC surge protection device (optional) If you have installed the type 1+2 combined DC surge protection devices, you must remove them before returning the inverter. - Page 168 11 Replacing the inverter Dismantling the type 1+2 combined DC surge protection device (optional) 4. If the Wi-Fi module is installed, pull out the Wi-Fi cable. 5. Loosen all screws on the printed circuit board with the DC surge protection devices and remove the printed circuit board.
- Page 169 11 Replacing the inverter Dismantling the type 1+2 combined DC surge protection device (optional) 6. Insert the cover for the DC surge protection devices. Installation and Operation Manual for Solar Power Inverter M70A EU V2.0 EN 2020-08-03...
-
Page 170: Dismantling The Sub-1G Antenna (Optional)
11 Replacing the inverter Dismantling the Sub-1G antenna (optional) 11.8 Dismantling the Sub-1G antenna (op- tional) 1. Unscrew the mounting frame. 2. Rotate the mounting frame with the Sub-1G antenna downward. 3. Pull the mounting frame downward. Installation and Operation Manual for Solar Power Inverter M70A EU V2.0 EN 2020-08-03... - Page 171 11 Replacing the inverter Dismantling the Sub-1G antenna (optional) 4. Unscrew and remove the Sub-1G antenna. Installation and Operation Manual for Solar Power Inverter M70A EU V2.0 EN 2020-08-03...
-
Page 172: Dismantling The Wi-Fi Module (Optional)
11 Replacing the inverter Dismantling the Wi-Fi module (optional) 11.9 Dismantling the Wi-Fi module (optional) If you have installed the Wi-Fi module, you must remove it before returning the inverter. The replacement device does not come with a Wi-Fi module. 1. - Page 173 11 Replacing the inverter Dismantling the Wi-Fi module (optional) 4. Unscrew and remove the Wi-Fi module. 5. Insert the cover for the DC surge protection devices. Installation and Operation Manual for Solar Power Inverter M70A EU V2.0 EN 2020-08-03...
-
Page 174: Removing And Packing The Inverter
11 Replacing the inverter Removing and packing the inverter 11.10 Removing and packing the inverter WARNING Heavy weight The inverter is heavy. ► Lift and carry the inverter with at least 2 people. 1. Unscrew the grounding cable on the inverter. 2. - Page 175 4. Place all components of the replacement device that will not be needed back into the box. 5. Package and ship the old inverter in accordance with the notes received from Delta Customer Service. 6. Install and commission the new inverter in accordance with the installation instructions supplied.
- Page 176 Installation and Operation Manual for Solar Power Inverter M70A EU V2.0 EN 2020-08-03...
-
Page 177: Installing Accessories After Commissioning
12 Installing accessories after commissioning Safety Instructions Installing accessories after commis- WARNING sioning Electric shock The IP65 protection degree is no longer guaran- 12.1 Safety Instructions teed when the door is open. ► Only open the door when absolutely necessary. DANGER ►... -
Page 178: Making Preparations For Work - Disconnecting The Inverter From The Grid (Ac) And Solar Modules (Dc)
12 Installing accessories after commissioning Making preparations for work – disconnecting the inverter from the grid (AC) and solar modules (DC) 12.2 Making preparations for work – discon- necting the inverter from the grid (AC) and solar modules (DC) 1. To shut off the inverter at the grid, open the load-break switch between the inverter and the grid connection point. - Page 179 12 Installing accessories after commissioning Making preparations for work – disconnecting the inverter from the grid (AC) and solar modules (DC) 5. Unscrew and open the upper door lock cover. 6. Unscrew and open the lower door lock cover. Installation and Operation Manual for Solar Power Inverter M70A EU V2.0 EN 2020-08-03...
- Page 180 12 Installing accessories after commissioning Making preparations for work – disconnecting the inverter from the grid (AC) and solar modules (DC) 7. Open the upper door lock. 8. Open the lower door lock. 9. Open the door and secure it on top with the Allen key. Installation and Operation Manual for Solar Power Inverter M70A EU V2.0 EN 2020-08-03...
- Page 181 12 Installing accessories after commissioning Making preparations for work – disconnecting the inverter from the grid (AC) and solar modules (DC) 10. Use a voltmeter to check that there is no longer any volt- age at the marked connections. → If voltage is present, open the external load-break switch of the AC line and check that both DC discon- nectors are in the OFF position.
- Page 182 12 Installing accessories after commissioning Making preparations for work – disconnecting the inverter from the grid (AC) and solar modules (DC) 13. Unscrew the conductors of the AC cable and pull out the AC cable. Installation and Operation Manual for Solar Power Inverter M70A EU V2.0 EN 2020-08-03...
-
Page 183: Installing The Type 1+2 Combined Dc Surge Protection Devices After Commissioning
12 Installing accessories after commissioning Installing the type 1+2 combined DC surge protection devices after commissioning 12.3 Installing the type 1+2 combined DC surge protection devices after commissioning 1. Remove the cover from the DC surge protection devices. 2. Pull out the power supply cable of internal fan 2. 3. - Page 184 12 Installing accessories after commissioning Installing the type 1+2 combined DC surge protection devices after commissioning 5. Loosen all screws on the printed circuit board and remove the type 2 DC surge protection devices. Installation and Operation Manual for Solar Power Inverter M70A EU V2.0 EN 2020-08-03...
- Page 185 12 Installing accessories after commissioning Installing the type 1+2 combined DC surge protection devices after commissioning 6. Insert the type 1+2 combined DC surge protection devices and tighten all screws of the printed circuit board. Installation and Operation Manual for Solar Power Inverter M70A EU V2.0 EN 2020-08-03...
- Page 186 12 Installing accessories after commissioning Installing the type 1+2 combined DC surge protection devices after commissioning 7. Plug in the signal cable. 8. Plug in the power supply cable of internal fan 2. 9. If the Wi-Fi module is installed, plug in the Wi-Fi cable. 10.
-
Page 187: Installing The Type 1+2 Combined Ac Surge Protection Devices After Commissioning
12 Installing accessories after commissioning Installing the type 1+2 combined AC surge protection devices after commissioning 12.4 Installing the type 1+2 combined AC surge protection devices after commis- sioning 1. Unscrew and remove the cover of the type 2 AC surge protection devices. - Page 188 12 Installing accessories after commissioning Installing the type 1+2 combined AC surge protection devices after commissioning 3. Loosen all screws on the printed circuit board with the AC surge protection devices and remove the printed circuit board. 4. Install the new printed circuit board and tighten all screws on the printed circuit board.
- Page 189 12 Installing accessories after commissioning Installing the type 1+2 combined AC surge protection devices after commissioning 5. Plug the two cables into the top of the printed circuit board. 6. Mount and screw on the cover of the AC surge protection devices.
- Page 190 12 Installing accessories after commissioning Installing the type 1+2 combined AC surge protection devices after commissioning 7. To complete the installation work, follow the instructions in the following section: “12.6 Finishing the work - connect- ing the inverter to the grid (AC) and solar modules (DC)”, page 194.
- Page 191 12 Installing accessories after commissioning Installing the Wi-Fi module after commissioning 12.5 Installing the Wi-Fi module after com- missioning 1. Unscrew the cable gland of the Wi-Fi connection and remove the cable gland and seal. 2. Mount and fasten the Wi-Fi module. Installation and Operation Manual for Solar Power Inverter M70A EU V2.0 EN 2020-08-03...
- Page 192 12 Installing accessories after commissioning Installing the Wi-Fi module after commissioning 3. Thread the cable through the cable gland and seal. 4. Remove the cover from the DC surge protection devices. 5. Plug the cable into the power supply connection on the printed circuit board with the DC surge protection devices.
- Page 193 12 Installing accessories after commissioning Installing the Wi-Fi module after commissioning 6. Mount the cover of the DC surge protection devices. 7. Insert the seal and cable gland of the Wi-Fi connection and screw the cable gland in place. 8. To complete the installation work, follow the instructions in the following section: “12.6 Finishing the work - connect- ing the inverter to the grid (AC) and solar modules (DC)”, page 194.
- Page 194 12 Installing accessories after commissioning Finishing the work - connecting the inverter to the grid (AC) and solar modules (DC) 12.6 Finishing the work - connecting the inverter to the grid (AC) and solar mod- ules (DC) 1. Insert the Ac cable and cable gland and screw the cable gland in place.
- Page 195 12 Installing accessories after commissioning Finishing the work - connecting the inverter to the grid (AC) and solar modules (DC) 4. Close the door. 5. Close the upper and lower door locks. 6. Close and tighten the cover of the upper door lock. Installation and Operation Manual for Solar Power Inverter M70A EU V2.0 EN 2020-08-03...
- Page 196 12 Installing accessories after commissioning Finishing the work - connecting the inverter to the grid (AC) and solar modules (DC) 7. Close and tighten the cover of the lower door lock. 8. Insert the Allen key into the upper door lock. Installation and Operation Manual for Solar Power Inverter M70A EU V2.0 EN 2020-08-03...
- Page 197 12 Installing accessories after commissioning Finishing the work - connecting the inverter to the grid (AC) and solar modules (DC) 9. Plug in the DC cables. 10. Turn both DC isolating switches to the ON position. 11. Close the isolating switch between the inverter and the grid connection point or inverter and the solar modules.
- Page 198 13 Technical Data Technical Data Input (DC) M70A Recommended maximum PV power 125 kW Maximum input power (per MPP Tracker/total) 15.7 kW/78.5 kW Rated power 70 kW 1100 V Maximum input voltage Infeed stopped at > 1000 V Operating input voltage range 200 …...
- Page 199 Amphenol UTX H4 2x RS485, 2x dry contacts, 1x external power-off, 6x digital inputs, Communication interfaces 1x Sub-1G antenna, 1x Wi-Fi module (optional accessory) General specifications M70A Delta model name M70A_260 Delta part number RPI703M260000 Maximum efficiency 98.8% EU efficiency 98.4%...
- Page 200 Other European countries support.europe@solar-inverter.com +49 7641 455 549 © Copyright – Delta Electronics (Netherlands) B.V. – All rights reserved. All information and specifications can be modified without prior notice. Installation and Operation Manual for Solar Power Inverter M70A EU V2.0 EN 2020-08-03...
Need help?
Do you have a question about the M70A 260 and is the answer not in the manual?
Questions and answers