Table of Contents
Advertisement
Quick Links
Advertisement
Table of Contents

Related Manuals for Metrohm 869


Summary of Contents for Metrohm 869
- Page 1 869 Compact Sample Changer Manual 8.869.8002EN...
- Page 3 Metrohm AG CH-9101 Herisau Switzerland Phone +41 71 353 85 85 Fax +41 71 353 89 01 info@metrohm.com www.metrohm.com 869 Compact Sample Changer Manual 8.869.8002EN 11/2009 dm...
- Page 4 Teachware Metrohm AG CH-9101 Herisau teachware@metrohm.com This documentation is protected by copyright. All rights reserved. Although all the information given in this documentation has been checked with great care, errors cannot be entirely excluded. Should you notice any mistakes please send us your comments using the address...
-
Page 5: Table Of Contents
Mounting the cable cover and the safety shield ..... 25 4 Automation sequences Dipping in special ............... 26 Dipping in special 2 ............27 Double dipping ..............28 Rinsing in sample ..............29 Rinsing in special ..............30 Pump control ..............31 ■■■■■■■■ 869 Compact Sample Changer... - Page 6 Automation: Dipping in special ......... 55 Automation: Dipping in special 2 ........56 Automation: Double dipping ..........57 Automation: Rinsing in sample ......... 58 Automation: Rinsing in special .......... 59 8 Handling and maintenance General ................61 ■■■■■■■■ 869 Compact Sample Changer...
- Page 7 ■■■■■■■■■■■■■■■■■■■■■■ Table of contents Quality Management and validation with Metrohm ..61 9 Appendix Remote interface ..............63 9.1.1 Pin assignment of the remote interface ........63 9.1.2 Status diagram of the remote interface ........64 Stirring rate ................. 64 USB devices .................
- Page 8 ..................... 17 Figure 12 Remote cable with lettering ............. 18 Figure 13 Remote connection 869 Compact Sample Changer - Titrino plus ..19 Figure 14 Remote connection Dosimat plus - 869 Compact Sample Changer - Titrino plus ..................19...
-
Page 9: Introduction
1 Introduction Instrument description The 869 Compact Sample Changer is a sample changer for titration that can be put to a wide number of uses. It is the central control device in an automation system that can include, in addition to a titrator, a Dosimat (for adding auxiliary solutions) and a pump for rinsing and aspirating the sample vessels. -
Page 10: About The Documentation
This symbol draws attention to a possible hazard due to heat or hot instrument parts. Warning This symbol draws attention to a possible biological hazard. Caution This symbol draws attention to a possible damage of instruments or instrument parts. ■■■■■■■■ 869 Compact Sample Changer... -
Page 11: Safety Instructions
The electrical safety when working with the instrument is ensured as part of the international standard IEC 61010. Warning Only personnel qualified by Metrohm are authorized to carry out service work on electronic components. Warning Never open the housing of the instrument. The instrument could be damaged by this. -
Page 12: Tubing And Capillary Connections
Personnel safety Warning Wear protective goggles and working clothes suitable for laboratory work while operating the 869 Compact Sample Changer . It is also advisable to wear gloves when caustic liquids are used or in situations where glass vessels could break. -
Page 13: Flammable Solvents And Chemicals
Warning The 869 Compact Sample Changer is not suitable for utilization in bio- chemical, biological or medical environments in its basic equipment ver- sion. - Page 14 ■■■■■■■■■■■■■■■■■■■■■■ 1.3 Safety instructions More details about the disposal of your old equipment can be obtained from your local authorities, from waste disposal companies or from your local dealer. ■■■■■■■■ 869 Compact Sample Changer...
-
Page 15: Overview Of The Instrument
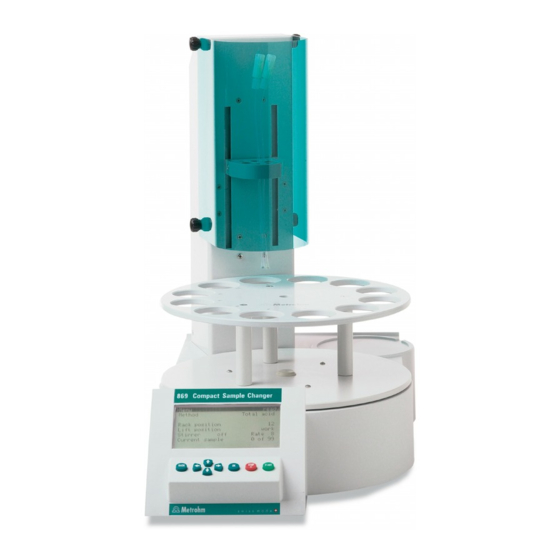
■■■■■■■■■■■■■■■■■■■■■■ 2 Overview of the instrument 2 Overview of the instrument Figure 1 Front 869 Compact Sample Changer Safety shield Sample rack With knurled screws for mounting. The For 11 sample beakers and 1 rinsing beaker safety shield can be folded up. -
Page 16: Figure 2 Rear 869 Compact Sample Changer
■■■■■■■■■■■■■■■■■■■■■■ Figure 2 Rear 869 Compact Sample Changer Warning symbol Tubing and cable cover (see Chapter 1.3.4, page 4) Remote connector USB (OTG) connector For connecting instruments with a remote For connecting printers, USB sticks, USB interface. D-Sub, 9-pin. hubs, etc. -
Page 17: Installation
Place the instrument in a location of the laboratory which is suitable for operation, free of vibrations, protected from corrosive atmosphere, and contamination by chemicals. The instrument should be protected against excessive temperature fluctu- ations and direct sunlight. ■■■■■■■■ 869 Compact Sample Changer... -
Page 18: Removing The Safety Shield And Cable Cover
1 Loosen the knurled screws on the sides of the tower and remove the safety shield. 2 Loosen the knurled screws on the rear of the tower and remove the cable cover. Do not forget to refasten these two shields after the installation of the accessories. ■■■■■■■■ 869 Compact Sample Changer... -
Page 19: Setting Up The Titration Head
5 Manually screw the two enclosed 6.1805.110 FEP tubings firmly to the dosing tips mounted on the titration head. Connect the two other ends of the tubings with the exchange units on the titrator or on the Dosimat. ■■■■■■■■ 869 Compact Sample Changer... -
Page 20: Figure 5 Installing Rinsing Nozzles And Aspiration Tip
It can be adjusted in terms of height and its tip can be cut as required to the necessary length. 4 Manually screw the 6.1805.200 aspiration tubing (with M8 thread) firmly to the aspiration tip. ■■■■■■■■ 869 Compact Sample Changer... -
Page 21: Figure 6 Setting Up The Distributor
Note Enclosed with the 869 Compact Sample Changer is the 6.1815.010 spiral band. You can wrap cables and tubings with it. This will ensure that the cables and tubings are arranged in an organized manner. -
Page 22: Connecting A Stirrer
5 Use the four knurled screws to remount the cable and tubing cover. Caution Close the safety shield again after the titration head has been equipped. The 869 Compact Sample Changer is not permitted to be operated unless the safety shield is correctly mounted. Connecting a stirrer A DIN socket for connecting a rod stirrer 802 Stirrer is located on the rear of the instrument. -
Page 23: Connecting Keyboard, Printer And Other Usb Devices
3 Installation Connecting keyboard, printer and other USB devices The 869 Compact Sample Changer has a USB (OTG) connector. Use the provided 6.2151.100 adapter USB MINI (OTG) - USB A for connecting USB devices as e.g. printers, keyboards or USB sticks, see the following figure. -
Page 24: Figure 10 Connecting The Usb Stick
USB hubs are available in specialty stores in a number of different models. The USB (OTG) connector of the 869 Compact Sample Changer has no such hub. The 6.2147.000 numerical USB keypad has a USB hub and two USB connectors. -
Page 25: Remote Connections
Connecting the 6.2147.000 USB keyboard with USB stick and printer Remote connections The 869 Compact Sample Changer can be used as a control instrument for a simple automation system with a large variety of different instru- ments. Even older Metrohm instruments can thus be integrated into an automated analysis system. -
Page 26: Example Systems
■ directly at the 869 Compact Sample Changer . The signal lines at the metallic plug (connector at the 869 Compact Sam- ple Changer or at the Remote 2 connector of the 843 Pump Station) are divided up into two different strands. The cable end that is printed with 865 must be connected with a 6.2141.240 or 6.2136.010 Dosimat con-... -
Page 27: Figure 13 Remote Connection 869 Compact Sample Changer - Titrino Plus
Figure 13 Remote connection 869 Compact Sample Changer - Titrino plus The sample series is started on the 869 Compact Sample Changer 869 — Titrino plus — Dosimat plus For determinations with addition of auxiliary solutions, without rinsing or aspiration. -
Page 28: Figure 15 Remote Connection 869 Compact Sample Changer - 843 Pump Station
Remote connection 869 Compact Sample Changer - 843 Pump Station - Titrino plus At the 843 Pump Station, the 869 is connected to Remote 1, the Titrino plus to Remote 2. Pump 1 is used for rinsing the electrode, Pump 2 for aspirating the sample solution. -
Page 29: Figure 17 Remote Connection 869 Compact Sample Changer - 843 Pump Station - Titrino Plus - Dosimat Plus
XDOS mode. The volume of the auxiliary solution is defined at the Dosimat plus. At the 843 Pump Station, the 869 is con- nected to Remote 1, the Titrino plus to Remote 2. Pump 1 is used for rinsing the electrode, Pump 2 for aspirating the sample solution. -
Page 30: Figure 18 Remote Connection Dosimat - 869 Compact Sample Changer
■■■■■■■■■■■■■■■■■■■■■■ 3.6 Remote connections this cable. The sample series is started on the 869 Compact Sample Changer 869 — Titrino For determinations with a Titrino of the 7xx series, without rinsing or aspi- ration. 869 Compact Sample Changer Titrino 6 . 2 1 4 1 . 2 5 0 / 6 . -
Page 31: Figure 19 Remote Connection Dosimat - 869 Compact Sample Changer - 843
The Dosimat plus is operated in DIS mode. The volume of the auxiliary solution is defined at the Dosimat. At the 843 Pump Station, the 869 is connected to Remote 1, the Titrino plus to Remote 2. Pump 1 is used for rinsing the electrode, Pump 2 for aspirating the sample solution. -
Page 32: Connecting The Mains Cable
Pump Unit - Remote Box - 867 pH Module / Conductivity Module The 843 Pump Station is controlled by the 869 Compact Sample Changer . The 6.2148.010 Remote Box must be connected to MSB 1 of the 867 pH Module or the 856 Conductivity Module. The sample series is started on... -
Page 33: Mounting The Cable Cover And The Safety Shield
When each of the lower knurled screws is slightly loosened, the safety shield can be folded up if needed. Warning The 869 Compact Sample Changer may not be operated without a safety shield! ■■■■■■■■ 869 Compact Sample Changer... -
Page 34: Automation Sequences
Wait for Rinsing time to be completed ■ Switch off the stirrer and move the lift upward ■ Wait for Dripping time to be completed ■ After the last sample: Lower the lift in the rinsing beaker to work position ■ ■■■■■■■■ 869 Compact Sample Changer... -
Page 35: Dipping In Special 2
Switch off the stirrer and move the lift upward ■ Wait for Dripping time to be completed ■ After the last sample: Move to special beaker position ■ Lower the lift in the rinsing beaker to work position ■ ■■■■■■■■ 869 Compact Sample Changer... -
Page 36: Double Dipping
Wait for Rinsing time to be completed ■ Switch off the stirrer and move the lift upward ■ Wait for Dripping time to be completed ■ After the last sample: Lower the lift in the rinsing beaker to work position ■ ■■■■■■■■ 869 Compact Sample Changer... -
Page 37: Rinsing In Sample
Switch off the aspiration pump and move the lift upward ■ Wait for Dripping time to be completed ■ After the last sample: Moving to special beaker position ■ Lower the lift to work position ■ ■■■■■■■■ 869 Compact Sample Changer... -
Page 38: Rinsing In Special
After the last sample: Lower the lift in the rinsing beaker to work position ■ Switch on the rinsing pump and wait for Rinsing time to be comple- ■ ted. Switch off the rinsing pump ■ ■■■■■■■■ 869 Compact Sample Changer... -
Page 39: Pump Control
Dosing auxiliary solutions The addition of an auxiliary solution can be carried out with a 6xx/7xx Dosimat or a Dosimat plus. This is connected via remote cable to the 869 Compact Sample Changer (see Chapter 3.6.2, page 18). The method runs of the 869 Compact Sample Changer start the dosing on the Dosimat immediately prior to a determination. -
Page 40: Operation
Proceed as follows: Keep the red [STOP] key pressed down for at least 3 s. ■ A progress bar is displayed. If the key is released during this time, then the instrument will not be switched off. ■■■■■■■■ 869 Compact Sample Changer... -
Page 41: Fundamentals Of Operation
5 Operation Fundamentals of operation 5.2.1 The keypad Figure 24 Keypad 869 Compact Sample Changer BACK Apply the input and exit the dialog. ⇧ ⇩ Move the selection bar either up or down by one line at a time. Select the character to be entered in the text editor. -
Page 42: Navigating In The Dialog
Editing function Description Accept The modification is applied and the editing dialog is exited. Cancel The editing dialog is exited without applying the modification. Delete The contents of the input field is deleted com- pletely. ■■■■■■■■ 869 Compact Sample Changer... -
Page 43: Methods
The [BACK] key has the same function as Accept. Methods The 869 Compact Sample Changer works with process methods that are based on specified method templates. Individual working steps of a method run can be individually parameterized, depending on the applica- tion. -
Page 44: Creating A New Method
■ The method template is now loaded and is displayed in the main dia- log under Method. If a new method has been created, then the individual parameters can be modified under Menu ▶ Parameters. ■■■■■■■■ 869 Compact Sample Changer... -
Page 45: Saving A Method
Press [OK]. ■ The text editor opens. Enter a method name (max. 12 characters) and apply with ■ Accept or [BACK]. Press [BACK]. ■ The method will be saved and the method table is displayed. ■■■■■■■■ 869 Compact Sample Changer... -
Page 46: Loading A Method
This function is possible only if a USB stick is connected as an external storage medium. To export a method, proceed as follows: 1 Open the method table In the main dialog, select Method and press [OK]. ■ The method table with the stored methods opens: ■■■■■■■■ 869 Compact Sample Changer... -
Page 47: Performing A Sample Series
Entering the sample data, such as sample size, etc. (enable the Sam- ■ ple table/Silo) Loading the determination method ■ Deactivating the Autostart function. ■ Rinsing the electrode ■ Flushing the tubing (PREP function) ■ ■■■■■■■■ 869 Compact Sample Changer... -
Page 48: Starting The Sample Series
The value for the number of samples remains saved for the next sam- ple series. The position of the first sample is increased with each method run. You can still cancel the start of the sample series at this time with [BACK] or [STOP]. ■■■■■■■■ 869 Compact Sample Changer... -
Page 49: Pausing A Sample Series And Continuing
5.4.2 Pausing a sample series and continuing Interrupting a sample series A method run of the 869 Compact Sample Changer can be paused and then continued again. The connected instruments are however not stop- ped. No pausing is possible while the 869 Compact Sample Changer waits for the end of a determination. - Page 50 2 Press the [OK] key and enter the number of samples that still need to be processed. The current sample must be taken into account. 3 Press the [START] key. The sample series continues. ■■■■■■■■ 869 Compact Sample Changer...
-
Page 51: Printing A Report Manually
■ The report is printed out. The following reports can be printed out manually: Parameters Report with all method parameters of the loaded method. System System report with system settings, solution list, external devices, etc. ■■■■■■■■ 869 Compact Sample Changer... -
Page 52: Manual Control
At the same time, the starting position (Next sample pos.) is reset to 1 for the start of the next sample series. The rack position display is always updated as soon as the rack is in the new position. ■■■■■■■■ 869 Compact Sample Changer... -
Page 53: Moving The Lift
Switches off the stirrer if it is switched on. Stir– Reduces the stirring rate by one increment. Stir+ Increases the stirring rate by one increment. The status and the stirring rate that has been set are displayed in the main dialog. ■■■■■■■■ 869 Compact Sample Changer... - Page 54 When the stirrer is viewed from above, this means: "+": counterclockwise rotation ■ "–": clockwise rotation ■ –15 - 15 Input range Default value The stirring rate can also be modified when the stirrer is switched off. ■■■■■■■■ 869 Compact Sample Changer...
-
Page 55: System Settings
Current time. Only valid numbers can be entered. Format: hh:mm:ss Date Current date. Only valid numbers can be entered. Format: YYYY:MM:DD Language Setting the dialog language. In addition to English a further language can be selected. ■■■■■■■■ 869 Compact Sample Changer... - Page 56 If the limited dialog is activated for routine operations, then the expert dialog cannot be switched on during running operations. To change the dialog type, the 869 Compact Sample Changer must be switched off and then back on again. The expert dialog can be forced at the time the instrument is started.
-
Page 57: File Management
Methods can be imported and deleted from a USB stick in this dialog. Only methods located in the Files directory are displayed in the list (see "Directory structure on the USB stick", page 50). ■■■■■■■■ 869 Compact Sample Changer... - Page 58 Files Exported methods will be stored in this directory. The directory will be created the first time a method is exported. Only methods being located in this directory can be imported. ■■■■■■■■ 869 Compact Sample Changer...
-
Page 59: Lift Settings (Lift)
60 mm Initial lift pos. After the 869 Compact Sample Changer has been switched on, the lift moves all the way to the top (shift position) for initialization of the drive. It can then be moved back down to the working height if desired. -
Page 60: Configuring External Devices
Program files They are instrument-specific. The file name has the following structure: 5XXXyyyy.bin whereas XXX = Instrument type (e.g. 848 for the 848 Titrino plus) yyyy = Program version ■■■■■■■■ 869 Compact Sample Changer... - Page 61 Press [OK]. ■ The selection list with the program and language files available on the USB stick is opened. 4 Select the file Select the required file with the arrow keys. ■ Press [OK]. ■ ■■■■■■■■ 869 Compact Sample Changer...
-
Page 62: Diagnosis Functions
Electronic and mechanical functional groups in Metrohm instruments can and should be checked as part of regular maintenance by specialist per- sonnel from Metrohm. Please ask your local Metrohm agent regarding the precise terms and conditions involved in concluding a corresponding maintenance agreement. -
Page 63: Parameters
The algebraic sign of the stirring rate changes the direction in which the stirring is done. When the stirrer is viewed from above, this means: "+": counterclockwise rotation ■ "–": clockwise rotation ■ Input range –15 - 15 Default value ■■■■■■■■ 869 Compact Sample Changer... -
Page 64: Automation: Dipping In Special 2
The algebraic sign of the stirring rate changes the direction in which the stirring is done. When the stirrer is viewed from above, this means: "+": counterclockwise rotation ■ "–": clockwise rotation ■ Input range –15 - 15 Default value ■■■■■■■■ 869 Compact Sample Changer... -
Page 65: Automation: Double Dipping
The algebraic sign of the stirring rate changes the direction in which the stirring is done. When the stirrer is viewed from above, this means: "+": counterclockwise rotation ■ "–": clockwise rotation ■ Input range –15 - 15 Default value ■■■■■■■■ 869 Compact Sample Changer... -
Page 66: Automation: Rinsing In Sample
The algebraic sign of the stirring rate changes the direction in which the stirring is done. When the stirrer is viewed from above, this means: "+": counterclockwise rotation ■ "–": clockwise rotation ■ –15 - 15 Input range Default value ■■■■■■■■ 869 Compact Sample Changer... -
Page 67: Automation: Rinsing In Special
The algebraic sign of the stirring rate changes the direction in which the stirring is done. When the stirrer is viewed from above, this means: "+": counterclockwise rotation ■ ■■■■■■■■ 869 Compact Sample Changer... - Page 68 ■■■■■■■■■■■■■■■■■■■■■■ 7.5 Automation: Rinsing in special "–": clockwise rotation ■ –15 - 15 Input range Default value ■■■■■■■■ 869 Compact Sample Changer...
-
Page 69: Handling And Maintenance
8 Handling and maintenance 8 Handling and maintenance General The 869 Compact Sample Changer requires appropriate care. Excess con- tamination of the instrument may result in malfunctions and a reduction in the service life of the sturdy mechanics and electronics of the instru- ment. - Page 70 ■■■■■■■■■■■■■■■■■■■■■■ 8.2 Quality Management and validation with Metrohm Note You can find information on the subjects of quality management, vali- dation and maintenance as well as an overview of the documents cur- under Support. rently available at www.metrohm.com/com/ ■■■■■■■■ 869 Compact Sample Changer...
-
Page 71: Appendix
Pin assignment of the remote interface Figure 25 Pin assignment of remote socket and plug The above figure of the pin assignment applies for all Metrohm instru- ments with 9-pin D-Sub remote connectors. Table 1 Inputs and outputs of the remote interface Pin No. -
Page 72: Status Diagram Of The Remote Interface
The stirring rate can be adjusted in steps of –15 to +15. The approximate rotational speed can be calculated with the following formula: Rotational speed/min (r/min) = 125 · stirring rate Example: Stirring rate set: 8 Rotational speed in rpm = 125 · 8 = 1000 ■■■■■■■■ 869 Compact Sample Changer... -
Page 73: Usb Devices
The respective editing dialog must be opened for the number input. Table 2 Keyboard assignment Key of the 869 Compact Sam- Key on the numerical USB ple Changer or function in the keypad editing dialog... -
Page 74: Printer
■■■■■■■■■■■■■■■■■■■■■■ 9.4 System initialization Key of the 869 Compact Sam- Key on the numerical USB ple Changer or function in the keypad editing dialog Accept [Home] 9.3.2 Printer The range of USB printers available is extremely varied and constantly changing. The following points must be taken into account when select-... - Page 75 If the query is not confirmed within 8 s, then the procedure will be interrupted. Press [BACK] twice. ■ Initialization is started. The process takes approximately 80 s. The instrument will be automatically restarted after successful initializa- tion. ■■■■■■■■ 869 Compact Sample Changer...
-
Page 76: Technical Data
Adjustable in 15 steps each in both directions of rotation. USB (OTG) connec- For connecting USB devices. Remote connector For connecting instruments with a remote interface. 10.4 Mains connection Voltage 100…240 V Frequency 50…60 Hz Power consump- 45 W tion Fuse 1.0 ATH ■■■■■■■■ 869 Compact Sample Changer... -
Page 77: Safety Specifications
EN/IEC 61000-4-4 ■ EN/IEC 61000-4-5 ■ EN/IEC 61000-4-6 ■ EN/IEC 61000-4-11 ■ EN/IEC 61000-4-14 ■ NAMUR ■ 10.7 Ambient temperature Nominal function 5…45 °C range Humidity < 80 % Storage –20…60 °C Transport –40…60 °C ■■■■■■■■ 869 Compact Sample Changer... -
Page 78: Reference Conditions
25 °C (± 3 °C) ture ≤ 60 % Relative humidity 10.9 Dimensions Width 0.26 m Height 0.47 m Depth 0.43 m Weight 8.82 kg (without accessories) Material Housing Lower part: Crastin PBTP Lift: Metal, surface-treated Rack ■■■■■■■■ 869 Compact Sample Changer... -
Page 79: 11 Conformity And Warranty
Name of commodity 869 Compact Sample Changer Sample changer for automated processing of small sample series in analytical laboratories. -
Page 80: Warranty (Guarantee)
61010-1 and CSA-C22.2 No. 61010-1. This product is listed in Intertek’s Directory of Listed Products. Manufacturer Metrohm Ltd., CH-9101 Herisau/Switzerland Metrohm Ltd. is holder of the SQS certificate ISO 9001:2000 Quality man- agement system for development, production and sales of instruments and accessories for ion analysis. Herisau, 28 September 2009 D. -
Page 81: Quality Management Principles
Components All components used in the Metrohm instruments have to satisfy the qual- ity standards that are defined and implemented for our products. Suppli- ers of components are audited by Metrohm as the need arises. - Page 82 ■■■■■■■■■■■■■■■■■■■■■■ 11.3 Quality Management Principles tional Qualification and Performance Verification of the system compo- nents or in carrying out the System Validation for the quantitative determi- nation of a substance in a given matrix. ■■■■■■■■ 869 Compact Sample Changer...
-
Page 83: 12 Accessories
Subject to change without notice. 12.1 Scope of delivery 2.869.0010 Qty. Order no. Description 1.802.0010 802 Stirrer Rod stirrer. With fixed cable. 1.869.0010 869 Compact Sample Changer The 869 Compact Sample Changer allows automation in a minimum of space. ■■■■■■■■ 869 Compact Sample Changer... - Page 84 ■■■■■■■■■■■■■■■■■■■■■■ 12.1 Scope of delivery 2.869.0010 Qty. Order no. Description 6.1458.050 Titration head for 869 Compact Sample Changer Titrationhead with 3 x NS14, 4 x 6.4 mm and two inserted dosing tubings with anti-diffusion valve Material: 6.1459.300 Sample beaker / 120 mL / 100 pieces Sample beaker with screw cap for sampling, 100 pieces.
- Page 85 Propeller for 802 Stirrer when this is used with sample racks for 120 mL beakers (6.1459.300) Material: ETFE Length (mm): 6.2151.100 Adapter USB MINI (OTG) - USB A For connecting USB instruments. 6.2621.130 Hexagon key 2 mm 2 mm. 6.2621.140 Hexagon key 2.5 mm ■■■■■■■■ 869 Compact Sample Changer...
-
Page 86: Optional Accessories
6.2122.020 Germany, …: Type CEE(7), VII 6.2122.040 USA, …: Type NEMA/ASA 6.2122.070 8.869.8002EN 869 Compact Sample Changer Manual 12.2 Optional accessories Order no. Description 2.843.0020 843 Pump Station (membrane) The 843 Pump Station (membrane) has two built-in membrane pumps. These can be controlled directly via the interface using remote signals or manually by pressing a button. - Page 87 Compact Sample Changer The 843 Pump Station (membrane) has two built-in membrane pumps. These can be controlled directly from the 869 Compact Sample Changer via remote signals. The Rinse / Aspirate version is provided with all the accessories needed for automatically emptying the titration beaker and rinsing the titration equip- ment.
- Page 88 (e.g. Titrino plus or Pump Station). 6.2141.320 Remote cable 869 Compact Sample Changer to Remote box MSB Remote cable (9-pin) for the connection of a 869 Compact Sample Changer to Remote box MSB (6.2148.010). Length (m): 6.2147.000...
- Page 89 ■■■■■■■■■■■■■■■■■■■■■■ 12 Accessories Order no. Description 6.2151.120 Cable USB MINI (OTG) - USB B, 1.8 m For connecting USB instruments. ■■■■■■■■ 869 Compact Sample Changer...
-
Page 90: Index
Electrostatic charge ....4 Perform ......39 Expert dialog ......48 Prepare ....... 39 Operation Prolong ......42 General ......33 Resume ......42 FEP tubing ........ 11 Shorten ......42 FEP tubings ....... 12 Start ........40 ■■■■■■■■ 869 Compact Sample Changer... - Page 91 Warranty ........72 Controlling ......45 Working height ......51 Mount ........ 11 Update ........52 Work position ......51 Rate ........45 USB .......... 65 Stirring propeller ....... 11 Keypad ....... 65 Stirring rate ......64 ■■■■■■■■ 869 Compact Sample Changer...
Need help?
Do you have a question about the 869 and is the answer not in the manual?
Questions and answers