Table of Contents
Advertisement
Quick Links
Advertisement
Table of Contents

Subscribe to Our Youtube Channel
Related Manuals for HIKVISION DS-8104AHGHLI-E4


Summary of Contents for HIKVISION DS-8104AHGHLI-E4
- Page 1 Digital Video Recorder Quick Start Guide UD04622B-A...
-
Page 2: Table Of Contents
Digital Video Recorder Quick Start Guide TABLE OF CONTENTS Chapter 1Description of Panels ........................6 Front Panel ............................6 Rear Panel ............................7 Chapter 2Installation and Connections ......................9 DVR Installation ..........................9 Hard Disk Installation ........................9 Peripheral Connections ........................10 Wiring of Alarm Input ........................ - Page 3 (hereinafter referred to be “the Manual”) cannot be reproduced, changed, translated, or distributed, partially or wholly, by any means, without the prior written permission of Hikvision. Unless otherwise stipulated, Hikvision does not make any warranties, guarantees or representations, express or implied, regarding to the Manual.
- Page 4 Digital Video Recorder Quick Start Guide Regulatory Information FCC Information Please take attention that changes or modification not expressly approved by the party responsible for compliance could void the user’s authority to operate the equipment. FCC compliance: This equipment has been tested and found to comply with the limits for a Class A digital device, pursuant to part 15 of the FCC Rules.
- Page 5 Digital Video Recorder Quick Start Guide Safety Instruction These instructions are intended to ensure that user can use the product correctly to avoid danger or property loss. The precaution measure is divided into “Warnings” and “Cautions” Warnings: Serious injury or death may occur if any of the warnings are neglected. Cautions: Injury or equipment damage may occur if any of the cautions are neglected.
- Page 6 This manual is applicable to the models listed in the following table. Series Model DS-8104AHGHI-E4 ATM DVR DS-8104AHGHLI-E4 Symbol Conventions The symbols that may be found in this document are defined as follows. Symbol Description Indicates a potentially hazardous situation, which if not avoided, could result in equipment damage, data loss, performance degradation, or unexpected results.
-
Page 7: Chapter 1Description Of Panels
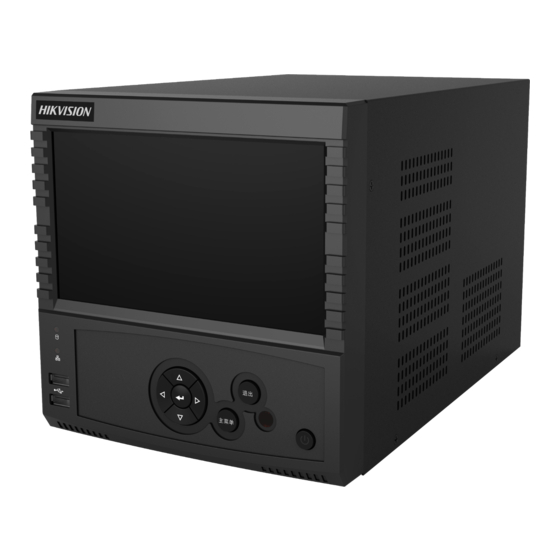
Digital Video Recorder Quick Start Guide Chapter 1 Description of Panels 1.1 Front Panel Refer to Figure 1.1 for the front panel of DS-8104AHGHLI-E4. Front Panel of DS-8104AHGHLI-E4 Figure 1. 1 There is no LCD screen for DS-8104AHGHI-E4 series ATM DVR. -
Page 8: Rear Panel
Digital Video Recorder Quick Start Guide Name Function Description modes. It can also be used to tick checkbox fields. In Playback mode, it can be used to play or pause the video. In single-frame Playback mode, pressing the button will advance the video by a single frame. - Page 9 Digital Video Recorder Quick Start Guide Rear Panel Figure 1. 2 Table 1. 2 Description of Rear Panel Item Description VIDEO IN BNC connector for analog video input. AUDIO IN RCA connector for audio input. LINE IN RCA connector for two-way audio. AUDIO OUT RCA connector for audio output.
-
Page 10: Chapter 2Installation And Connections
Digital Video Recorder Quick Start Guide Chapter 2 Installation and Connections 2.1 DVR Installation During the installation of the DVR: 1. Use brackets for rack mounting. 2. Ensure there is ample room for audio and video cables. 3. When installing cables, ensure that the bend radius of the cables are no less than five times than its diameter. 4. -
Page 11: Peripheral Connections
Digital Video Recorder Quick Start Guide 4. Tighten the screws on both sides of the bracket, and insert it to the chassis Install the Bracket Figure 2. 3 5. Tighten the 2 screws on top of the bracket. Tighten the Screw Figure 2. -
Page 12: Wiring Of Alarm Output
Digital Video Recorder Quick Start Guide Wiring of Alarm Input Figure 2. 6 Wiring of Alarm Output To connect to an alarm output (AC or DC load), use the following diagram: DC Load Connection Diagram Figure 2. 7 AC Load Connection Diagram Figure 2. -
Page 13: Alarm Connection
Digital Video Recorder Quick Start Guide Alarm Connection To connect alarm devices to the DVR: 1. Disconnect pluggable block from the ALARM IN /ALARM OUT terminal block. 2. Press and hold the orange part of the pluggable block; insert signal cables into slots and release the orange part. Ensure signal cables are in tight. -
Page 14: Termination Switch Connection
Digital Video Recorder Quick Start Guide Termination Switch Connection To connect the DVR with multiple speed domes, the bus topology can be adopted, which means the speed domes are connected with each other via the R+ and R- of RS-485 serial interface. Due to the impedance of 485 wire, the longer the wire is, the greater the impedance gets. -
Page 15: Hdd Storage Calculation Chart
Digital Video Recorder Quick Start Guide 2.4 HDD Storage Calculation Chart The following chart shows an estimation of storage space used based on recording at one channel for an hour at a fixed bit rate. Bit Rate Storage Used 128K 160K 192K 224K... -
Page 16: Chapter 3Menu Operation
Digital Video Recorder Quick Start Guide Chapter 3 Menu Operation 3.1 Menu Structure The menu structure varies according to different models. Menu Maintenance Configuration Shutdown Record Camera Playback Export Manual Schedule Camera General System Info Logout Normal Record Normal General Continuous Parameters Network... -
Page 17: Activating Your Device
Digital Video Recorder Quick Start Guide Check the power supply is plugged into an electrical outlet. It is HIGHLY recommended that an Uninterruptible Power Supply (UPS) be used in conjunction with the device. Turn on the power switch button on the rear panel after the power supply is connected. The Power indicator LED should turn red indicating that the device begins to start up. -
Page 18: Login And Logout
Digital Video Recorder Quick Start Guide STRONG PASSWORD RECOMMENDED– We highly recommend you create a strong password of your own choosing (using a minimum of 8 characters, including upper case letters, lower case letters, numbers, and special characters) in order to increase the security of your product. -
Page 19: User Logout
Digital Video Recorder Quick Start Guide In the Login interface, for the admin, if you have entered the wrong password for 7 times, the account will be locked for 60 seconds. For the operator, if you have entered the wrong password for 5 times, the account will be locked for 60 seconds. -
Page 20: Using The Setup Wizard
Digital Video Recorder Quick Start Guide After you have logged out the system, menu operation on the screen is invalid. It is required to input a user name and password to unlock the system. 3.5 Using the Setup Wizard The Setup Wizard can walk you through some important settings of the device. By default, the Setup Wizard starts once the device is activated. -
Page 21: General Settings
Digital Video Recorder Quick Start Guide 2. You can configure the following settings: NIC Type, IPv4 Address, IPv4 Gateway, MTU and DNS Server. If the DHCP server is available, you can click the checkbox of DHCP to automatically obtain an IP address and other network settings from that server. -
Page 22: Adding Ip Cameras
Digital Video Recorder Quick Start Guide Attention Box Figure 3. 12 If the external display is connected to the DVR via the HDMI or VGA interface, you can set the VGA/HDMI Resolution to be higher than 1024× 768/60Hz. The higher the resolution is, the worse the menu display effect of the LCD will be. - Page 23 Digital Video Recorder Quick Start Guide Steps: 1. Select the Add IP Camera option from the right-click menu in live view mode or click Menu> Camera> Camera to enter the IP camera management interface. Figure 3. 14 IP Camera Management 2.
-
Page 24: Live View
Digital Video Recorder Quick Start Guide click the Add button to add it. 3.9 Live View Some icons are provided on screen in Live View mode to indicate different camera status. These icons include: In the live view mode, there are icons at the right top of the screen for each channel, showing the status of the record and alarm in the channel, so that you can find problems as soon as possible. -
Page 25: Atm Settings
Digital Video Recorder Quick Start Guide Name Description Output Mode is configurable with Standard, Bright, Gentle and Vivid options. Output Mode Display/Hide Transaction Display/hide the transaction information on the live view. Information 3.10 ATM Settings Steps: Enter the ATM settings interface. Menu >... -
Page 26: Recording Settings
Digital Video Recorder Quick Start Guide Figure 3. 19 Data Package Settings Click Apply to finish the ATM settings. 3.11 Recording Settings Before you start: Make sure that the disk has already been installed. If not, please install a disk and initialize it. You may refer to the user manual for detailed information. -
Page 27: Playback
Digital Video Recorder Quick Start Guide Figure 3. 21 Attention Box The full-screen motion detection triggered recording is configured by default in this mode. 3.12 Playback Purpose: Play back the record files of a specific channel in the live view menu. Instant playback by channel Choose a channel under live view using the mouse and click the button in the shortcut operation menu. -
Page 28: Backup
Digital Video Recorder Quick Start Guide Figure 3. 23 Playback from Right-click Menu 2. Playback management. The toolbar in the bottom part of Playback interface can be used to control playing process. The channel and time selection menu will display by moving the mouse to the right of the playback interface. Tick the channel or channels if you want to switch playback to another channel or execute simultaneous playback of multiple channels. - Page 29 Digital Video Recorder Quick Start Guide Menu > Export > Normal Figure 3. 25 Normal Video Search for Backup 2. Set search conditions and click Search button to enter the search result interface. You can also choose the channel (s) you want to back up and click the Quick Export button to enter the export interface.
- Page 30 Digital Video Recorder Quick Start Guide Figure 3. 27 Export Interface...
-
Page 31: Chapter 4Accessing By Web Browser
Digital Video Recorder Quick Start Guide Chapter 4 Accessing by Web Browser You shall acknowledge that the use of the product with Internet access might be under network security risks. For avoidance of any network attacks and information leakage, please strengthen your own protection. If the product does not work properly, please contact with your dealer or the nearest service center. - Page 32 Digital Video Recorder Quick Start Guide Figure 4. 2 Login Install the plug-in before viewing the live video and managing the camera. Please follow the installation prompts to install the plug-in. You may have to close the web browser to finish the installation of the plug-in. After login, you can perform the operation and configuration of the device, including the live view, playback, log search, configuration, etc.
-
Page 33: Chapter 5Specifications
Digital Video Recorder Quick Start Guide Chapter 5 Specifications Model DS-8104AHGHI-E4 DS-8104AHGHLI-E4 Video compression H.264+/H.264 4-ch BNC interface (1.0 Vp-p, 75 Ω), TVI/CVBS self-adaptive Analog video input 720p25, 720p30, CVBS Video/Audio Defaulted 2-ch; Max. 6-ch (Disabling one analog channel can add... - Page 34 Digital Video Recorder Quick Start Guide Working -10 º C to +55 º C (+14 º F to +131 º F) temperature Working humidity 10% to 90% Dimensions 180 × 280 × 180 mm (7.1 × 11.0 × 7.1 inch) (W ×...
- Page 35 Digital Video Recorder Quick Start Guide...
Need help?
Do you have a question about the DS-8104AHGHLI-E4 and is the answer not in the manual?
Questions and answers