hager EGN200AU Manual
Bluetooth multi-function 2-channel and 4-channel time switch
Hide thumbs
Also See for EGN200AU:
- Quick start manual (18 pages) ,
- Manual (2 pages) ,
- Installation manual (4 pages)

Related Manuals for hager EGN200AU


Summary of Contents for hager EGN200AU
- Page 1 EGN200AU EGN400AU Bluetooth Multi-Function ® 2-Channel Time Switch Bluetooth Multi-Function ® 4-Channel Time Switch Hager Mood 6LE007167A...
- Page 2 Contents 1. About the Product ........3 2. Main Features ........... 4 3. Connection Diagrams ....... 6 4. Technical Specifications ......8 5. Startup ............ 11 6. Manual Commands ........ 12 7. Reset ............14 8. Menu ............15 9. Programs ..........17 9.1.
- Page 3 1 Contents 1. About the product EGN200AU and EGN400AU time switches are electronic programming clocks with weekly and annual cycles for automatically controlling different loads. Examples of applications: street lighting, neon signs, shop windows, monuments, façades etc. The built-in astronomical clock can be set to switch loads according to sunset and sunrise times.
- Page 4 1 Contents 2. Mean Features • Product delivered with day and time set (from Paris). • Programming by application via Bluetooth ® or local programming (except annual). • Backlit screen. • Automatic Daylight Savings Time adjustment. • Astronomical mode. • Programming by day or group of days. •...
- Page 5 1 Contents Display and keys Screen saver Date Bluetooth ® Time enabled Status of channel A, B, C, D ▼ ▲ (depending on the version) Press to enable the backlight; press again to view the home screen Home screen MTWTFSS Daily profile bar graph Channel...
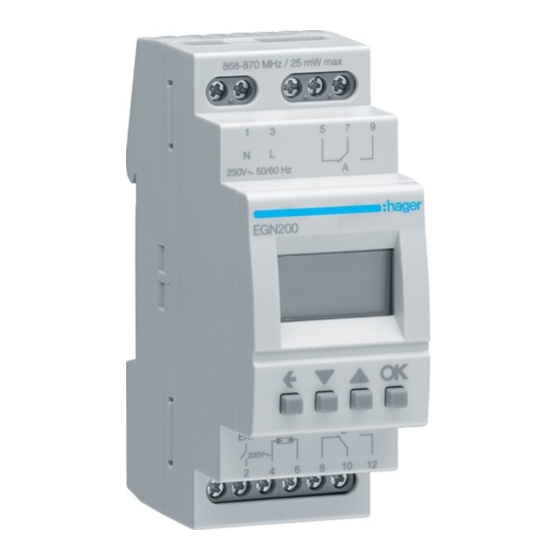
- Page 6 1 Contents 3. Connection diagrams Device must only be installed by an electrician according to applicable standards. 1 Forcing or variance input 2 Brightness sensor Image 2: EGN200AU connection diagram (2 outputs)
- Page 7 1 Contents 1 Forcing or variance input 2 Brightness sensor Image 3: EGN400AU connection diagram (4 outputs)
- Page 8 Electrical specifications • Power supply voltage: 230 V~ +10 / -15% and 240 V~ ± 6% • Network frequency: 50/60 Hz • Consumption: EGN200AU < 350 mW / EGN400AU < 500 mW • Output: 2 or 4 non-insulated changeover contacts (depending on the version) •...
- Page 9 1 Contents Functional specifications • Programming capacity: 200 or 400 steps depending on the model • Min. time between 2 steps: 1 minute • Rate accuracy: ± 0.25 sec / day • The product switches to standby status (display off): after 1 minute of no power or inactivity.
- Page 10 1 Contents • EGN200AU size: 36 mm / 2 modules • EGN400AU size: 72 mm / 4 modules • Product for surface mounting on DIN rail according to EN 60715 Environment • Operating temperature: -5 °C to +45 °C • Storage temperature: -25 °C to +70 °C •...
- Page 11 1 Contents 5. Startup With the configuration application If you are using the app to configure the clock, install as described below. 1. Access the app download link directly by scanning the QR code printed on the clock and on the manual with a mobile device.
- Page 12 1 Contents 6. Manual Commands From the screen saver, press one of the 4 keys twice to enable the backlight and then switch to the home screen. Press the ok key to view the manual commands screen. SCREEN HOME MANUAL SAVER SCREEN COMMANDS...
- Page 13 1 Contents Display the output: • output status ON (black background); • output status OFF (white background). MANUAL COMMANDS... View the option Return to Set the option for the home Change channel manual control screen A, B, C or D Image 4: presentation of the manual commands screen.
- Page 14 1 Contents • : forcing the output to ON or OFF (constant control). The Forcing function is used to force an output into an ON or OFF status. No other command (ON, OFF, timer, pulse or variance) is taken into account if the forcing function is enabled.
- Page 15 1 Contents 8. Menu If the programming was performed via the configuration app, the local menu does not allow you to edit the period (annual cycle). From the screen saver, press one of the 4 keys twice to enable the backlight and then switch to the home screen.
- Page 16 1 Contents HOME SAVER Press a key twice MANUAL HOME COMMANDS SCREEN Press and hold PROGRAMS SETTINGS BLUETOOTH LIST OF PROGRAMS DATE/TIME WIRE INPUT PROGRAM 1 DAYLIGHT SAVINGS TIME PROGRAM 2 ASTRO CONTRAST –––––––– BACKLIGHT PROGRAM XX* LANGUAGE CHANGING SETTINGS * 10 or 20 programs ABOUT depending on...
- Page 17 1 Contents 9. Programs To access the programs: HOME HOME MANUAL SAVER SCREEN COMMANDS Press a Press and hold key twice PROGRAMS sett SETTINGS 9.1. WRITING / EDITING A PROGRAM It is possible to create up to 10 or 20 programs (depending on the version).
- Page 18 1 Contents Then define the weekly program. To do this: • Program the selection of the output (or outputs) concerned. PROGRAM 1 EDIT OUTPUTS LIST OF EVENTS Using keys 3/4 and ok, select the output (or outputs) to be enabled. The enabled output is on a black background.
- Page 19 1 Contents After selecting a program step, three steps need to be taken to establish the sequence: Step 1. Define the type of action associated with the program step among the 4 available: - ON to enable the selected output: OUTPUTS LIST OF EVENTS + ADD...
- Page 20 1 Contents - PULSE ON to briefly enable the selected output: OUTPUTS LIST OF EVENTS + ADD PULSE ON PULSE OFF The pulse duration is adjustable from Duration 01 s to 120 s step 2 - PULSE OFF to briefly disable the selected output: OUTPUTS LIST OF EVENTS...
- Page 21 1 Contents Step 2. Define the trigger element associated with the program step among the 4 available: - TIME to start the sequence at a specific time: TIME SUNSET SUNRISE 08: 00 Using keys 3/4, set the hour and minutes step 3 - SUNSET* to start the sequence according to the sunset time:...
- Page 22 1 Contents - LUM to start the sequence according to brightness. This requires the connection of an EEN002 / EEN003 twilight sensor: TIME SUNSET SUNRISE Using keys 3/4, and ok, you Current setpoint can change the brightness > 400 lux 697 lux setpoint by selecting: - the <...
- Page 23 1 Contents Step 3. Select the day (or days) of the week associated with the program step. Using keys 3/4 and ok, select the day (or days) of the week to be enabled. TWTFSS OK The enabled day is on a black background. Press the ok key after selecting OK to confirm the weekly programming of the program step and return to the...
- Page 24 1 Contents • When a program is disabled, only “Enable” and “Delete” are available for selection. • After confirming “Enable,” “Edit,” “Disable” and “Delete” will again be available for selection. 9.3. DELETING A PROGRAM The Delete option is used to delete the entire program.
- Page 25 1 Contents • the type of action; • at what time of the day; • the day (or days) associated with the program step. PROGRAMS SETTINGS PROGRAM 1 ––––– +ADD PROGRAM 1 PROGRAM 1 EDIT PROGRAM 1 DISABLE DELETE OUTPUTS LIST OF EVENTS 14: 15 P.M.
- Page 26 1 Contents 9.5. EDITING AN EVENT Once a program step is created, the Edit option is available to change the programming of an event. PROGRAMS SETTINGS PROGRAM 1 ––––– +ADD PROGRAM 1 PROGRAM 1 EDIT PROGRAM 1 DISABLE DELETE OUTPUTS LIST OF EVENTS 14: 15 P.M.
- Page 27 1 Contents 9.6. DELETING AN EVENT The Delete option is used to delete a programming step in a program. PROGRAMS SETTINGS PROGRAM 1 ––––– +ADD PROGRAM 1 PROGRAM 1 EDIT PROGRAM 1 DISABLE DELETE OUTPUTS LIST OF EVENTS 14: 15 P.M. ON –––––...
- Page 28 1 Contents 9.7. KEY LOCK This function is used to lock the clock keyboard. It can be accessed via the configuration app or locally using the ok and keys. • To enable this function locally, press the ok and keys simultaneously (> 3 s) until symbol appears (2 s).
- Page 29 1 Contents 10. Settings To access the settings: HOME HOME SAVER SCREEN Press a Press and hold key twice PROGRAMS sett SETTINGS The Settings menu provides access to the following settings: SETTINGS CONTRAST BACKLIGHT LANGUAGE CHANGING SETTINGS ABOUT BLUETOOTH DATE WIRE &...
- Page 30 1 Contents 10.1. BLUETOOTH Enabling Bluetooth ® Enable the Bluetooth function if you use the ® configuration app to program your clock. BLUETOOTH DATE WIRE & TIME DAYLIGHT INPUT ASTRO SAVINGS TIME –––– ENABLE DISABLE Press ok to confirm and the key to return to the Settings menu.
- Page 31 1 Contents 10.3. WIRE INPUT Variance / forcing input BLUETOOTH DATE WIRE & TIME DAYLIGHT INPUT ASTRO SAVINGS TIME –––– The Wire Input menu is used to select: • The type of product that activates the input (push button or switch) WIRE INPUT TYPE FUNCTION...
- Page 32 1 Contents - Timer ON: output enabled for an adjustable time period with preset values from 1 s to 24 h. - Timer OFF: output disabled for an adjustable time period with predefined values from 1 s to 24 h. TYPE FUNCTION PUSH BUTTON...
- Page 33 1 Contents TYPE FUNCTION SWITCH OUTPUTS CONCERNED SWITCH ON/OFF FORCING FORCING Press ok to confirm and return to the Wire input menu • The output (or outputs) concerned by the wire input: TYPE FUNCTION Using keys 3/4 and OUTPUTS ok, select the output (or CONCERNED outputs) to be enabled.
- Page 34 1 Contents 10.4. DAYLIGHT SAVINGS TIME This menu allows you to adjust daylight savings dates and times according to the geographical area of the project. The time change always takes place between 2:00 a.m. and 3:00 a.m. BLUETOOTH DATE WIRE &...
- Page 35 1 Contents Types available: Start of Daylight of Daylight Application Type Savings Savings area Time Time EURO* last Sunday last Sunday European in March in October Union DAYLIGHT SAVINGS TIME AUSTRALIA last Sunday last Sunday Australia in October in April DAYLIGHT SAVINGS TIME...
- Page 36 1 Contents When the CUSTOM type is chosen, you can select: • the relative dates if the event needs to be repeated every year in the same period. CUSTOM RELATIVE Using keys 3/4 and ok, FIXED DATES select the relative dates of the start DATES of the daylight savings time period to be enabled.
- Page 37 1 Contents • the fixed dates if the event needs to be repeated every year on the same dates. CUSTOM Using keys 3/4 and ok, select the RELATIVE FIXED DATES fixed dates of the start and end of DATES Daylight Savings Time to be enabled. The examples opposite (the start of START OF DAYLIGHT...
- Page 38 1 Contents 10.5. ASTRO The Astronomical menu is used to precisely define the geographic location of the project and thus calculate the sunrise and sunset times automatically. BLUETOOTH DATE WIRE & TIME DAYLIGHT INPUT ASTRO SAVINGS TIME –––– After selecting the Astro mode: •...
- Page 39 1 Contents ASTRO OUTPUTS LAT / LON OUTPUT A OUTPUT B OUTPUT C OUTPUT D SEQUENTIAL SPECIFIC Press ok to confirm and the key to return to the Astro menu. Fill in the data required for the clock to calculate the sunrise and sunset times automatically.
- Page 40 1 Contents Using keys 3/4 and ok, set: OUTPUTS LAT / LON - the latitude: the setting range is 90°N (North) to 90°S (South); - the longitude: the setting range is 180°E (East) to 180°W (West); - the time zone: the setting range is 48°...
- Page 41 1 Contents 10.7. BACKLIGHT The Backlight menu is used to set the brightness of the screen and to enable (or disable) this function. ––––– CONTRAST BACKLIGHT LANGUAGE CHANGING ABOUT SETTINGS To set the backlight brightness: BACKLIGHT BRIGHTNESS IGNITION Using keys 3/4, select the brightness percentage 100%...
- Page 42 1 Contents BRIGHTNESS IGNITION MANUAL ENABLE DISABLE Press ok to confirm and return to the Backlight menu. The backlight is enabled* after pressing a key on the product and for a period of 20 s. * when the product is supplied with 230 V ~. To enable the backlight permanently: BRIGHTNESS IGNITION...
- Page 43 1 Contents To disable the backlight: BRIGHTNESS IGNITION MANUAL ENABLE DISABLE Press ok to confirm and return to the Backlight menu. 10.8. LANGUAGE Select the desired language from the following: FRANÇAIS, DEUTSCH, ENGLISH, NEDERLANDS, PORTUGUES, ESPAÑOL, ITALIANA, ΕΛΛΗΝΙΚΗ, SVENSKA. ––––– CONTRAST BACKLIGHT LANGUAGE...
- Page 44 1 Contents 10.9. CHANGING SETTINGS ––––– CONTRAST BACKLIGHT LANGUAGE CHANGING ABOUT SETTINGS The Changing Settings menu has several submenus: • Reset BLE: to reset the Bluetooth link ® security code. After this reset, your mobile device needs to be re-paired with your clock. CHANGE SETTINGS RESET...
- Page 45 1 Contents • Return to product factory configuration: to return to the product factory configuration, i.e. delete all programs and all settings changed. CHANGE SETTINGS RESET RETURN TO PRODUCT FACTORY CONFIGURATION Using keys 3/4, RETURN TO PRODUCT select NO or YES FACTORY CONFIGURATION? Press ok to confirm and return to the...
- Page 46 1 Contents 10.10. ABOUT The About menu displays the following information: • the product reference; • the version of the embedded software; • the version of the microcontroller; • the version of the startup program; • the unique Bluetooth identifier seen ®...
- Page 47 1 Contents 11. Update The firmware is updated via the configuration app. A new version of the clock firmware is offered when: • the app is started on your mobile device; • the mobile device and clock are connected via Bluetooth ®...
- Page 48 1 Contents The screen turns off and the product stops working a few seconds after the message is displayed. It will no longer be possible to configure the product when it is off (screen off on battery).
- Page 49 Can be used anywhere in Europe and Switzerland The Bluetooth word mark and logos are registered trademarks ® owned by Bluetooth SIG, Inc. and any use of such marks by Hager is under license. Other trademarks and trade names are those of their respective owners.
Need help?
Do you have a question about the EGN200AU and is the answer not in the manual?
Questions and answers