hager EGN200AU Manual
Multi-function time switch 4/2 channel bluetooth
Hide thumbs
Also See for EGN200AU:
- Quick start manual (18 pages) ,
- Manual (49 pages) ,
- Installation manual (4 pages)
Advertisement
Quick Links
EGN200AU, EGN400AU
Product Presentation
The EGN200AU and EGN400AU time switches are
clocks with weekly and annual electronic programming
that automatically control different loads.
Examples of applications: street lighting, neon signs,
shop windows, monuments, facades etc.
The integrated astronomical clock can be set to
switch loads according to sunset and sunrise times.
The connection of an EEN002 / EEN003 twilight
sensor (optional) makes it possible to switch the loads
according to brightness.
Programming by mobile terminal is recommended
via Bluetooth
technology by using the configuration
®
application (iOS and Android) available as a free
download.
Main features
• Product delivered with updated time and day.
• Programming by application via Bluetooth
programming (except annual).
• Backlit screen.
• Automatic daylight savings time change.
• Astronomical mode.
• Programming by day or group of days.
• 200 or 400 program steps (depending on version)
On, Off, pulses
.
• Permanent overrides On or Off.
• Temporary overrides On or Off.
• Exceptions (temporary, permanent or delayed) can
be activated remotely using a push button.
• Bar graph display of the daily profile for 2 or 4
channels (depending on version).
• Programmable when off via screen only (with limited
functionality).
• Twilight switch function via an EEN002 or EEN003
wired brightness sensor.
Display and keys
Screensaver
Date
Time
Channel
status
A, B,
C, D
(depending
on version)
▼
▲
Press once to turn backlight on,
twice to display the home screen.
Home screen
LMMJVSD
Bar graph
of the daily
profile
0
6
12
18
Channel
currently
displayed
Brightness
Change
the channel
A, B, C or D
(depending on
Selection of days
the version)
(cursor)
Figure 1: Presentation of the screensaver and home
screen
1
z Multi-function Time Switch
2 Channel Bluetooth
Multi-function Time Switch
4 Channel Bluetooth
Additional information
is available by
scanning the displayed
QR code with your
mobile terminal.
Hager Mood
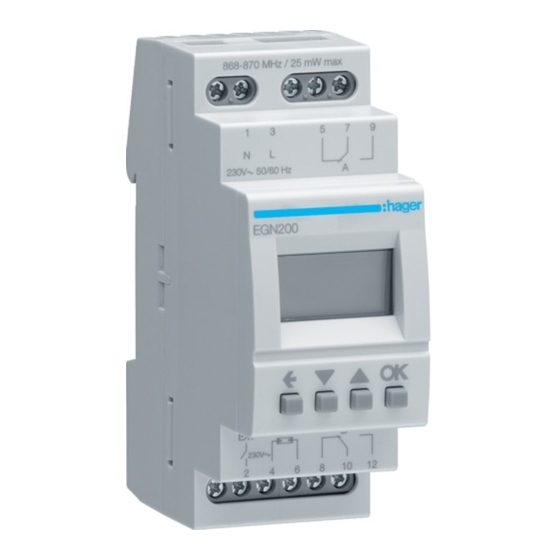
Connection diagram
• Device to be installed only by a qualified
electrician according to the standards
applicable in the country.
• Before connecting the brightness sensor, or
before carrying out any operations on
it, cut the 230 V power supply to the clock.
or local
®
Figure 2: EGN200AU connection diagram (2 outputs)
Bluetooth
®
enabled
Image 3: EGN400AU connection diagram (4 outputs)
Technical specifications
Electrical specifications
• Supply voltage: 230 V~ +10/-15%
and 240 V~ ± 6%
• Network frequency: 50/60 Hz
• Consumption: EGN200AU < 350 mW / EGN400AU
< 500 mW
• Output 2 or 4 non-insulated changeover contacts
(depending on the version)
• Max. breaking capacity: AC1
24
• Incandescent light bulbs, power relay with contact:
normally open / 2300 W_normally closed / 1500 W
Time
• Halogen lamps: 230 V~ 2300 W
• Fluorescent tubes, compensated // (max. 45 F),
power relay with contact: normally open / 400 W_
Display the
normally closed / 300 W
manual
• Fluorescent tubes, uncompensated, series
controls
compensated: 1000 W
screen
• Compact fluorescent lamps and LED lamps, power
(brief press)
relay with contact: normally open / 400 W_normally
closed / 300 W
• Min. breaking capacity: AC1 100 mA 230 V~
• Rated shock voltage: 4 kV
• Maximum switching speed at full load: 6 switching
cycles/minute
®
®
Complies with
IMDA Standards
DA101847
1
Override input
or exception
2
Brightness
sensor
1
Override input or exception
2
Brightness sensor
16A 230 V~
Functional features
• Programming capacity: 200 or 400 steps depending
on the model
• Min. time between 2 steps: 1 minute
• Precision of operation: ± 0.25 s / day
• The product switches to the standby state (display
off) after 1 minute of no voltage or inactivity.
It returns to auto mode when power is restored or
when a key is pressed.
• Bluetooth
radio frequency: 2.4 - 2.483 GHz
®
- Max. transmitting power: 10 mW
- Range: 10 m in free field
- Version: 4.2
• Mobile/PC terminal configuration
- iOS version equal to or greater than 8
- Android version equal to or greater than 5.1
- Windows version equal to or greater than 10
- Bluetooth
: version equal to or greater than 4.2
®
• Insulation class: 2
• Action type: 2B
• Software class: Class A
• Ball test T°: 75 °C
• Upstream protection: 16 A circuit breaker
• Stated voltage and current for EMC emissions
testing: 230 V~ / - 0.5 A
• Protection class: IP20 (case), IP30 (case under
faceplate)
• Impact resistance: IK04
Battery
• Power reserve: 10 years with no action
• Non-replaceable and non-rechargeable
Case
• EGN200AU dimensions: 36 mm / 2 modules
• EGN400AU dimensions: 72 mm / 4 modules
• DIN rail mounted independent product according to
EN 60715
Environment
• Operating T° -5 °C to +45 °C
• Storage T° -25 °C to +70 °C
• Relative humidity: 95 % to 20°C
• Pollution category 2
Connection with screw terminals
• Rigid 0.2 to 4 mm
2
• Flexible 0.2 to 2.5 mm
2
• Screw recess: PH1
Initial set-up
With the configuration application
If the application is used to configure the clock, install
as described below.
1. Directly access the download link of the application
by scanning the QR code printed on the clock and
the instructions with a mobile terminal.
2. Download and install the configuration application.
3. Check that Bluetooth
is enabled (seeSettings /
®
BLUETOOTH chapter).
4. Pair your mobile terminal and your clock via the
Bluetooth
®
application.
5. Program your product via the application. To do this,
follow the application instructions to configure the
clock.
With the local programming interface
During initial set-up, set the following:
• language;
• year, month, day;
• hour and minutes;
• daylight savings time change.
Press keys 3/4 to enter the required settings on the
display.
Press the ok key to confirm.
Once the settings are completed, the clock switches
to automatic mode.
Manual commands
From the screen saver, press one of the 4 keys twice
to activate the backlight and then switch to the
home screen. Display the manual controls screen by
pressing the ok key.
From the screen saver, press one of the 4 keys twice
to activate the backlight and then switch to the
home screen. Display the manual controls screen by
pressing the ok key.
HOME
HOME
SCREEN
SCREEN
Press a key
twice
All programming and settings are based on the
following principle:
• Keys 3/4 are used to navigate between outputs A,
B, C and D (depending on version).
• briefly press the OK key repeatedly to display the
various manual control options for the selected
output.
MANUAL
CONTROLS
6LE005569B
Advertisement

Related Manuals for hager EGN200AU


Summary of Contents for hager EGN200AU
- Page 1 Case Examples of applications: street lighting, neon signs, • Before connecting the brightness sensor, or • EGN200AU dimensions: 36 mm / 2 modules shop windows, monuments, facades etc. before carrying out any operations on • EGN400AU dimensions: 72 mm / 4 modules The integrated astronomical clock can be set to it, cut the 230 V power supply to the clock.
- Page 2 PROGRAM XX* provisions of Directive 2014/53/EU. The CE declaration (*) 10 or 20 programs can be viewed at: www.hager.com depending on the version Hager Controls S.A.S., 33 rue Saint-Nicolas, B.P. 10140, 67703 SAVERNE CEDEX, France - www.hager.com Hager 06.2020 - 6LE005569B...
Need help?
Do you have a question about the EGN200AU and is the answer not in the manual?
Questions and answers